Belt Sander: Difference between revisions
(added image) |
(moving "Sanding Belts" to its own page) |
||
| (24 intermediate revisions by 3 users not shown) | |||
| Line 1: | Line 1: | ||
A belt sander removes material rather aggressively with the risk of leaving visible sanding marks (lines). | |||
However, sometimes power is what you need to tackle rough workpieces, so this machine will be a great addition for [[woodworking]] as well as other projects as it can also be used to grind [[metals]]. There are even advantages over stone-based grinders such as the larger surface and no chance of exploding stones. [[Sanding Belts|Belts]] may rip and fly off though, especially if they are installed in the wrong direction. | |||
{{ | {{MachineInclusion}} | ||
}} | |||
== Stand == | == Stand == | ||
[[File:toy wheel turning 5.JPG|thumb| | [[File:toy wheel turning 5.JPG|thumb|left|250 px|although a belt sander can be clamped ''very carefully'' in a [[Woodworking Vise|woodworking vise]], we should really make a proper stand for such stationary uses!]] | ||
The Spanish Maker Román Palma shared instructions for a nifty three-position stand in Make: magazine, see the article and video [http://makezine.com/2016/05/03/add-versatility-to-your-belt-sander-with-diy-3-position-stand/ here]! | The Spanish Maker Román Palma shared instructions for a nifty three-position stand in Make: magazine, see the article and video [http://makezine.com/2016/05/03/add-versatility-to-your-belt-sander-with-diy-3-position-stand/ here]! | ||
With such a stand we could use | With such a stand we could use a handheld belt sander like a [[Stationary Sander|stationary sander]] (although we have a real one now!) or as a simple substitute for a [[planer]] ''(DE: Hobelmaschine)'' or [[Bench Grinder|bench grinder]]. | ||
Latest revision as of 15:52, 3 March 2024
A belt sander removes material rather aggressively with the risk of leaving visible sanding marks (lines). However, sometimes power is what you need to tackle rough workpieces, so this machine will be a great addition for woodworking as well as other projects as it can also be used to grind metals. There are even advantages over stone-based grinders such as the larger surface and no chance of exploding stones. Belts may rip and fly off though, especially if they are installed in the wrong direction.
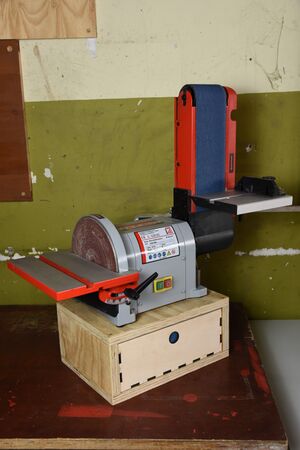
Holzmann BT 203-914
| MachineInfoBox Holzmann BT 203-914 | |
|---|---|

| |
| Type: | Belt Sander |
| Material: | wood, metal |
| Used with: | 914x100 mm sanding belts 200 mm sanding discs (velcro/Klett) |
| Location: | Grinding Table |
| Access Requirements: | Handheld Sander Introduction, Stationary Sander Introduction |
| Status: | Working |
| Manual: | in wooden box below the machine / PDF on manualslib |
| Tutors: | Lukas NitramLegov Pakue Lmnl99 Johannes Luzian Keno Sebastian Jakob, Lukas Pakue Johannes Luzian Utis Sebastian Jakob |
| Similar (More or Less): | belt sander, disc sander |
This machine stands in the metal workshop (next to the bench grinders) on a wooden box containing the manual and the accessories.
It is a combined disc and belt sander with a 200 mm sanding disc and a 914x100 mm belt sander. Both are always simultaneously driven by the 550W motor. Belt speed is 9,5 m/s and disc speed is 2850 rpm.
Features
The machine has the following features
- pivoting aluminium table for disc and belt sander (up to 45°)
- sanding belt unit tiltable from 0-90° (can be used horizontally and vertically)
- mitre fence for precise angle sanding
- suitable for longitudinal and front edges, round and mitre sanding and plane faces
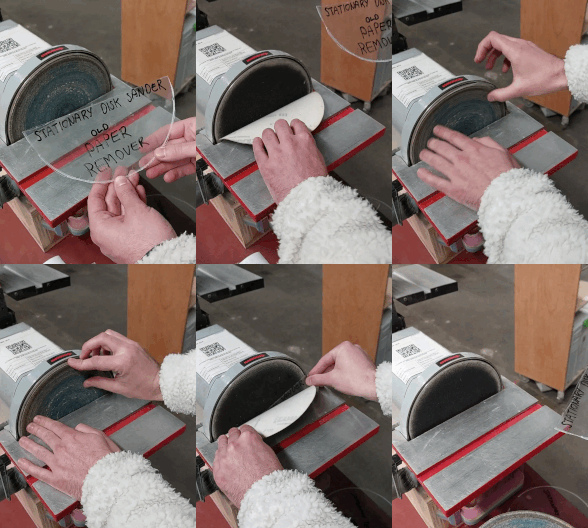
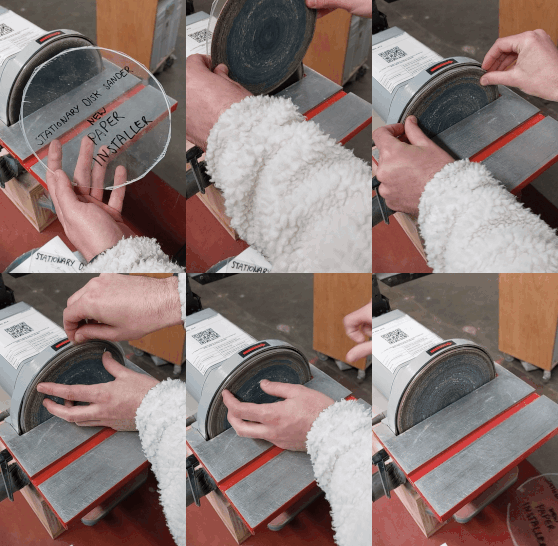
In the factory version, the sanding disk was glued. We modified the machine to accept velcro-backed abrasive discs for much more comfort!
To change discs without disassembling half of the machine, you should slide a separator between the velcro pad and the sanding disc:
Materials
As by the makers specification, the machine is permitted to process wood, and wood-like materials.
Use the disc sander for rough shaping, or to create outside curves on wood. Use the belt sander to sand your wood or other material. Should you use it to process other materials or light metals, such as Aluminium, adhere to the special precautions mentioned in the machine introduction, and make sure that the mounted sanding belt/ disk supports your material.
Proper Use
Always check the following before you start to work with the machine
- All cables and plugs
- Loose screws and connections. Damaged parts have to be replaced immediately, no operation of the machine in the meantime!
- Tight fit of table and safety fence
- The free and centered run of sanding belt and disc
- Attention! To prevent fingers from being squeezed between the band and table, a maximum separation of 3 mm has to be maintained between the table and grinding band. Check that this is the case.
Configure the machine for your use case (table-angles etc).
- The angle stop can be used for angles of up to 45°, to the left or right, by releasing the locking button and adjusting the angle stop to the desired angle.
- The backing plate of the grinding belt has to be adjusted so it almost touches the grinding belt. In order to adjust it, release the two screws holding the plate in the machine rack. Tighten the screws again after you adjusted the plate.
- To remove the plate to perform special jobs (e.g. polishing or contour-grinding), loosen the two attachment screws
When working with the machine, do not apply too much pressure to the sanding abrasive.
As the machine offers no possibility to clamp your material, it is vital that the workpiece maintains stable contact with the worktable at all times!
Stand

The Spanish Maker Román Palma shared instructions for a nifty three-position stand in Make: magazine, see the article and video here!
With such a stand we could use a handheld belt sander like a stationary sander (although we have a real one now!) or as a simple substitute for a planer (DE: Hobelmaschine) or bench grinder.

