Chop Saw: Difference between revisions
No edit summary |
m →Long Base / Zero Clearence Jig: category:Jigs |
||
| (2 intermediate revisions by one other user not shown) | |||
| Line 18: | Line 18: | ||
=== Long Base / Zero Clearence Jig === | === Long Base / Zero Clearence Jig === | ||
This long base helps to measure long pieces of wood, and against tear-out on the bottom of your workpieces. It should be used for 90 degree cuts ONLY!! (The jig contains screws which would damage the chop saw blade, and any cuts other than 90 degrees would also damage the stability and the zero clearance cut. | [[Category:Jigs]]This long base helps to measure long pieces of wood, and against tear-out on the bottom of your workpieces. It should be used for '''90 degree cuts ONLY'''!! (The jig contains screws which would damage the chop saw blade, and any cuts other than '''90 degrees''' would also damage the stability and the zero clearance cut. | ||
The jig was built for [[Project:Shoji Room-Divider|this | The jig was built for [[Project:Shoji Room-Divider|this shoji wall project]], to make measuring easier and to achieve cuts in the same position on several pieces of wood. | ||
On the jig's rear side, there is a wooden block, which needs to be placed in between the chop saw's rear guides (underneath the rubber guide / air intake behind the blade). The jig's long end expands to the right of the saw, so the two legs sit on the table to the right. | On the jig's rear side, there is a wooden block, which needs to be placed in between the chop saw's rear guides (underneath the rubber guide / air intake behind the blade). The jig's long end expands to the right of the saw, so the two legs sit on the table to the right. | ||
You can find the jig next to the ladders near the planer. Be careful when taking it off the wall: it is fairly heavy!<gallery> | You can find the jig next to the ladders near the planer. Be ''careful'' when taking it off the wall: it is fairly heavy!!<gallery> | ||
File:Chop saw long zero clearance base (02).jpg | File:Chop saw long zero clearance base (02).jpg | ||
File:Chop saw long zero clearance base (01).jpg | File:Chop saw long zero clearance base (01).jpg | ||
</gallery> | </gallery> | ||
[[Category:Saws]] | [[Category:Saws]] | ||
[[Category:Woodworking]] | [[Category:Woodworking]] | ||
Latest revision as of 08:58, 27 April 2024
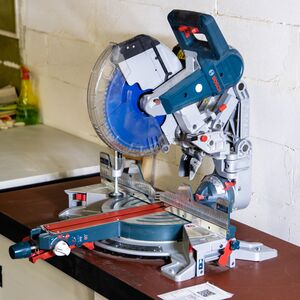
A chop saw is an electric miter saw (BE: mitre saw) and consists of a large circular saw and a sturdy frame. Movement of the saw head is restricted by a sliding rail which can be angled both vertically and horizontally ("compound miter").
For the hand tool capable of making only horizontally angled cuts, see miter saw.
Safety
Always keep your hands clear of the blade path and use the machine's clamp and the back fence to hold your workpiece in place. If your workpiece is too small for the clamp, a 10 million dollar stick allows you to hold it from a safe distance!
Before turning on the power at all, make sure you understand how the saw head will move and double check that all restraints are properly and tightly adjusted.
Bosch GCM 12 GDL
| MachineInfoBox Bosch GCM 12 GDL | |
|---|---|
| |
| Synonyms: | sliding compound miter saw; DE: Kappsäge, Kapp-, Zug- und Gehrungssäge, Zugkappsäge, Paneelsäge |
| Type: | Chop Saw |
| Material: | wood NO aluminum!! |
| Used with: | circular saw blades, shop vac, inclinometer |
| Location: | Saw Station |
| Access Requirements: | Chop Saw Introduction |
| Status: | Working |
| Manual: | bosch-professional.com |
| Tutors: | Lukas NitramLegov Pakue Lmnl99 Johannes Luzian Keno Utis Sebastian Jakob Loewenstein |
| Similar (More or Less): | miter saw, handheld circular saw, table saw, radial arm saw |
Cutting Angles
Miter angle (horizontal): left/right 45°
Bevel angle (vertical): left 0-47° right 0-47°
Adjusting miter:
- Loosen locking screw in the front
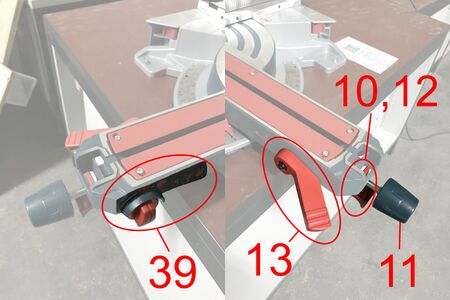
- Pull "miter presetting lever" [12]
- can be locked up with a locking clamp [10]
- Move to desired angle (indents at 45°, 31.6°, 22.5°, 15°, 0°, 15°, 22.5°, 31.6°, 45°, 60°)
- tighten locking screw [11] before cutting!
Adjusting bevel
- Loosen the locking lever [13]
- The saw can now be tilted up to 45° to the left
- In order to tilt to the right (or further than 45°) the rotary knob [39] on the right needs to be turned to the desired direction.
- if the knob is hard to turn, push the saw slightly in the other direction before turning the knob
- Push the locking lever back down
- Check the travel before making the cut. If necessary move the fences to clear all the parts of the saw.
Blade
Our saw is designed for saw blades measuring 305 × 30 × 1,7-2,6 mm (OD × bore × thickness).
The currently installed blade is a Bosch "expert Wood" 305 × 30 × 2.4 mm one with 72 carbide-tipped teeth. It is NOT suitable for cutting aluminum! No matter what you see on YouTube, improper use damages the blade and costs a lot of €€€...
Locking Movement Axis
Locking sliding mechanism
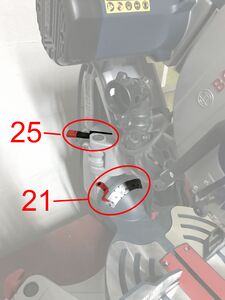
- A lever [25] can be switched to restrict the sliding movement of the saw
Depth stop
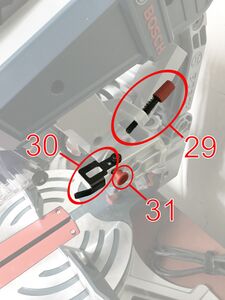
- On the right side of the saw a screw [29] can be used to adjust the depth stop of the saw.
- The depth stop can be disengaged by switching [30]
- (the transport safety lock [31] in the same area is not related to this)
Laser
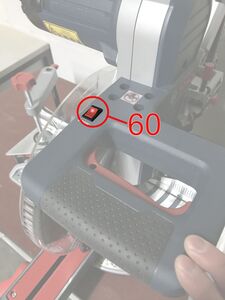
The saw has a line laser that indicates the cutting edges (left and right). The switch for the laser can be found on the handle [60]. Please consult the manual if the laser isn't accurate anymore. There is an adjustment procedure.
Images
Noise & Dirt
If you are not alone, ask the others whether it is okay to cut for a few minutes as they may have to interrupt their project to give you room and to protect their ears. Although the saw is not extremely loud, it is definitely startling when you are surprised by it turning on in your back!
It's advisable to hook up a shop vac for dust extraction as the passive collector bags that typically come with this kind of tool are not too efficient. Even the shop vac will let a lot of sawdust escape. The Festool shop vac fits the dust extraction. Please be aware that the saw draws too much power to be connected through the shop vac's on-board outlet, but should be powered from a separate power outlet instead.
Maintenance
The blade should be sharpened or replaced when it becomes dull, otherwise using it is very dangerous! Tell a manager if you are noticing any problems, e.g. increased force required to cut your workpieces or poor quality cuts.
Decreased cutting ability can also result from dirt buildup - here are some cleaning instructions.
Long Base / Zero Clearence Jig
This long base helps to measure long pieces of wood, and against tear-out on the bottom of your workpieces. It should be used for 90 degree cuts ONLY!! (The jig contains screws which would damage the chop saw blade, and any cuts other than 90 degrees would also damage the stability and the zero clearance cut.
The jig was built for this shoji wall project, to make measuring easier and to achieve cuts in the same position on several pieces of wood.
On the jig's rear side, there is a wooden block, which needs to be placed in between the chop saw's rear guides (underneath the rubber guide / air intake behind the blade). The jig's long end expands to the right of the saw, so the two legs sit on the table to the right.
You can find the jig next to the ladders near the planer. Be careful when taking it off the wall: it is fairly heavy!!
