Project:Tigerente: Difference between revisions
Created |
NitramLegov (talk | contribs) Documented my make |
||
| (9 intermediate revisions by 3 users not shown) | |||
| Line 1: | Line 1: | ||
{{ProjectInfoBox | {{ProjectInfoBox | ||
|project title=Tigerente | |project title=Tigerente | ||
|image= | |image=Tigerente Martin Done.JPG | ||
|status=In Progress | |status=In Progress | ||
|date=Jan 19 | |date=Jan 19 | ||
|initiator=[[User:Keno|Kenomat]] | |initiator=[[User:Keno|Kenomat]] | ||
|team= | |team=[[Lukas]] | ||
|materials= leftover wood, | |materials=[[Scrap Wood|leftover wood]], wooden [[Dowel Rods|dowel]] (~ 9 mm),<br> kid-compatible [[Material:Acrylic Paint|acrylic paint]] (saliva and sweat-resistant) | ||
|tools=[[Scroll Saw]], [[Drill Press]], [[Hole Saw]], [[Laser Printers| | |tools=[[Scroll Saw|scroll saw]], [[Drill Press|drill press]], [[Hole Saw|hole saw]], [[Laser Printers|printer]], [[sandpaper]] | ||
|software= | |software= | ||
|cost= marginal, | |cost= marginal, toy-safe acrylic paint is ~ 4€ per 50ml | ||
}} | }} | ||
The | The [https://de.wikipedia.org/wiki/Tigerente Tigerente] is a popular German childhood figure. I decided to make one as a simple woodworking project. This is a quick and easy project which can probably finished in one two two sessions, with the longest periods by far consisting of waiting for the glue or paint to dry. | ||
== Parts == | == Parts == | ||
=== Body === | === Body === | ||
I selected a piece of leftover | [[File:Tigerente Body Scrollsaw.jpg |200px|thumb|right|Cutting out the body using a [[Scroll Saw|scroll saw]]]] | ||
I selected a piece of [[Scrap Wood|leftover]] fir board roughly 40x20x2cm. I sawed the board in half and glued both halves together to achieve a thickness of 4cm, making the toy more stable. I downloaded a sassy image of the Tigerente that I liked (search for "Tigerente", there are plenty) and printed it on a piece of paper. [[Material:Glue Sticks|Glued]] that on the wood and cut out the outlines on the [[Scroll Saw|scroll saw]]. [[Sanding|Sanded]] down rough corners and edges until I was happy with the form with 80 and then 120 grit [[sandpaper]]. | |||
=== Wheels === | === Wheels === | ||
Selected another piece of leftover wood with a thickness of 2 cm and cut out wheels using a hole saw and, ideally, a drill press. Try to find a diameter that looks good optically, go for the larger diameter if in doubt (toy will | [[File:Tigerente Wheels Drill Sanding.jpg |200px|thumb|left|Sanding the wheels.]] | ||
Selected another piece of leftover wood with a thickness of 2 cm and cut out wheels using a [[Hole Saw|hole saw]] and, ideally, a [[Drill Press|drill press]]. Try to find a diameter that looks good optically, go for the larger diameter if in doubt (toy will roll more easily). Sand down the wheels. If your wheels end up eccentric (like mine did because I used a handheld drill), consider threading them onto a [[Threaded Rod|threaded rod]], affixing that to a drill and using the drill to sand down the wheels. | |||
=== Painting === | === Painting === | ||
Paint body and wheels whichever way you fancy. Typically black and yellow. | Paint body and wheels whichever way you fancy. Typically black and yellow. Regarding the paint: You are looking for paint that is "Speichelecht" and "Schweißfest" and fulfills the regulations of [https://en.wikipedia.org/wiki/EN_71 EN 71-Part 3]. Use multiple layers, sanding in between layers with 120 or 180 grit until satisfied with paint coverage. If you want to go all the way, apply a layer of shellac for a nice shine and a silky surface feel. | ||
=== Assembly === | === Assembly === | ||
Take a wooden | Take a wooden [[Dowel Rods|dowel]] and saw from it two pieces of a length of (body thickness + 2x wheel thickness + ~3 mm) for your axles. The 3 mm wiggle room allow the wheels some freedom to turn apart from the body. Drill out the diameter of the wheel bores to the thickness of the axles. Drill two holes in the duck body where the wheels should go, using a drill that's 1-2 mm wider than the axle. [[Wood Glue|Glue]] one wheel on each axle, thread axles trough the body, glue on other wheel. Sand down and paint over wheel if required. | ||
=== Optionally === | === Optionally === | ||
* Drill a small hole in the center of the front part of the duck and screw in a noosed hook. Attach a length of string, so your kid can pull it. | * Drill a small hole in the center of the front part of the duck and screw in a noosed hook. Attach a length of string, so your kid can pull it. | ||
* Glue some black threads to the top as hair (which the Tigerente has sometimes). | * Glue some black threads to the top as hair (which the Tigerente has sometimes). | ||
* Give present to other parent's kids, feeling smug that you give higher quality toys to them than their parents do. Be frustrated that kid doesn't appreciate your craftsmanship and plays with the doll singing the "Frozen" Theme over and over again anyways. | |||
==Makes== | |||
* [[Martin]] made a version: | |||
<gallery widths=150> | |||
File:Tigerente Martin body cut.JPG|step 1: Cut the body with the scroll saw | |||
File:Tigerente Martin Bad Painting.JPG|step 2: paint the Tigerente with a brush and fail miserably | |||
File:Tigerente Martin Wheel.JPG|step 3: make (and paint a nice wheel) | |||
File:Tigerente Martin Done.JPG|step 4: assemble it all together and feel awesome | |||
</gallery> | |||
== Variations == | |||
* make wheels on the [[Wood Lathe|wood lathe]] rather than with a hole saw (could be improved further with a better [[Parting Tool|parting tool]]): | |||
<gallery widths=150> | |||
File:toy wheel turning 1.JPG|step 1 (after your [[Woodturning Blanks|blank]] becomes round): mark what to keep/where to part | |||
File:toy wheel turning 2.JPG|step 2: use a [[Parting Tool|parting tool]] to define the wheels | |||
File:toy wheel turning 3.JPG|step 3: repeat [[Parting Tool|parting]] until there are enough recognizable wheels | |||
File:toy wheel turning 4.JPG|step 4: finish the parting cut off the lathe, using a [[Japanese Saw|Japanese saw]] for example | |||
File:toy wheel turning 5.JPG|step 5: sand off the central roughness, e.g. with a clamped-down [[Belt Sander|belt sander]] (we did not have a [[Disc Sander|disc sander]] yet) | |||
File:toy wheel turning 6.JPG|step 6: drill a perfectly centered hole using a drill chuck on the [[Wood Lathe|wood lathe]]! | |||
</gallery> | |||
* laser engrave the pattern & finish with [[beeswax]] instead of painting: | |||
<gallery widths=150> | |||
File:Laser-Tigerente 1.JPG|step 1: engrave your design with a [[Laser Cutter|laser cutter]] | |||
File:Laser-Tigerente 2.JPG|step 2: test assembly after cutting (on the [[Scroll Saw|scroll saw]] as usual) and drilling | |||
File:Laser-Tigerente 3.JPG|step 3: apply [[beeswax]] with a [[Heat Gun|heat gun]] and some rags or paper towels | |||
File:Laser-Tigerente 4.JPG|step 4: the wood darkens slightly due to the [[beeswax]] | |||
File:Laser-Tigerente 5.jpg|step 5: final assembly with waxed body & wheels | |||
</gallery> | |||
[[Category:Quick Projects]] | |||
[[Category:Toys & Games]] | |||
[[Category:Woodworking]] | |||
Latest revision as of 22:05, 3 June 2019
| ProjectInfoBox Tigerente | |
|---|---|

| |
| Status: | In Progress |
| Release Date: | Jan 19 |
| Initiator: | Kenomat |
| Team: | Lukas |
| Materials Used: | leftover wood, wooden dowel (~ 9 mm), kid-compatible acrylic paint (saliva and sweat-resistant) |
| Tools Used: | scroll saw, drill press, hole saw, printer, sandpaper |
| Approx. Cost: | marginal, toy-safe acrylic paint is ~ 4€ per 50ml |
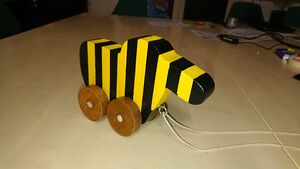
The Tigerente is a popular German childhood figure. I decided to make one as a simple woodworking project. This is a quick and easy project which can probably finished in one two two sessions, with the longest periods by far consisting of waiting for the glue or paint to dry.
Parts
Body

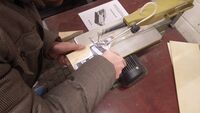
I selected a piece of leftover fir board roughly 40x20x2cm. I sawed the board in half and glued both halves together to achieve a thickness of 4cm, making the toy more stable. I downloaded a sassy image of the Tigerente that I liked (search for "Tigerente", there are plenty) and printed it on a piece of paper. Glued that on the wood and cut out the outlines on the scroll saw. Sanded down rough corners and edges until I was happy with the form with 80 and then 120 grit sandpaper.
Wheels

Selected another piece of leftover wood with a thickness of 2 cm and cut out wheels using a hole saw and, ideally, a drill press. Try to find a diameter that looks good optically, go for the larger diameter if in doubt (toy will roll more easily). Sand down the wheels. If your wheels end up eccentric (like mine did because I used a handheld drill), consider threading them onto a threaded rod, affixing that to a drill and using the drill to sand down the wheels.
Painting
Paint body and wheels whichever way you fancy. Typically black and yellow. Regarding the paint: You are looking for paint that is "Speichelecht" and "Schweißfest" and fulfills the regulations of EN 71-Part 3. Use multiple layers, sanding in between layers with 120 or 180 grit until satisfied with paint coverage. If you want to go all the way, apply a layer of shellac for a nice shine and a silky surface feel.
Assembly
Take a wooden dowel and saw from it two pieces of a length of (body thickness + 2x wheel thickness + ~3 mm) for your axles. The 3 mm wiggle room allow the wheels some freedom to turn apart from the body. Drill out the diameter of the wheel bores to the thickness of the axles. Drill two holes in the duck body where the wheels should go, using a drill that's 1-2 mm wider than the axle. Glue one wheel on each axle, thread axles trough the body, glue on other wheel. Sand down and paint over wheel if required.
Optionally
- Drill a small hole in the center of the front part of the duck and screw in a noosed hook. Attach a length of string, so your kid can pull it.
- Glue some black threads to the top as hair (which the Tigerente has sometimes).
- Give present to other parent's kids, feeling smug that you give higher quality toys to them than their parents do. Be frustrated that kid doesn't appreciate your craftsmanship and plays with the doll singing the "Frozen" Theme over and over again anyways.
Makes
- Martin made a version:
-
step 1: Cut the body with the scroll saw
-
step 2: paint the Tigerente with a brush and fail miserably
-
step 3: make (and paint a nice wheel)
-
step 4: assemble it all together and feel awesome
Variations
- make wheels on the wood lathe rather than with a hole saw (could be improved further with a better parting tool):
-
step 1 (after your blank becomes round): mark what to keep/where to part
-
step 2: use a parting tool to define the wheels
-
step 3: repeat parting until there are enough recognizable wheels
-
step 4: finish the parting cut off the lathe, using a Japanese saw for example
-
step 5: sand off the central roughness, e.g. with a clamped-down belt sander (we did not have a disc sander yet)
-
step 6: drill a perfectly centered hole using a drill chuck on the wood lathe!
- laser engrave the pattern & finish with beeswax instead of painting:
-
step 1: engrave your design with a laser cutter
-
step 2: test assembly after cutting (on the scroll saw as usual) and drilling
-
step 4: the wood darkens slightly due to the beeswax
-
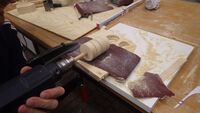
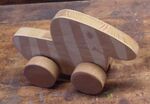
step 5: final assembly with waxed body & wheels


