HBM AS188: Difference between revisions
m →HBM AS188: intro done |
NitramLegov (talk | contribs) m →HBM AS188: PDF manual stored in manager folder in nextcloud |
||
| (5 intermediate revisions by 4 users not shown) | |||
| Line 1: | Line 1: | ||
==HBM AS188== | ==HBM AS188== | ||
{{MachineInfoBox | {{MachineInfoBox | ||
|machine name=HBM AS188 | |machine name=HBM AS188 | ||
| Line 11: | Line 9: | ||
|used with=[[airbrushes]] | |used with=[[airbrushes]] | ||
|similar=[[compressor]] | |similar=[[compressor]] | ||
|manual=pdf: ask a [[manager]] | |||
|location=[[Location::Airbrush Area|airbrush area]] | |location=[[Location::Airbrush Area|airbrush area]] | ||
|assetid= | |assetid=157}} | ||
This compressor is dedicated to be used with [[airbrushing]] equipment and must '''not''' be used otherwise! | This compressor is dedicated to be used with [[airbrushing]] equipment and must '''not''' be used otherwise! | ||
=== Recommended Pressure Settings for Airbrushing === | === Recommended Pressure Settings for Airbrushing === | ||
| Line 26: | Line 22: | ||
* [[airbrush]] needle diameter | * [[airbrush]] needle diameter | ||
* gravity feed (paint compartment at the top, for example our Iwata Neo airbrush) | * gravity feed (paint compartment at the top, for example our Iwata Neo airbrush) | ||
* syphon feed (paint bottle below the airbrush, for example our black | * syphon feed (paint bottle below the airbrush, for example our black Badger Ideal 350 airbrush) | ||
Apart from the above, the "ideal" pressure setting also depends on personal preference. As a rule of thumb, start with low pressure and slowly go higher. For our Iwata Neo (a double action, gravity feed airbrush), start with 15-20 psi. The pressure should be high enough to create a good atomised misty spray from your airbrush, but also low enough to allow for control of the trigger. | Apart from the above, the "ideal" pressure setting also depends on personal preference. As a rule of thumb, start with low pressure and slowly go higher. For our Iwata Neo (a double action, gravity feed airbrush), start with 15-20 psi. The pressure should be high enough to create a good atomised misty spray from your airbrush, but also low enough to allow for control of the trigger. | ||
| Line 33: | Line 29: | ||
=== Specifications === | === Specifications === | ||
* | * outlet thread: 1/8" [https://www.anzugsmoment.de/rohrgewinde/bsp-gewinde/ BSP] | ||
* working pressure: 0.2 - 4 bar | * tank capacity: 3 liters | ||
* engine power 150 watts | * working pressure: 0.2 - 4 bar (3-58 psi) | ||
* number of | * engine power: 150 watts (1/6 HP) | ||
* voltage: 220 - 240 | * number of cylinders: 1 | ||
* voltage: 220 - 240 V | |||
* noise level: approx. 50 dB (A) | * noise level: approx. 50 dB (A) | ||
* net air yield: 23 L/minute | * net air yield: 23 L/minute | ||
* weight: 8.6 kg | * weight: 8.6 kg | ||
Both | Both outlets have their own pressure regulator and pressure gauge. | ||
Built-in | Built-in moisture separator in the tank. | ||
Thermal safety and overpressure protection above 6 bar. | |||
Oil-free compressor. | Oil-free compressor. | ||
Latest revision as of 13:10, 2 May 2024
HBM AS188
| MachineInfoBox HBM AS188 | |
|---|---|

| |
| Synonyms: | DE: Airbrush-Kompressor |
| Type: | Airbrush Compressor |
| Material: | airbrush paint |
| Used with: | airbrushes |
| Location: | Airbrush Area |
| Access Requirements: | Airbrush Introduction |
| Status: | Working |
| Manual: | pdf: ask a manager |
| Tutors: | Pakue Björn |
| Similar (More or Less): | compressor |
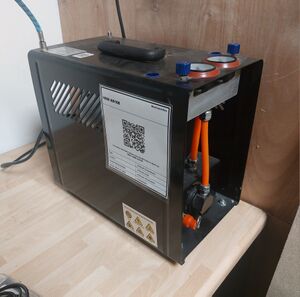
This compressor is dedicated to be used with airbrushing equipment and must not be used otherwise!
Recommended Pressure Settings for Airbrushing
Our compressor has 2 air outlets, each of which has its own pressure gauge. The output pressure can be adjusted by turning the blue "on/off" knob next to the pressure gauge.
The required pressure setting depends on a number of factors such as
- type of paint (thicker paints require higher pressures, for example our "Aero Pearl" and "Aero Shine" effect colors)
- airbrush needle diameter
- gravity feed (paint compartment at the top, for example our Iwata Neo airbrush)
- syphon feed (paint bottle below the airbrush, for example our black Badger Ideal 350 airbrush)
Apart from the above, the "ideal" pressure setting also depends on personal preference. As a rule of thumb, start with low pressure and slowly go higher. For our Iwata Neo (a double action, gravity feed airbrush), start with 15-20 psi. The pressure should be high enough to create a good atomised misty spray from your airbrush, but also low enough to allow for control of the trigger.
A higher pressure setting atomises the paint better, but this also results in faster drying time.
Specifications
- outlet thread: 1/8" BSP
- tank capacity: 3 liters
- working pressure: 0.2 - 4 bar (3-58 psi)
- engine power: 150 watts (1/6 HP)
- number of cylinders: 1
- voltage: 220 - 240 V
- noise level: approx. 50 dB (A)
- net air yield: 23 L/minute
- weight: 8.6 kg
Both outlets have their own pressure regulator and pressure gauge.
Built-in moisture separator in the tank.
Thermal safety and overpressure protection above 6 bar.
Oil-free compressor.
How to Connect an Airbrush to the Compressor
To connect the compressor hose to an airbrush, please use the adaptor piece. The compressor will keep its pressure even if no airbrush is connected.