3D Printers
This article is mandatory reading for anyone who would like to 3D print, but it does not replace a personal introduction!
All of our printers use "fused filament fabrication" (FFF, a.k.a. FDM) and are therefore limited to thermoplastics as materials. Lots of cool things can be made with this technology, but it's good to be aware of the limits of FFF before starting to design your parts.
You can find our 3D printer farm in the electronics room.
Available Printers
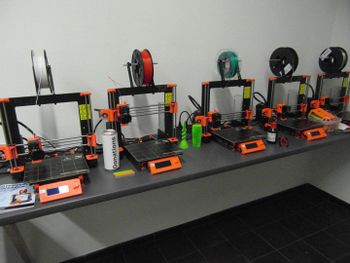
The Prusa 3D Printers P1 to P6 are on long term loan to the CoMakingSpace from our support partners Course Resource UG and the University of Heidelberg. P1 to P4 were built by participants of the euVENTION Summer School 2017 as part of the training programme provided by Course Resource UG and the University of Heidelberg. P5 and P6 are additional Course Resource UG training printers that are also made available to the CoMakingSpace members. Briefly, at euVENTION 2019, some of the printers returned to their role of supporting the Summer School participants in their rapid prototyping needs. However, now all six printers are again back at the CoMakingSpace available for our members use.
Bambu Lab P1S (P7)
| MachineInfoBox Bambu Lab P1S | |
|---|---|
| |
| Synonyms: | "P7" |
| Type: | 3D Printers |
| Material: | plastic filament |
| Location: | 3D Printing Area |
| Access Requirements: | 3D Printer Introduction |
| Status: | Working |
| Software: | Bambu Slicer, Orca Slicer |
| Manual: | wiki.bambulab.com |
| Tutors: | Lukas NitramLegov Pakue Lmnl99 Johannes Ciaran Luzian Leo Narquadah Björn Erik |
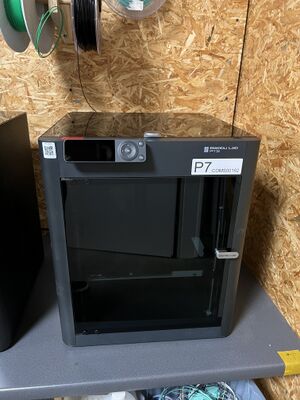
In addition to receiving a personal introduction from one of the tutors, make sure that you have read the manual and use the latest version of Bambu Studio on the slicer PC. The build volume of this model is 256 × 256 × 256 mm.
Both our Bambu Lab P1S have a 0.4mm Nozzle.
Overheating Risk
The Bambu Lab wiki suggests to only close doors and top cover for materials that need a warm print chamber (e.g. ABS or ASA). We have had clogging issues that may be related to printing in an overheated environment:
"When printing filament with a softening temperature below 60 °C (such as PLA, PVA, or TPU) and the heatbed temperature is set above 45 °C, it is recommended to open the front door and remove the upper glass cover plate to avoid the filaments get soft and deform under the squeeze of the extruder, which may result in abnormal extrusion or clogging."
The same is suggested for materials softening at 60-80 °C, such as PETG, when the buildplate is heated above 60 °C. [1]
Bambu Lab P1S (P8)
| MachineInfoBox Bambu Lab P1S | |
|---|---|

| |
| Synonyms: | "P8" |
| Type: | 3D Printers |
| Material: | plastic filament |
| Location: | 3D Printing Area |
| Access Requirements: | 3D Printer Introduction |
| Status: | Working |
| Software: | Bambu Slicer, Orca Slicer |
| Manual: | wiki.bambulab.com |
| Tutors: | Lukas NitramLegov Pakue Lmnl99 Johannes Ciaran Luzian Leo Narquadah Björn Erik |
In addition to receiving a personal introduction from one of the tutors, make sure that you have read the manual and use the latest version of Bambu Studio on the slicer PC. The build volume of this model is 256 × 256 × 256 mm.
Overheating Risk
The Bambu Lab wiki suggests to only close doors and top cover for materials that need a warm print chamber (e.g. ABS or ASA). We have had clogging issues that may be related to printing in an overheated environment:
"When printing filament with a softening temperature below 60 °C (such as PLA, PVA, or TPU) and the heatbed temperature is set above 45 °C, it is recommended to open the front door and remove the upper glass cover plate to avoid the filaments get soft and deform under the squeeze of the extruder, which may result in abnormal extrusion or clogging."
The same is suggested for materials softening at 60-80 °C, such as PETG, when the buildplate is heated above 60 °C. [2]
Prusa i3 MK2S Multi Material (P6)
| MachineInfoBox Original Prusa i3 MK2S Multi Material | |
|---|---|
| |
| Synonyms: | "P6" |
| Type: | 3D Printers |
| Material: | plastic filament |
| Location: | 3D Printing Area |
| Access Requirements: | 3D Printer Introduction |
| Status: | Working |
| Software: | Slic3r Prusa Edition |
| Firmware: | https://www.prusa3d.com/drivers/ |
| Manual: | prusa3d.com |
| Tutors: | Lukas NitramLegov Pakue Lmnl99 Johannes Ciaran Luzian Leo Narquadah Björn Erik |
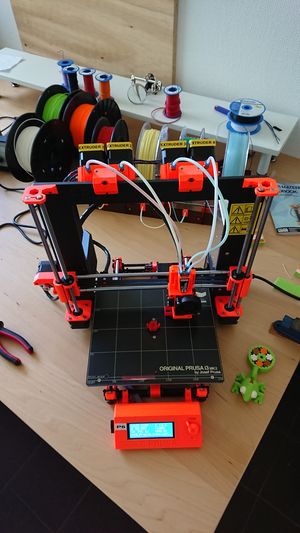
The printer "P6" has a multi-material upgrade ("MMU")! Of all the 3D printing tutors, Ciaran may have the most experience with this so far.
In the slicer, please select "Original Prusa i3 MK2 Multi Material" as the printer.
Please ensure that the filament loaded into the printer matches the settings you have in the slicer, for example like this:
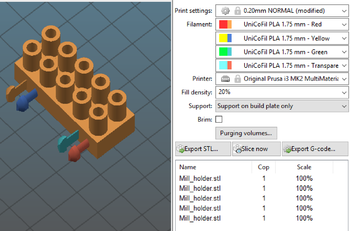
For each part in your model, you can assign a specific extruder. If you import your parts in a single STL file, try marking it and pressing the "Split" button in order to split it into multiple parts (it will for example split it into the bodies from Fusion 360).
Prusa provides a few helpful links for Multi Material Printing:
- Export model from Fusion 360
- Gcode Preparation for Multi Material v 2.0
- Splitting STL using MeshMixer
- Splitting STL with single compact part
Please read them while preparing for your first print.
In case you have a specific support Material (e.g. Soluble support), please see the settings at: Print Settings --> Multiple Extruders.
Please note that Multi Material printing takes much longer than regular printing. After you exported the GCode, you can see the estimated printing time in the lower right corner.
A promising way to waste less time and material with multi-color prints could be color transitioning inside the infill instead of a waste tower.
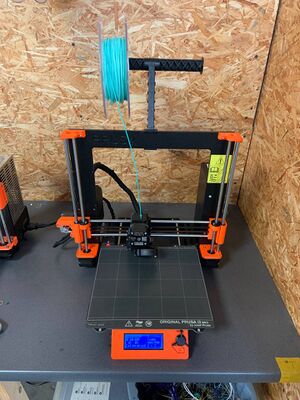
Prusa i3 MK3S (P10)
| MachineInfoBox Original Prusa i3 MK3S | |
|---|---|
| |
| Synonyms: | "P10" |
| Type: | 3D Printers |
| Material: | plastic filament |
| Location: | 3D Printing Area |
| Access Requirements: | 3D Printer Introduction |
| Status: | Working |
| Software: | Slic3r Prusa Edition |
| Firmware: | https://www.prusa3d.com/drivers/ |
| Manual: | prusa3d.com |
| Tutors: | Lukas NitramLegov Pakue Lmnl99 Johannes Ciaran Luzian Leo Narquadah Björn Erik |
In addition to receiving a personal introduction from one of the tutors, make sure that you have read the handbook and use the latest version of Slic3r available at the drivers and manuals page.
Please also note the differences between this printer and the other Original Prusa i3 MK2S listed in the General Usage Guidelines.
The build volume of this model is 250 × 210 × 210 mm.
Prusa i3 MK3S (P11)
| MachineInfoBox Original Prusa i3 MK3S | |
|---|---|

| |
| Synonyms: | "P11" |
| Type: | 3D Printers |
| Material: | plastic filament |
| Location: | 3D Printing Area |
| Access Requirements: | 3D Printer Introduction |
| Status: | Working |
| Software: | Slic3r Prusa Edition |
| Firmware: | https://www.prusa3d.com/drivers/ |
| Manual: | prusa3d.com |
| Tutors: | Lukas NitramLegov Pakue Lmnl99 Johannes Ciaran Luzian Leo Narquadah Björn Erik |
In addition to receiving a personal introduction from one of the tutors, make sure that you have read the handbook and use the latest version of Slic3r available at the drivers and manuals page.
Please also note the differences between this printer and the other Original Prusa i3 MK2S listed in the General Usage Guidelines.
The build volume of this model is 250 × 210 × 210 mm.
Prusa i3 MK3S+ (P9)
| MachineInfoBox Original Prusa i3 MK3S+ | |
|---|---|

| |
| Synonyms: | "P9" |
| Type: | 3D Printers |
| Material: | plastic filament |
| Location: | 3D Printing Area |
| Access Requirements: | 3D Printer Introduction |
| Status: | Working |
| Software: | Slic3r Prusa Edition |
| Firmware: | https://www.prusa3d.com/drivers/ |
| Manual: | prusa3d.com |
| Tutors: | Lukas NitramLegov Pakue Lmnl99 Johannes Ciaran Luzian Leo Narquadah Björn Erik |
In addition to receiving a personal introduction from one of the tutors, make sure that you have read the handbook and use the latest version of Slic3r available at the drivers and manuals page.
Please also note the differences between this printer and the other Original Prusa i3 MK2S listed in the General Usage Guidelines.
The build volume of this model is 250 × 210 × 210 mm.
General Usage Guidelines
Using the 3D printers, like any other machine, requires a personal introduction - ask a tutor to get one!
Slicing
Bambu Lab Printers
Use the Orca Slicer that is installed on the slicer computer next to the 3D printers. Please check the official Wiki in case something is missing, or outdated (alternatively have a look at the docs for Bambu Studio, which Orca Slicer is based on).
Starting a print
- Import your 3D model file (stl, 3mf etc.) into Bambu Studio
- Orient your part as necessary/optimal to print
- Print settings
- layer height
- filament settings (PLA, PETG, etc)
- any other quality/strength settings
- Slice the part (button is on the top right in Bambu Studio)
- Check if sliced model looks good
- Before sending the file to the printer make sure
- the printer is on
- the right filament is loaded into the right printer
- check the bed if it is clear and clean
- Upload the file to the printer
- disable the timelapse feature as is fills up the storage over time
- enable bed leveling
- Watch the first layer in case of an error
Prusa i3 Printers
A 3D model has to be virtually split into its layers ("sliced") before a printer can start building it up layer by layer in reality. You can use Slic3r Prusa Edition with the default settings for the MK2S (MK2, doesn't matter) or MK3S+ provided by Prusa Research.
Also have a look at PrusaLink to simplify your upload workflow.
Attention!!! When printing with the MK3S+ make sure to check if the right setting is selected. You can do this by checking the textbox for the printer setting or the text on the virtual build plate.
The MK2S and MK3S+ are very similar.The biggest differences are the removable build plate and a slightly faster, quieter print.
The slicing for our printers is done on the computer in the Electronics Room using Slic3r Prusa Edition.
Import
Put your STL file on a thumb drive and plug it into the slicer computer. Open Slic3r (orange/grey on the side bar) and drag the file into the program.
Print Settings
Presets can be selected on the "Plater" tab (where you see your model) on the left side. Its a good idea to chose the setting which fits your desired quality the most and make adjustments from there. Individual options can be changed in the "Print Settings" tab (e.g. support, infill, ...).
Filament Settings
All the available filament rolls should have a preset created for them, which can be selected in the "Plater" tab. If this on not the case ask a tutor for the settings.
Export G-Code
Press the "Export G-Code" button and save the file on the SD card of the printer. It's good practice to save your print files in a folder with your name.
Multi Material Printing
If your model requires multi-material printing, this can be done using printer P6.
Do Your Math
A few simple calculations will save you a lot of time and material:
- shell thickness must be a multiple of the nozzle diameter
- elements very close to or below the nozzle diameter won't turn out well
- bottom/top thickness must be a multiple of your selected layer height
Supervision
- even simple prints can go wrong, so please watch the homing process and the first layer closely and check the progress regularly
- do not leave the printers unattended - you'll have to find someone else to supervise a print if you absolutely need to leave the building
- there is no need to sit in front of the machine all the time, just do not leave the Space!
Cleanliness
- for improved adhesion, remove any dust from the print bed and wipe it with a few drops of isopropanol
- do not use acetone on the PEI sheet, it will destroy the print bed!
- collect any clean plastic waste in the appropriate (material and color!)
SD Cards
- if you don't know a file, don't print it - ideally, slice all your models just before printing
- Bambu Printers: Use the Slicer to send the files to the printer via the network.
File Storage
- always back up your files on your own storage: our file drop, SDs and computers might be cleaned up at any time without warning!
- do not use old G-codes over and over again, but rather save your STLs and slice freshly for every print - there could have been changes to the machine since your last visit!
Material Donations
We try to keep the cost low to allow anyone to print. Apart from the filament, we need new isopropanol from time to time.
If you want to participate to the costs, feel free do donate
Time/Material Estimation
To check the amount of filament and the rough time needed for a print we suggest to use the gcode.ws online tool and analyse the exported G-Code file there. The filament amount is usually quite accurate, but the print time in reality is usually 20-30% longer on our printers.
Some slicers also have built-in estimation features - unfortunately, our favorite Slic3r only estimates the required material, not the time.
Maintenance
Prusa Research provides a list of maintenance tips.
How Can You Help?
If you want to practice your 3D-printing skills and do some good for the space, you can do so!
Often, there are issues in the space that can be solved by 3D-printing. Here's the list of issues in GitHub.