Metal Lathes: Difference between revisions
sections for each machine; commissioning "small one" |
m →Myford ML7: updated status |
||
| Line 24: | Line 24: | ||
|synonyms=metalworking lathe, engine lathe,<br>machinists' lathe; DE: "Drehbank",<br>Zug- und Leitspindeldrehmaschine,<br>"Drehe" | |synonyms=metalworking lathe, engine lathe,<br>machinists' lathe; DE: "Drehbank",<br>Zug- und Leitspindeldrehmaschine,<br>"Drehe" | ||
|location=[[Metal Workshop|metal workshop]] | |location=[[Metal Workshop|metal workshop]] | ||
|status= | |status=working | ||
|access=upon [[Metal Lathe Introduction|personal introduction]] | |access=upon [[Metal Lathe Introduction|personal introduction]] | ||
|tutors=[[Patrick]] | |tutors=[[Patrick]] | ||
Revision as of 11:35, 21 April 2019
A lathe can easily pull you in if you don't pay attention. Keep long hair tucked away and avoid long sleeves or any other clothes that could get caught in the lathe. Take care of lose objects around the rotating parts as they can be thrown at high speeds.
Before You Leave
Before you leave it is important to clean the machine properly.
Mandatory:
- use the brush to clean off the chips (you don't have to disassemble the whole machine every time to get all of them)
- untighten the belt
- remove your workpiece
- disconnect the leadscrew and auto feed
- cover the machine with the old bedsheet to protect it from abrasive dust
Sanding
You can use sandpaper to quickly finish the surface of a piece you've turned on the lathe. When doing this, place a shop rag on the lathe bed to prevent pieces of the abrasive from getting dragged into the mechanics where they might cause some damage!
Myford ML7
| MachineInfoBox Myford ML7 (Serial No. K51412) | |
|---|---|

| |
| Synonyms: | metalworking lathe, engine lathe, machinists' lathe; DE: "Drehbank", Zug- und Leitspindeldrehmaschine, "Drehe" |
| Used with: | tool bits |
| Access Requirements: | Metal Lathe Introduction |
| Manual: | vintagemachinery |
| Tutors: | Pakue Johannes Luzian Schmidt3D |
| Similar (More or Less): | wood lathe |
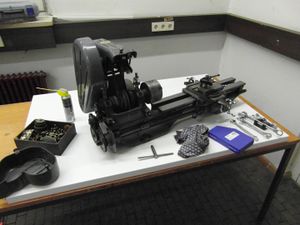
We were generously given a Myford ML7 metalworking lathe. Based on the serial number, this beauty seems to be from the year 1962!
It is currently being restored (see corresponding issue), more information will be added as work progresses!
Lubrication

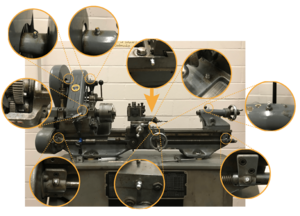
There are various oil nipples (2 B.A. thread; Schmiernippel) all over the machine and two sight-feed lubricators (a.k.a. drip feed oilers) above the headstock spindle bearings.
The manufacturer's recommendation is "Esso Nuto 32" gear oil but we are using a more viscous "90" oil as that was available to us and two trusted sources ensured us it should work just fine.
Oil Nipples
According to the manufacturer's assembly diagrams, there should be 3 oil nipples on the carriage, 2 on the "motorizing" section, 1 on the tailstock, 2 on the headstock and 2 on the "bed, leadscrew and gear train" section for a total of 10 nipples. However, one of those (on the headstock, inside a belt pulley for whatever reason) is currently not installed as it is very difficult to reach.
You need a grease gun (a.k.a. oil gun or Fettpresse) to lubricate through the oil nipples. We bought replacement oil nipples with metric thread and installed them in all but two locations, and the grease gun fits those and (well enough, anyway) the original British ones.
Carriage
Cross Slides
The cross slides move 0.2mm for 1/10th of a revolution. Keep in mind the diameter of the workpiece reduces by twice that amount!
Work Holding
The lathe is equipped with a simple 3-door chuck with two sets of jaws. One set is for small diameter workpieces and inside diameter holding, the other for larger diameters (steps get shorter to the center). To change the jaws turn the key until they come out. Be sure not to drop them! Insert the new set in the right order (1-1, 2-2, 3-3) while turning the chuck key in the other direction.
It is very important to hold the workpiece securely so no chatter occurs and the piece doesn't fly out. Avoid too long of a stick-out without the use of the end stock support (not available yet). Usually the thicker the material, the longer the stick-out can be. A good rule of thumb is a 3:1 ratio.
Scratches can be avoided by using some shim stock (copper or brass) in between the jaws and the workpiece.
We should attach coil springs to each of our chuck keys so they can't be accidentally left in the chuck when the machine is turned on and go flying. [1]
Headstock
The drive shaft's thread is 1 1/8" x 12 TPI Whitworth.
Tailstock
Our lathe has a tailstock with a MKII (18 mm) taper for a live center (not yet) or a drill chuck (installed).
The (live) center is used to support longer workpieces. For this they need to be center drilled beforehand. With the drill chuck normal drills can be mounted; center-drilling is advised before drilling with a standard drill.
Small Lathe
This tool is not ready for use yet since not all commissioning steps have been completed. The process is also tracked on GitHub. Feel free to contribute to making it usable, any help is very welcome!
| Task | comment | Status |
|---|---|---|
| Name the tool: | - | pending |
| Take a picture | - | pending |
| Find the manual as PDF | needed for all machines - add a link to the InfoBox or comment where you could not find it | pending |
| Documentation | this page, status: in commissioning | pending |
| Print QR-Code | use the MachineQR Factory | pending |
| Introduction | - | pending |
| Security Check | to be done or witnessed by a manager | pending |
| Test | to be done or witnessed by a manager | pending |
| tool's name, owner and approx. value | provide to Johannes for inventorization | pending |
| Last step: make it available | physically and in the wiki - then delete this template | pending |
Further Reading
- manufacturer's website (EN)
- Wikipedia
- lathes.co.uk photo essay - including some nice upgrade ideas!
- another owner's rebuild protocol