Bench Grinders: Difference between revisions
m need to take a new photo |
precise location |
||
| (39 intermediate revisions by 5 users not shown) | |||
| Line 1: | Line 1: | ||
{{ | {{MachineInfoBox | ||
| | |machine name=Bench Grinders | ||
|image= | |german=Doppelschleifer | ||
|synonyms=bench top | |image=<!-- GIF or "action photo" could be nice here --> | ||
|extrabox=yes (= not used in SMW gallery) | |||
|synonyms=''bench top grinders, grinding wheels;<br>DE: "Schleifmaschinen"'' | |||
|location= | |location=[[Location::Grinding Table]] | ||
|material=[[metal]] | |material=[[metal]] (not [[aluminum]]) | ||
|similar=[[Disc Grinder|disc grinder]], [[files]], [[sandpaper]] | |||
|similar=[[Disc Grinder|disc grinder]], [[files]] | |manual= | ||
}} | }} | ||
== Safety == | == Safety == | ||
As the bench grinder is not only a power tool but one with openly accessible spinning parts, precautions need to be made. Have a [[tutor]] show the machine to you before touching it! | As the bench grinder is not only a power tool but one with openly accessible spinning parts, precautions need to be made. Have a [[tutor]] show the machine to you before touching it! | ||
* never wear gloves and/or scarves, roll up long sleeves and tie back long hair so nothing gets caught | * never wear gloves and/or scarves, roll up long sleeves and tie back long hair so nothing gets caught | ||
* always wear [[Personal Protection|personal protection]], especially safety goggles and if necessary some ear defenders and dust | * always wear [[Personal Protection|personal protection]], especially safety goggles and if necessary some ear defenders and a dust mask | ||
== Usage == | == Usage == | ||
| Line 24: | Line 21: | ||
* do not force your workpiece onto the wheel as that will produce a lot of heat; cooling your piece from time to time is always a good idea | * do not force your workpiece onto the wheel as that will produce a lot of heat; cooling your piece from time to time is always a good idea | ||
== | === [[Sharpening]] === | ||
[[ | |||
* approach the spinning wheel slowly so your workpiece doesn't catch on it! | * approach the spinning wheel slowly so your workpiece doesn't catch on it! | ||
* when sharpening hardened steel make sure to keep the blade cool, otherwise previous hardening may be undone | * when sharpening hardened steel make sure to keep the blade cool, otherwise previous hardening may be undone! | ||
* it's a good idea to press the blade firmly against the | * it's a good idea to press the blade firmly against the support to keep a consistent blade alignment | ||
* check the squareness of the blade often to be able to make corrections | * check the squareness of the blade often to be able to make corrections | ||
* keep in mind that the grinder itself is only for roughing out the blade geometry, for a truly sharp blade you definitely need to work with some [[wetstones]] afterwards | * keep in mind that the grinder itself is only for roughing out the blade geometry, for a truly sharp blade you definitely need to work with some [[wetstones]] afterwards | ||
<!-- NOTE: The following block "imports" content from separate pages - please don't change the code! To edit the actual information, please go back and click "edit" next to the section headline you are interested in :-) --> | |||
The | {{#ask: | ||
[[MachineType::Bench Grinder]] | |||
= | |order=descending | ||
|format=embedded | |||
|embedonly=yes | |||
}} | |||
[[Category:Metalworking | [[Category:Metalworking]] | ||
[[Category: | [[Category:Sharpening]] | ||
Latest revision as of 11:21, 26 October 2022
| MachineInfoBox Bench Grinders | |
|---|---|

| |
| Synonyms: | bench top grinders, grinding wheels; DE: "Schleifmaschinen" |
| Material: | metal (not aluminum) |
| Access Requirements: | Bench Grinder Introduction |
| Tutors: | Lukas Pakue Johannes Luzian Utis Sebastian |
| Similar (More or Less): | disc grinder, files, sandpaper |
Safety
As the bench grinder is not only a power tool but one with openly accessible spinning parts, precautions need to be made. Have a tutor show the machine to you before touching it!
- never wear gloves and/or scarves, roll up long sleeves and tie back long hair so nothing gets caught
- always wear personal protection, especially safety goggles and if necessary some ear defenders and a dust mask
Usage
- after plugging the grinder in, turn it on and wait until it reaches its final speed
- if you hear any rattling or other funny noises turn it off immediately and check whether something is loose or whether tiny parts are inside of the casing
- grind whatever you want to grind by holding it against the stone wheel; make sure the piece is supported either by the little table in front of the wheel or some other structure
- do not force your workpiece onto the wheel as that will produce a lot of heat; cooling your piece from time to time is always a good idea
Sharpening
- approach the spinning wheel slowly so your workpiece doesn't catch on it!
- when sharpening hardened steel make sure to keep the blade cool, otherwise previous hardening may be undone!
- it's a good idea to press the blade firmly against the support to keep a consistent blade alignment
- check the squareness of the blade often to be able to make corrections
- keep in mind that the grinder itself is only for roughing out the blade geometry, for a truly sharp blade you definitely need to work with some wetstones afterwards
Triton TWSS10
| MachineInfoBox Triton TWSS10 | |
|---|---|

| |
| Synonyms: | wet grinder, whetstone sharpener, dual-purpose wet grinder/stropping wheel; DE: Nassschleifmaschine |
| Type: | Bench Grinders |
| Material: | metal (not aluminum) |
| Location: | Grinding Table |
| Access Requirements: | Bench Grinder Introduction |
| Status: | Working |
| Manual: | Instruction Manual Explosion Diagram Product Sheet |
| Tutors: | Lukas Pakue Johannes Luzian Utis Sebastian |
| Similar (More or Less): | disc grinder, files, sandpaper |
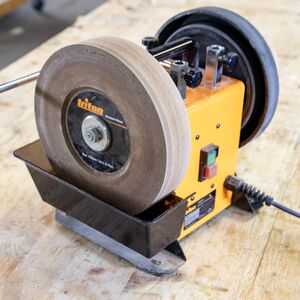
The Triton TWSS10 provides a stone for wet grinding and a leather stropping wheel. Please ensure you always empty the water and loosen the torque screw when you are done!
This grinder is slow moving and intended for the final sharpening passes, not gor quick material removal. It has a 220 grit "diamond wheel" (with a water bath) and a leather honing wheel. It may be nice to add a swiveling base under it so you don't need to pick up the machine to switch directions!
There are quite a few accessories available from the manufacturer. You can find them in the manual (page 8) as well as on the product page.
We should document individual accessories as we get (or 3D print) them.
Straight Edge Jig
We have a straight edge jig for flat irons like bevel edge chisels or plane blades.
NU-POWER MABG 006AMA
| MachineInfoBox NU-POWER MABG 006AMA | |
|---|---|

| |
| Synonyms: | bench top grinder, grinding wheel; DE: Doppelschleifer, Schleifbock, Trockenschleifmaschine |
| Type: | Bench Grinders |
| Material: | metal (not aluminum) |
| Location: | Grinding Table |
| Access Requirements: | Bench Grinder Introduction |
| Status: | Working |
| Tutors: | Lukas Pakue Johannes Luzian Utis Sebastian |
| Similar (More or Less): | disc grinder, files, sandpaper |
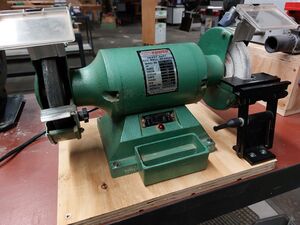
We got this old bench grinder used but still in good condition; the wheels run true and quietly. The grinder is equipped with two different stone wheels with different grits; one for heavy-duty and quick material removal, one for a finer and more precise material removal that will leave a way nicer surface finish.
Take care: there is no prevention of turning on after loss & restoration of power (keine Anlaufsicherung)! Besides, the motor takes quite a long time to run down after it was turned off.
Specs
- wheel diameter: 6" (approx. 15 cm)
- motor: 1/2 hp
- speed: 2950 rpm
- serial number: 898853
Maintenance
The wheels need to be "dressed" from time to time in order to produce nice straight edges and maintain stability. There is a T-shaped diamond file for this on the grinding table.
Apparently, it's also possible to dress a stone with nothing more than a few spring washers on a piece of threaded rod![1]
Changing Wheels
After installing a new grinding wheel, set up a safety perimeter (let's say everyone leaves the room) and let the grinder run for five minutes. Only if that went well, without suspicious noises or visible signs of problems, should the grinder be used again.