Push Blocks: Difference between revisions
*short* section on jointer push blocks |
NitramLegov (talk | contribs) m German |
||
| (One intermediate revision by one other user not shown) | |||
| Line 16: | Line 16: | ||
{{ToolInfoBox | {{ToolInfoBox | ||
|tool name="Sticky" Push Blocks | |tool name="Sticky" Push Blocks | ||
|image=push blocks.JPG | |german=Schiebeklötze|image=push blocks.JPG | ||
|synonyms=push pads, "safety grips";<br>DE: Schiebeblöcke, Schiebeklötze | |synonyms=push pads, "safety grips";<br>DE: Schiebeblöcke, Schiebeklötze | ||
|type=workholding | |type=workholding | ||
| Line 28: | Line 28: | ||
** anti-slide rubber grid on the bottom | ** anti-slide rubber grid on the bottom | ||
** change in next version: make one in the opposite orientation, seems to be more ergonomic | ** change in next version: make one in the opposite orientation, seems to be more ergonomic | ||
** room for improvement: add pegs like in [https://www.youtube.com/watch?v=z6zpUnjVnWM this video] | ** room for improvement: add pegs like in [https://www.youtube.com/watch?v=z6zpUnjVnWM this video] | ||
*** these - or a lip - are needed for use with the [[jointer]] | *** these - or a lip - are needed for use with the [[jointer]] | ||
::[[File:making push blocks.JPG|300px|thumb|left|save your offcuts for [[gluing]] uneven pieces like these!]] | |||
<br clear=left> | |||
=== Use === | === Use === | ||
Press down firmly on the workpiece, ideally with a block in each hand, and practice some movements before the actual cut (especially if you are handling slippy workpieces)! If the workpiece is thinner than the push blocks, make sure you are actually pressing ''on'' and not ''next to'' it. | Press down firmly on the workpiece, ideally with a block in each hand, and practice some movements before the actual cut (especially if you are handling slippy workpieces)! If the workpiece is thinner than the push blocks, make sure you are actually pressing ''on'' and not ''next to'' it. | ||
::[[File:push block use.JPG|300px|left]] | |||
<br clear=left> | <br clear=left> | ||
Latest revision as of 10:48, 2 May 2022
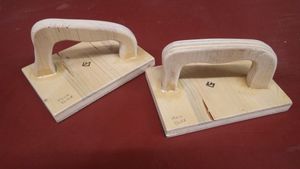
Push blocks are simple but important pieces of safety equipment for dangerous tools like a router table, jointer or table saw.
They can easily be self-made (NO METAL!!) and should provide a healthy distance from the workpiece while providing at least as much control as your flat hands would.
On the table saw, push sticks may be the better choice - it depends on the cut you are making and the forces involved, as well as the room you have available!
Inspiration
Some YouTube Makers showing how they've made their push blocks, with a short summary of the (perhaps) most interesting features:
- John Heisz (ibuildit.ca) - glued joints without metal fasteners, a huge advantage in case you ever cut into the block by accidents; angled grips
- Ollaris - retractable wooded pegs at one end that can give extra support at the workpiece edges, if desired
- Kenbo (Kennyearrings) - handsaw-style grip, using an old mousepad as the sticky part
Basic Push Blocks
| ToolInfoBox "Sticky" Push Blocks | |
|---|---|

| |
| Synonyms: | push pads, "safety grips"; DE: Schiebeblöcke, Schiebeklötze |
| Type: | workholding |
| Used with: | router table, table saw; NOT the jointer unless there is a back lip/pegs |
| Location: | wood workshop (router table) |
| Similar (More or Less): | push sticks |
- first try by Lukas: essentially John Heisz's design
- freehanded the handles, one rather horizontal and one pointing up - which is more comfortable?
- anti-slide rubber grid on the bottom
- change in next version: make one in the opposite orientation, seems to be more ergonomic
- room for improvement: add pegs like in this video
- these - or a lip - are needed for use with the jointer
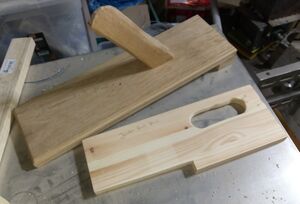
save your offcuts for gluing uneven pieces like these!
Use
Press down firmly on the workpiece, ideally with a block in each hand, and practice some movements before the actual cut (especially if you are handling slippy workpieces)! If the workpiece is thinner than the push blocks, make sure you are actually pressing on and not next to it.
Jointer Push Blocks
The jointer MUST only be used with push blocks that have a backstop of some sort, e.g. a "lip" or pegs that fall down behind the workpiece.


