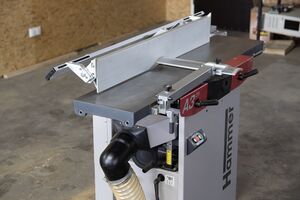
Jointer-Planer
A jointer is used for straightening the narrow sides of wooden boards which is necessary for panel glue-ups and some kinds of joinery. It basically consists of a flat surface with a slightly protruding cutting drum at the center.
Hammer A3-31
| MachineInfoBox Hammer A3-31 | |
|---|---|

| |
| Synonyms: | planer-thicknesser, power jointer, thickness planer; DE: Abricht- und Dickenhobelmaschine, "Abrichte", "Dickte" |
| Type: | Jointer-Planer |
| Material: | naturally structured wood (not more engineered than glued laminated timber!) |
| Used with: | push block with lip, dust extractor, SilberGleit |
| Location: | Wood Workshop |
| Access Requirements: | Jointer-Planer Introduction |
| Status: | Working |
| Manual: | felder-gruppe.at (DE), (EN) |
| Tutors: | Lukas Pakue Utis Sebastian Loewenstein |
| Similar (More or Less): | jointer plane, planer |
We chose to get a combination jointer/planer to save valuable space: thanks to the second flat surface under this cutting drum, you can also thickness boards with this machine! You can therefore buy rough-sawn wood and dimension it at the CoMakingSpace.

Jointing

Jointing (using the top table of the machine) creates flat, perpendicular surfaces. Flawless edges are especially important for glue-ups, e.g. to make your own glued laminated timber panels!
You should check the fence for squareness against the table, e.g. with a square or inclinometer. Advanced users may also try to joint at other angles than 90°.
A square fence is not absolutely required for a good glue-up joint: if you can't improve squareness (or want to play it safe either way), try varying the orientation of each board's edges as you joint them. If all your "left" edges are off-square in one direction and all the "right" ones are the opposite, you will still get a perfectly matching, but not square, joint (video).
Pieces for jointing need to be AT LEAST 10 mm high and AT MOST 310 mm wide.
Planing

If you flip the top of the machine back, you're able to feed a workpiece under the knives to plane its top surface. Thereby you can obtain a board with parallel faces and dial in its thickness exactly as you want. Make sure you fully understand grain direction or you'll easily get tearout!
Feeding boards through at a slight angle may help to avoid "snipe" (Hobelschläge) but you should be prepared to cut off unsightly ends afterwards - i.e., plane oversized boards and cut them to length as the next step.
Pieces for planing need to be AT LEAST 4 mm high and 160 mm long and AT MOST 250 mm high or 306 mm wide.
Accessories
Dust Evacuation
The planer should only be used in tandem with a suitable dust evacuation system. The intended machine for this purpose is the Felder AF 14, that should be in close proximity to the planer. The system should be hooked up through the automated switch box (switched output) mounted on the metal frame, that should also be connected to the planer (trigger output). Once the planer is started the vacuum system will turn on after 3 seconds and turn off once the planer is off for 8 seconds. Make sure to set the switch on the vacuum motor to '1' (ON) before starting!
Alternatives
- jointing can also be achieved with a plane (ideally a long-bodied jointer plane) or a special jig for the table saw
- instead of a thickness planer, you can use bench planes or a handheld planer