Router Table: Difference between revisions
NitramLegov (talk | contribs) (linked tutors (copied from routers, since they share the introduction)) |
m (linked accidental climb cut article from the project page) |
||
| Line 39: | Line 39: | ||
A router table turns a [[Router|handheld router]] into a stationary tool. The router gets attached to the router table upside down in order to enable the workpiece to be fed through the router (as of this, it is for a router what a [[Table Saw|table saw]] is for a [[Circular Saw|circular saw]]). | A router table turns a [[Router|handheld router]] into a stationary tool. The router gets attached to the router table upside down in order to enable the workpiece to be fed through the router (as of this, it is for a router what a [[Table Saw|table saw]] is for a [[Circular Saw|circular saw]]). | ||
It is very important to realize that the exposed router bit is not only dangerous because of its sharp edges, but also because it can rip the workpiece out of your hand and let it fly across the workshop. To make sure that you are in control and not the router, '''ONLY feed workpieces through from the right to the left side if you are working in front of the router bit and vice-versa!''' You should understand why this is important after getting the [[Handheld Router Introduction|router introduction]]. | It is very important to realize that the exposed router bit is not only dangerous because of its sharp edges, but also because it can rip the workpiece out of your hand and let it fly across the workshop. To make sure that you are in control and not the router, '''ONLY feed workpieces through from the right to the left side if you are working in front of the router bit and vice-versa!''' You should understand why this is important after getting the [[Handheld Router Introduction|router introduction]] or reading [https://www.finewoodworking.com/2014/05/07/router-accident-is-a-great-lesson-in-climb-cutting articles about accidental climb cuts] on the internet. | ||
''Please also see [[Project:Router Table]] in case you are planning to build your own.'' | ''Please also see [[Project:Router Table]] in case you are planning to build your own.'' | ||
Revision as of 11:46, 22 October 2018
This tool is not ready for use yet since not all commissioning steps have been completed. The process is also tracked on GitHub. Feel free to contribute to making it usable, any help is very welcome!
| Task | comment | Status |
|---|---|---|
| Name the tool: | Router Table/Westfalia Universal Frästisch Nr. 64 56 97 | done |
| Take a picture | - | done |
| Find the manual as PDF | See infobox | done |
| Documentation | For the moment only the Kingcraft Router is compatible. | done |
| Print QR-Code | use the wikicrawler | done |
| Introduction | added to Handheld Router Introduction | done |
| Security Check | Are all fences included? We should add a clear mark for the feed direction & make push blocks. Martin: We should also add an emergency stop which can be triggered using a foot similar to what the Table Saw has. Martin: Emergency stop added and attached to the router table. I would say it can be used now As per the Discussion, there needs to be a better explanation regarding the feed direction, before this template can be removed. |
pending |
| Test | Martin: It was tested together with Lukas and worked fine. | done |
| tool's name, owner and approx. value | Owned by Martin, data provided to Lukas with the Dauerleihgabe Form. | done |
| Last step: make it available | physically and in the wiki - then delete this template | pending |
| ToolInfoBox Westfalia Universal Frästisch Nr. 64 56 97 | |
|---|---|

| |
| Synonyms: | DE: Frästisch, Oberfrästisch |
| Type: | tool mount |
| Material: | wood |
| Used with: | routers, push blocks |
| Location: | wood workshop |
| Access Requirements: | upon personal introduction |
| Tutors: | Lukas, Martin |
| Manual: | Westfalia |
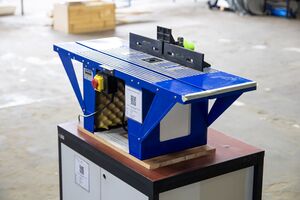
A router table turns a handheld router into a stationary tool. The router gets attached to the router table upside down in order to enable the workpiece to be fed through the router (as of this, it is for a router what a table saw is for a circular saw).
It is very important to realize that the exposed router bit is not only dangerous because of its sharp edges, but also because it can rip the workpiece out of your hand and let it fly across the workshop. To make sure that you are in control and not the router, ONLY feed workpieces through from the right to the left side if you are working in front of the router bit and vice-versa! You should understand why this is important after getting the router introduction or reading articles about accidental climb cuts on the internet.
Please also see Project:Router Table in case you are planning to build your own.
(Emergency) Stop
To stop the router, you can slap the lid of the yellow switchbox or use the foot switch. When stopping inside a cut, the foot switch is highly recommended so you can keep your hands on the workpiece for full control!
Setup
Dust Extraction
For edge work, you can use the top (green) dust port, but for grooves you should connect the shop vac to the bottom (black) dust port.
It will still be pretty messy work - a router generates lots of shavings - but should help reduce the amount of fine dust flying around.
Fence
soon...
Compatible Routers
- The KingCraft KBF-1050E router is currently attached to the table.
More to be determined...