Project:Jar Jar Shelf: Difference between revisions
(Created page with "{{ProjectInfoBox |project title=Jar Jar Shelf |image=jar jar shelf 6.JPG |status=finished |date=July 2016 |initiator=Lukas |materials=blockboard, Dowel Pe...") |
(had a late upgrade idea :-)) |
||
| Line 1: | Line 1: | ||
{{ProjectInfoBox | {{ProjectInfoBox | ||
|project title=Jar Jar Shelf | |project title=Jar Jar Shelf | ||
|image=jar jar shelf | |image=jar jar shelf 7.JPG | ||
|status=finished | |status=finished | ||
|date=July 2016 | |date=July 2016 | ||
| Line 32: | Line 32: | ||
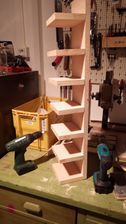
File:jar jar shelf 5.JPG|fully assembled shelf with cordless drills (one for drilling, one for screwing) | File:jar jar shelf 5.JPG|fully assembled shelf with cordless drills (one for drilling, one for screwing) | ||
File:jar jar shelf 6.JPG|installed in Lukas' kitchen | File:jar jar shelf 6.JPG|installed in Lukas' kitchen | ||
File:jar jar shelf 7.JPG|putting the glasses in lid-first gives a nice overview of their contents! | |||
</gallery> | </gallery> | ||
| Line 38: | Line 39: | ||
== Further Steps == | == Further Steps == | ||
The | The jars (sides or bottoms) may eventually be [[Laser Cutting|laser engraved]] with the names of the contents and/or basic recipes. | ||
== Things Learned == | == Things Learned == | ||
* the design is not adapted for comfortable bike transportation | * the design is not adapted for comfortable bike transportation | ||
* everything would have been a lot easier with [[Dowel Centers|dowel centers]] and a [[Table Saw|table saw]]! | * everything would have been a lot easier with [[Dowel Centers|dowel centers]] and a [[Table Saw|table saw]] which we have now, but not when I made it! | ||
[[Category:Furniture]] | [[Category:Furniture]] | ||
[[Category:Woodworking]] | [[Category:Woodworking]] | ||
Revision as of 19:35, 26 December 2018
| ProjectInfoBox Jar Jar Shelf | |
|---|---|

| |
| Status: | finished |
| Release Date: | July 2016 |
| Initiator: | Lukas |
| Materials Used: | blockboard, dowel pegs, screws, bracket |
| Tools Used: | circular saw, chop saw, sandpaper, cordless drill |
| Approx. Cost: | 10 € for materials |
This is a shelf for effectively storing those 720 g jars, e.g. as used by "Odenwald" for fruit preserves, in a small space between kitchen cabinets. It consists of several instances of a shelf and two jars - hence the name.

Idea
The maximum size was basically dictated by the already existing kitchen furniture and the jars that are great for storing lots of cooking supplies that are sold in flimsy plastic bags, e.g. lentils or semola. Placing the jars on their sides maximizes capacity as well as ease of access (once the lids are labeled). The shelf is mounted at an angle so the jars slide - if at all - only backwards and do not fall down.
Blockboard was chosen as a material as it looks pretty cool when cut in the right orientation and I had some appropriately sized leftovers from building bigger shelves.
Making
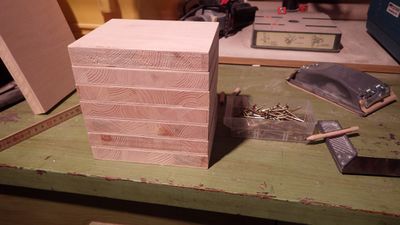
One 85 × 15.5 cm and seven 12.5 × 15.5 cm boards were cut using a circular saw and a chop saw (the proper tool would have been a table saw to which I did not have access at the time).
After some good sanding from all sides (120 grit), the small boards where arranged according to the would-be fronts so that darker and lighter boards alternated. The back sides where drilled with an 8 mm wood drill bit to receive two dowel pegs each. These were entered into matching holes in the larger board after applying some wood glue to the side of the small board. Two 4 × 50 mm wood screws per board made sure the glue received enough pressure and the connections some extra stability. 3 mm countersunk pilot holes were drilled to ensure a nice fit of these screws.
Just a bit more sanding and done!
- assembly steps
small pieces of blockboard waiting for assembly

wood drill bit marked with masking tape to see how deep to drill
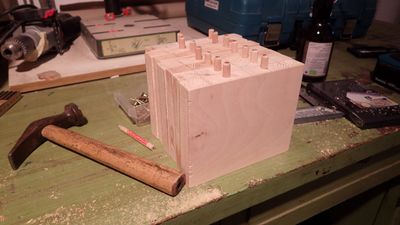
small boards with wooden dowels and additional markings for screws
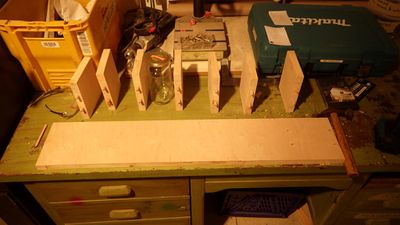
all boards aligned for assembly, with a jar for a last check of measurements
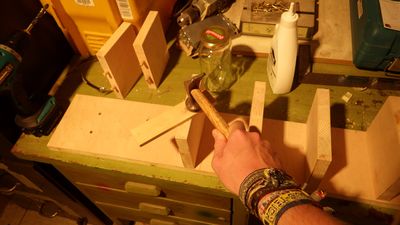
place a piece of scrap wood on your workpiece when hammering to keep it clean
fully assembled shelf with cordless drills (one for drilling, one for screwing)
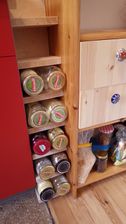
installed in Lukas' kitchen
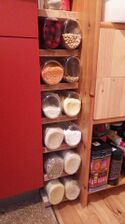
putting the glasses in lid-first gives a nice overview of their contents!


Mounting
The shelf was mounted at an angle of approx. 20 degrees. The base rests on the floor and a single bracket attached to the side of the neighboring kitchen shelf is sufficient to maintain this position. This step would have been quicker if I'd attached the bracket before the glue-up or had an angled bit holder back then...
Further Steps
The jars (sides or bottoms) may eventually be laser engraved with the names of the contents and/or basic recipes.
Things Learned
- the design is not adapted for comfortable bike transportation
- everything would have been a lot easier with dowel centers and a table saw which we have now, but not when I made it!