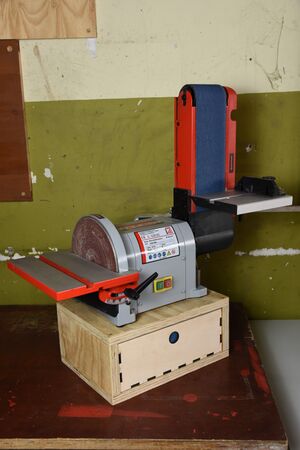
Belt and Disc Sander
| MachineInfoBox Holzmann BT 203-914 | |
|---|---|

| |
| Synonyms: | belt and disk sander; DE: Band- und Tellerschleifer (oder Schleifteller) |
| Material: | wood, metal |
| Used with: | 914x100mm sanding belts 200mm sanding discs (glued) |
| Access Requirements: | Stationary Sander Introduction |
| Manual: | in wooden box below grinder / similar machine on manualslib |
| Tutors: | Lukas Pakue Johannes Luzian Utis Sebastian Jakob |
This tool is not ready for use yet since not all commissioning steps have been completed. The process is also tracked on GitHub. Feel free to contribute to making it usable, any help is very welcome!
| Task | comment | Status |
|---|---|---|
| Name the tool: | - | done |
| Take a picture | - | Done |
| Find the manual as PDF | no pdf found | in wooden box below sander; also backed up on photos by Patrick |
| Documentation | this page, status: in commissioning | done |
| Print QR-Code | use the MachineQR Factory | Done |
| Introduction | Belt and Disc Sander Introduction | pending |
| Security Check | Patrick & Lukas | done |
| Test | Patrick & Lukas | done |
| tool's name, owner and approx. value | provided by Martin | Done |
| Last step: make it available | physically and in the wiki - then delete this template | pending |
Holzmann BT 203-914
After being commissioned, this machine will sit in the metal workshop, next to the grinding stones on a wooden box containing the manual and the accessories.
It is a combined disc and belt sander with a 200mm rough sanding disc and a 914x100mm belt sander. Both are always simultaneously driven by the 550W motor. Belt speed is 9,5m/s and disc speed is 2850 min-1.
This type of machine is helpful for all sanding tasks that require a fixed angle. Both sander sides have adjustable sanding tables and a slot for a miter gauge to guide your workpiece in a defined agle against the sanding disc or belt.
Features
The machine has the following features
- pivoting aluminium table for disc and belt sander (up to 45°)
- sanding belt unit tiltable from 0-90° horizontally and vertically
- mitre fence for precise angle sanding
- suction device
- suitable for longitudinal and front edges, round and mitre sanding and plane faces
In the current version, the sanding disk is glued. After planned modification, it will be possible to install velcro-backed abrrasive discs.
Materials
As by the makers specification, the machine is permitted to process wood, and wood-like materials.
Use the disc sander for rough shaping, or to create outside curves on wood. Use the belt sander to sand your wood or other material. Should you use it to process other materials or light metals, such as Aluminium, adhere to the special precautions mentioned in the machine introduction, and make sure that the mounted sanding belt/ disk supports your material.
Proper Use
Always check the following before you start to work with the machine
- All cables and plugs
- Loose screws and connections. Damaged parts have to be replaced immediately, no operation of the machine in the meantime!
- Tight fit of table and safety fence
- The free and centered run of sanding belt and disc
- Attention! To prevent fingers from being squeezed between the band and table, a maximum separation of 3 mm has to be maintained between the table and grinding band. Check that this is the case.
Configure the machine for your use case (table-angles etc).
- The angle stop can be used for angles of up to 45°, to the left or right, by releasing the locking button and adjusting the angle stop to the desired angle.
- The backing plate of the grinding belt has to be adjusted so it almost touches the grinding belt. In order to adjust it, release the two screws holding the plate in the machine rack. Tighten the screws again after you adjusted the plate.
- To remove the plate to perform special jobs (e.g. polishing or contour-grinding), loosen the two attachment screws
To turn the machine on, press "I" (green). Turn the machine off, press "O" (red).
When working with the machine, do not apply too much pressure to the sanding abrasive.
As the machine offers no possibility to clamp your material, it is important, that complete work piece maintains a firm grip on the worktable!
Safety
Always make sure to adhere to all precautions trained during the stationary sander introduction
Maintenance
The machine does not require extensive maintenance. Service malfunctions and defects by trained persons only. Regular maintenance:
- After each workshift: Remove chips and sanding dust from the device
- After 10 hours of operation: Check all screw connections and tighten if necessary
Refer to the manual in order learn more about the process to change the grinding belt and the disc.
Sandpaper Cleaning
Sandpaper can be restored a few times before it is used up by briefly sanding a piece of rubber! Instead of proper cleaning sticks you can apparently get great results with the sole of an old shoe - any donors? ;-)