Chop Saw: Difference between revisions
updated location; Moritz fixed the guard! |
No edit summary |
||
| Line 29: | Line 29: | ||
If you are not alone, ask the others whether it is okay to cut for a few minutes as they may have to interrupt their project to give you room and to protect their ears. Although the saw is not extremely loud, it is definitely startling when you are surprised by it turning on in your back! | If you are not alone, ask the others whether it is okay to cut for a few minutes as they may have to interrupt their project to give you room and to protect their ears. Although the saw is not extremely loud, it is definitely startling when you are surprised by it turning on in your back! | ||
It's advisable to hook up a [[Shop Vac|shop vac]] for dust extraction as the passive collector bags that typically come with this kind of tool are not too efficient. | It's advisable to hook up a [[Shop Vac|shop vac]] for dust extraction as the passive collector bags that typically come with this kind of tool are not too efficient. Even the shop vac will let a lot of sawdust escape. | ||
== Maintenance == | |||
The blade should be sharpened or replaced when it becomes dull, otherwise using it is very dangerous! Tell a [[manager]] if you are noticing any problems, e.g. increased force required to cut your workpieces or poor quality cuts. | |||
Decreased cutting ability can also result from dirt buildup - here are some [http://www.instructables.com/id/How-to-Clean-a-Table-Saw-Blade/ cleaning instructions]. | |||
== Potential Upgrades == | == Potential Upgrades == | ||
Revision as of 08:36, 20 April 2018
| ToolInfoBox Herkules KSZ 2100 | |
|---|---|

| |
| Synonyms: | sliding compound miter saw; DE: Kappsäge, Kapp-, Zug- und Gehrungssäge |
| Type: | power tool/saw |
| Material: | wood |
| Used with: | circular saw blades, shop vac |
| Location: | chop saw station |
| Access Requirements: | upon introduction |
| Tutors: | Lukas |
| Manual: | ManualsLib |
| Similar (More or Less): | miter saw, circular saw, table saw, radial arm saw |
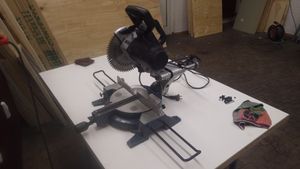
A chop saw is an electric miter saw (BE: mitre saw) and consists of a large circular saw and a sturdy frame. Movement of the saw head is restricted by a sliding rail which can be angled both vertically and horizontally ("compound miter").
For the hand tool capable of making only horizontally angled cuts, see miter saw.
This tool needs some additional upgrades but is already usable for small workpieces.
Safety
Always keep your hands clear of the blade path and use the machine's clamp and the back fence to hold your workpiece in place. Before turning on the power at all, make sure you understand how the saw head will move and double check that all restraints are properly and tightly adjusted.
Blade
Our saw is designed for saw blades measuring 210 × 30 × 2.8 mm (OD × bore × thickness).
The currently installed blade is a "Craftomat" 210 × 30 × 2.5 mm one with 64 carbide-tipped teeth.
Noise & Dirt
If you are not alone, ask the others whether it is okay to cut for a few minutes as they may have to interrupt their project to give you room and to protect their ears. Although the saw is not extremely loud, it is definitely startling when you are surprised by it turning on in your back!
It's advisable to hook up a shop vac for dust extraction as the passive collector bags that typically come with this kind of tool are not too efficient. Even the shop vac will let a lot of sawdust escape.
Maintenance
The blade should be sharpened or replaced when it becomes dull, otherwise using it is very dangerous! Tell a manager if you are noticing any problems, e.g. increased force required to cut your workpieces or poor quality cuts.
Decreased cutting ability can also result from dirt buildup - here are some cleaning instructions.
Potential Upgrades
- The work rests are crap and should be replaced by something, e.g. T-shaped wooden supports, at the proper height (see issue #11).
- It's possible to create a "shadow line" indicating your cut location by carefully positioning an LED right above the blade. [1]
- There is a clamping point on the right side of the blade, but when you actually put the clamp in there the motor will hit it. Could be fixed by adding a compatible hole (or simply another clamp) about 10 cm further to the right...very smart design -.-