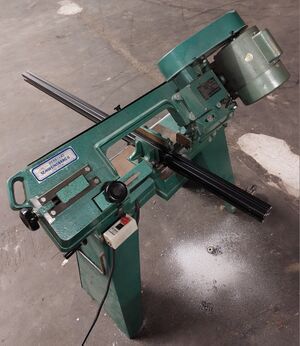
Herkules HMB 4000: Difference between revisions
NitramLegov (talk | contribs) m AssetID |
NitramLegov (talk | contribs) m →Herkules HMB 4000: Location |
||
| Line 8: | Line 8: | ||
|status=available | |status=available | ||
|material=many [[metals]]:<br>[[aluminum]], [[copper]], [[brass]],<br>'''non-hardened''' [[steel]],<br>[[Stainless Steel|stainless steel]] | |material=many [[metals]]:<br>[[aluminum]], [[copper]], [[brass]],<br>'''non-hardened''' [[steel]],<br>[[Stainless Steel|stainless steel]] | ||
|location=[[Location::Metal | |location=[[Location::Hot Metal Area]] | ||
|manual=[https://assets.einhell.com/manuals-pdf/900_368289/hmb-4000.pdf ''DE: assets.einhell.com''] | |manual=[https://assets.einhell.com/manuals-pdf/900_368289/hmb-4000.pdf ''DE: assets.einhell.com''] | ||
|assetid=155|used with=1640 mm(?) [[Bandsaw Blades]] | |assetid=155|used with=1640 mm(?) [[Bandsaw Blades]] | ||
Revision as of 22:27, 12 June 2024
Herkules HMB 4000
| MachineInfoBox Herkules HMB 4000 | |
|---|---|

| |
| Type: | Horizontal Bandsaw |
| Material: | many metals: aluminum, copper, brass, non-hardened steel, stainless steel |
| Used with: | 1640 mm(?) Bandsaw Blades |
| Location: | Hot Metal Area |
| Access Requirements: | Horizontal Bandsaw Introduction |
| Status: | Working |
| Manual: | DE: assets.einhell.com |
| Tutors: | Lukas Pakue Johannes Sebastian |
The exact name of this saw is not found anywhere on the case, but it's certainly a "Herkules HMB" series machine and we're going with model "4000" as the manual we could find comes extremely close at least. A generic name for this machine which is sold by different companies without apparent differences is "4x6 bandsaw".
Specs
- motor: 245 W
- blade speeds: add label on machine, if not already there!
- low: 20 m/min - suitable for stainless steel
- medium 30 m/min - suitable for steel
- high: 50 m/min - suitable for soft metals like aluminum, brass and copper as well as thin steel
- blade length: 1640 mm
- max. blade with: 13 mm
- workpiece dimensions:
- min. width: 6 mm with 10/14 TPI blade
- max. width: 60 mm with 10/14 TPI blade
- max. height: 110 mm
- min. clamped length: 50 mm seems safe (half the front vise width)
- max. length: potentially unlimited as long as you support all heavy sections with worktables
Changing Blades
We will usually only change the blade when it becomes dull to keep this saw well dialed-in. If you have special requirements, please reach out to a tutor!
New blades should be broken in before they can be run at the full feedrate.
A dull sawblade can be identified by eye (broken or chipped teeth, rough cut surfaces), ear (grinding noise), or feel (higher downward pressure required than usual). [1]
If you do need to change the blade, here's a nice video about adjusting a newly installed sawblade. One difference to keep in mind: the screw for tilting the top/front wheel of our machine is not on the outside of the housing, but inside (through the axis).
Upgrades
There is an interesting video series about improving this rather generic machine to a much higher standard.
Let's sum up the main ideas and our progress here:
- replace the standard blade with a bimetal one
- according to the author, 14 tpi is already a bit too fine for many purposes as too many teeth are in the cut at once, but we'll need to see what kinds of tooth ratios are available
- replace certain screws with star knobs/knurled bolts for tool-free tightening?
- replace belt with a better fitting one? apparently, the originals are too thin
- check oil coverage in the gear box? (not shown, but apparently recommended by other online sources - as our machine is a bit old, we should keep this in mind)
- square the table and/or fences?
- after some fiddling with the blade, we got pretty good results with aluminum in initial tests, but we should check the cast quality. Perhaps harder materials will show us we're still a bit off
- change spring bracket for lower balance position?
- easy 180° flip would increase the distance by about 5 cm - would definitely be noticeable! We should do this if it turns out we never use the highest downward pressure (seems likely) or we need to go even lighter than the lowest possible setting
- add 90° stop (along with removing slack from the fixed fence screw: in the video, a bit of shrink tube already does the trick)
- add sliding tray to collect chips (in the video, he just used a simple plastic box lid)
- table for vertical use??
- our saw has the required screw holes, but we should prohibit fiddling with this and keep the two machine types separate!