OpenScan: Difference between revisions
m fixed double redirect Tag: Redirect target changed |
NitramLegov (talk | contribs) m Removed redirect to 3D Scanners#OpenScan Tag: Removed redirect |
||
| Line 1: | Line 1: | ||
==OpenScan== | |||
{{MachineInfoBox | |||
|machine name=OpenScan | |||
|german=3D-Scanner | |||
|image=OpenScan.jpeg | |||
|synonyms=DE: 3D-Scanner, Laserscanner | |||
|type=3D Scanner | |||
|material= | |||
|location=[[Location::3D Printing Area]] | |||
|access=read this section | |||
|status=working | |||
|software= | |||
|manual= | |||
|tutors= | |||
|used with=smartphone | |||
|similar= | |||
}} | |||
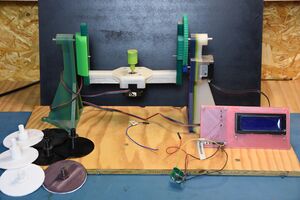
At Make Munich 2019 we met Thomas from the [https://www.openscan.eu/ OpenScan Project]. This project aims to create a cheap 3D scanning solution which can be built by anybody with access to a [[3D Printer|3D printers]] and basic knowledge about electronics and soldering.<br/> | |||
Since Thomas gave a free PCB and the needed electronic components to the CoMakingSpace, we decided to build the scanner. | |||
The PCB design, 3D printed parts and the software are entirely open source and can be accessed on the projects website. | |||
[[Ciaran]] kindly donated the NEMA 17 stepper motors. | |||
===Software Adjustments=== | |||
Unfortunately, the Arduino Sketch provided by the OpenScan Project had a bug which resulted in the camera trigger not being triggered. This was due to the sketch trying to access the variable val4, which was declared at the beginning of the sketch, but never got initialized. | |||
In order to fix the bug, we added <code>val4 = EEPROM.read(44);</code> into the function "AUSLOESEN". | |||
It might be a good idea to refactor the code in general in order to make it more stable. | |||
Due to the uncertain licensing situation, [[Martin]] is currently keeping the adjusted code in a private repository. Once the code is refactored or the licensing becomes clear, the code will be open source as well. | |||
===Usage=== | |||
In order to use the OpenScan, please connect your smartphone to the bluetooth dongle. Please see the two wires labeled "Android" and "iOS" and connect the one fitting to your smartphone to the OpenScan. Afterwards, start the program you want to use and wait until all pictures are taken. | |||
<br clear="all"/> | |||
Revision as of 22:34, 31 August 2022
OpenScan
| MachineInfoBox OpenScan | |
|---|---|

| |
| Synonyms: | DE: 3D-Scanner, Laserscanner |
| Used with: | smartphone |
| Access Requirements: | |
| Tutors: | |
At Make Munich 2019 we met Thomas from the OpenScan Project. This project aims to create a cheap 3D scanning solution which can be built by anybody with access to a 3D printers and basic knowledge about electronics and soldering.
Since Thomas gave a free PCB and the needed electronic components to the CoMakingSpace, we decided to build the scanner.
The PCB design, 3D printed parts and the software are entirely open source and can be accessed on the projects website.
Ciaran kindly donated the NEMA 17 stepper motors.
Software Adjustments
Unfortunately, the Arduino Sketch provided by the OpenScan Project had a bug which resulted in the camera trigger not being triggered. This was due to the sketch trying to access the variable val4, which was declared at the beginning of the sketch, but never got initialized.
In order to fix the bug, we added val4 = EEPROM.read(44); into the function "AUSLOESEN".
It might be a good idea to refactor the code in general in order to make it more stable.
Due to the uncertain licensing situation, Martin is currently keeping the adjusted code in a private repository. Once the code is refactored or the licensing becomes clear, the code will be open source as well.
Usage
In order to use the OpenScan, please connect your smartphone to the bluetooth dongle. Please see the two wires labeled "Android" and "iOS" and connect the one fitting to your smartphone to the OpenScan. Afterwards, start the program you want to use and wait until all pictures are taken.