CNC Mill: Difference between revisions
→EleksMill: Added german translation |
m slightly changed intro to fit real CNC mill |
||
| (5 intermediate revisions by 3 users not shown) | |||
| Line 1: | Line 1: | ||
A CNC mill is similar to a [[CNC Router|CNC router]], but more sturdy and therefore usable for harder materials. Furthermore, it is usually more precise and often designed for smaller workpieces. | |||
A CNC mill is similar to a [[CNC Router|CNC router]], but usually more precise and designed for smaller workpieces. | |||
{{MachineInclusion}} | |||
{{ | |||
}} | |||
[[Category:CNC]] | [[Category:CNC]] | ||
[[Category:Milling]] | [[Category:Milling]] | ||
Latest revision as of 12:57, 6 September 2022
A CNC mill is similar to a CNC router, but more sturdy and therefore usable for harder materials. Furthermore, it is usually more precise and often designed for smaller workpieces.
Kress CNC
| MachineInfoBox Kress CNC Portal Mill | |
|---|---|

| |
| Type: | CNC Mill |
| Material: | wood, metal |
| Used with: | endmills |
| Location: | CNC Area |
| Access Requirements: | CNC Mill Introduction |
| Status: | Working |
| Manual: | Manual of the Controller Board |
| Tutors: | Luzian Sebastian |
| Similar (More or Less): | CNC router |
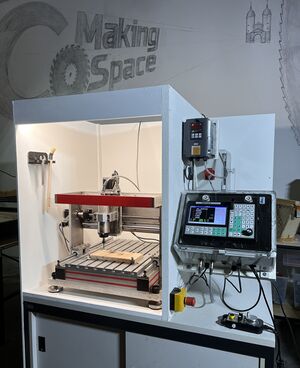
This CNC portal mill was bought used in 2022 from a maker that build and used it to machine aluminum parts for other CNCs. Main features and specs:
- Portal Mill driven by 3 stepper motors (23HS30-2804S)
- 80kg steel & aluminum build, t-slot table
- Spindle: 800w China HF spindle with ER11 collet
- Work area: 300x360x80mm
- Controller: SMC5-5-N-N with jog-wheel
- Power Supply: Meanwell 48V 10A
- Stepper Drivers: 3x Leadshine DM556
Workflow
This is just an overview and does NOT replace the personal introduction!
- Create the tool paths in a suitable CAM software (e.g. Fusion 360)
- Post and export the correct G-code flavor as described below in Fusion 360 Setup
- Home the machine to zero the machine coordinates
- Secure your workpiece on the machine's bed using clamps or a vice screwed to the t-nut table. If you plan on cutting through the workpiece use a spoil board or machine vise
- Insert the appropriate collet & bit as defined in your tool paths
- Set your workpiece zero
- Put on personal protection and turn the spindle on
- Start your job from the USB stick. Always test new code "in the air" before cutting.
Fusion 360 Setup
- In a new set-up, import the machine file from Github
- Edit the machine settings. Under "post processor", import the post file. Make sure to save the post under "local".
The SMC5-N-N-5 processor uses the "mach3" post processor. The one included in Fusion 360 is reported to sometimes cause erratic behavior with this controller. The prepared post on Github is modified to avoid this (add link).
Machine Control
The machine itself is mainly operated by the control panel located on the right side of the machine box and the jog-wheel (SMC5-5-N-N).

Homing the machine: This CNC has no auto-home. Always run the homing operation as first step directly after startup!

Navigation basics:
On the panel, use the XYZ +/- buttons to move the spindle. Always home the spindle at the beginning of your session. If properly homed, softstop settings should prevent the spindle from crashing into the sides of the machine, but navigate with caution. (add info how to change the distance per button press on the panel)
When using the jogwheel, press the button on the left side and then move the wheel. The X1, X10, X100 switch controls how far the spindle moves per click of the wheel. If set to X1, one click is 1/100mm. X10 is 1/10th and at X100 one click moves 1mm.
Zeroing the machine coordinate on the workpiece origin:
-
The coordinate system. Note that the machine zero point is in the top left front corner of the machine and the spindle moves down into the negative Z direction.
-
Carefully move down the tooltip onto the reference plane of your workpiece (usually the surface). Wiggle a piece of paper in between the tooltip and the workpiece and move the head down in 0.1mm or smaller increments until you start to feel the resistance and scratching.
-
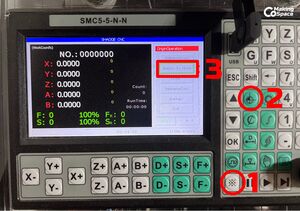
Press the „Coordinate Operation" button (1). Press „Z Auto Zero" to set zero of the work coordinate for Z in the current position.
-
Move the tooltip to the X and Y position that you have set up as your origin in the CAM software.
-
Zero the work coordinates for X and Y by pressing „X Axis Zero" and „Y Axis Zero" (1,2). You have now fully set-up the zero point of the work coordinates to be in line with the origin of your workpiece in CAM.
To load your program, insert USB key with gcode
In the control-panel, select "File-Open" > USB > *.tap file > Open
Make sure the Machine Zero is set-correctly and compare it one more time to your fusion settings.
Are you sure, that the height is correct and you are not cutting into the work table? Are you really sure? Good.
Dust & chip protection: If you are milling metal, position the U-shaped protection box over the work table. If it is wood, also hook up the dust shoe and a vacuum cleaner!
Move your Z Axis up to clearance and start the spindle. Manually adjust the speed.
RUN > Restart starts the program
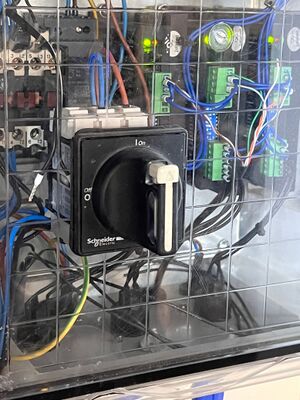
Stop and Emergency Stop: In case of any issues don't hesitate to hit the big emergency stop (cuts all electricity to spindle and stepper motors) or for smaller issues the stop on the jog-wheel (stops the program, moves to home after reset).
After finished, shut down the spindle and wait until it came to a full stop. Be careful: Endmill will be very hot!


