Pyrography Burners: Difference between revisions
NitramLegov (talk | contribs) m switching to a machine and add location and tutors as SMW parameters |
m infobox update |
||
| Line 4: | Line 4: | ||
|synonyms=etching pencil, pyrograph; DE: Brandkolben, Brandmalkolben,<br>Brennkolben, "Brenn-Peter", Elektroschreiber, "Arkograf" | |synonyms=etching pencil, pyrograph; DE: Brandkolben, Brandmalkolben,<br>Brennkolben, "Brenn-Peter", Elektroschreiber, "Arkograf" | ||
|type=power tool | |type=power tool | ||
|access= | |status=needs new tips | ||
|location='' | |access=help us fix it! | ||
|location=''{{£bench}} (until repaired)'' | |||
|material=[[wood]], [[cork]], [[leather]] | |material=[[wood]], [[cork]], [[leather]] | ||
|tutors= | |tutors= | ||
| Line 43: | Line 44: | ||
[[Category:Marking & Measuring]] | [[Category:Marking & Measuring]] | ||
[[Category:Woodworking]] | [[Category:Woodworking]] | ||
Revision as of 08:21, 5 July 2019
| MachineInfoBox Ideal ESH | |
|---|---|

| |
| Synonyms: | etching pencil, pyrograph; DE: Brandkolben, Brandmalkolben, Brennkolben, "Brenn-Peter", Elektroschreiber, "Arkograf" |
| Material: | wood, cork, leather |
| Access Requirements: | The query description has an empty condition.Property "Needs Introduction" (as page type) with input value "The query description has an empty condition." contains invalid characters or is incomplete and therefore can cause unexpected results during a query or annotation process. |
| Tutors: | The query description has an empty condition. |
... further resultsProperty "Has caption" (as page type) with input value "Vertical Bandsaws, Vertical Bandsaws, CNC Router, Mechanical Hand Tool, 3D Printers, 3D Printers, 3D Printers, 3D Printers, 3D Printers, 3D Printers, Oscilloscope, Oscillating Tool, Multimeter, Chop Saw, Wanted:Handheld Belt Sander, Bench Grinders, Bench Grinders, Table Saw, Handheld Circular Saws, Dust Extractors, Dust Extractors, Biscuit Joiner, Chop Saw, Handheld Circular Saws, CNC Router, Compressor, Archived:Corded Drills, Archived:Corded Drills, Cordless Drills, Cordless Disc Grinder, Cordless Drills, Jigsaws, Vice, Lab Power Supplies, Lab Power Supplies, Corded Disc Grinder, Corded Disc Grinder, Wood Lathes, CNC Mill, Wood Lathes, Laser Cutter, Eccentric Sanders, Kitchen Equipment, Chop Saw, Wood Lathe Accessory, Laser Printers, Audio Equipment, Audio Equipment, Wood Lathe Accessory, Wood Lathe Accessory[[:Special:Ask/-5B-5BHas-20Internal-20AssetID::+-5D-5D/-3FHas-20Internal-20Category/mainlabel=-2D/limit=50/offset=50/format=plainlist/link=none/headers=hide/default=Pyrography-20Burners" contains invalid characters or is incomplete and therefore can cause unexpected results during a query or annotation process."{{{assetid}}}" is not a number.|]]
A pyrography burner can be used to burn freehand drawings and small patterns into wood, e.g. for marking or decorational purposes. Using a laser cutter is much easier for intricate designs.
Although it looks much like a soldering iron, please refrain from using the burner for soldering - remains of charred wood in your solder will not exactly improve the connections and remains of solder may taint the pyrography.
Health & Safety
- only solid untreated wood, cork or leather should be burned with this tool as other materials may release harmful fumes (see Wikipedia)
- make sure you have good ventilation even if "your" fumes are not especially harmful
- obviously, the burner gets hot and should not be touched while plugged in or shortly after
- use a metal stand to rest the tool when it is hot
Use
Sketching your design in pencil beforehand is always a good idea, and scribing it with a pricking awl may help you guide the burner along its lines.
Move the burner along its path until you achieved the desired look - the slower, the darker!
Ideal ESH
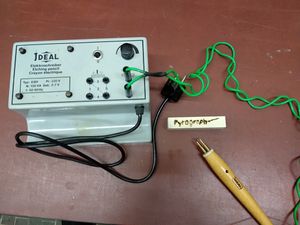
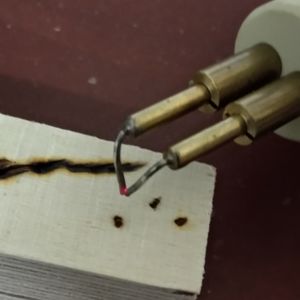
We have one older pyrograph as shown in the picture. You will find a more detailed instruction for this particular model. NOTE: the tungsten wire broke so make sure the ends contact each other.

New tungsten tips for wood pyrography would be nice if we can find them, and perhaps even compatible metal etching tips! They should function similar to a tiny TIG welder, but without the dangerous light. [1]
We don't plan on buying a new burner at the moment because we don't know how often it will be used. If we do need one it will cost us a bit as the screw-in tips of the cheap models don't stay in properly.
Example Project
Some shelves which were decorated with a pyrography burner:

Further Reading
- Wikipedia: Pyrography - inspiration for the really artsy ones; list of inappropriate materials