Micrometer Screw: Difference between revisions
typos, categories |
merged information from "micrometer" page |
||
| Line 2: | Line 2: | ||
|tool name=Micrometer Screw | |tool name=Micrometer Screw | ||
|image=Micrometer25.jpg | |image=Micrometer25.jpg | ||
|synonyms=micrometer screw gauge;<br/>DE: Mikrometerschraube, Bügelmessschraube | |synonyms=micrometer screw gauge;<br/>DE: Mikrometer, Messschraube, Mikrometerschraube,<br>Bügelschraube, Bügelmessschraube | ||
|type=[[measuring]] tool | |type=[[measuring]] tool | ||
|material= | |material= | ||
|used with= | |used with=[[Metal Lathes|metal lathes]] | ||
|location=[[Metal Workshop]] | |location=[[Location::Metal Workshop|metal workshop]] | ||
|access= | |access=read this page | ||
|tutors=[[Luzian]] | |tutors=[[Tutor::User:Luzian|Luzian]] | ||
|manual= | |manual= | ||
|donation= | |donation= | ||
|similar=[[calipers]] | |similar=[[calipers]] | ||
}} | }} | ||
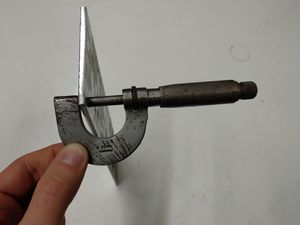
We have an (outside) micrometer in the [[Metal Workshop|metal workshop]]. | |||
Capacity: 25 mm | |||
== Should I Use It? == | == Should I Use It? == | ||
| Line 24: | Line 27: | ||
{{WMC}}[[File:Micrometer no zero error.gif|thumb|left|how to get the reading]] | {{WMC}}[[File:Micrometer no zero error.gif|thumb|left|how to get the reading]] | ||
== Further Reading == | |||
* Wikipedia | |||
** [https://en.wikipedia.org/wiki/Micrometer micrometer (EN)]] | |||
** [https://de.wikipedia.org/wiki/Messschraube ''Messschraube (DE)'']] | |||
[[Category:Marking & Measuring]] | [[Category:Marking & Measuring]] | ||
[[Category:Turning]] | [[Category:Turning]] | ||
Revision as of 22:22, 25 June 2019
| ToolInfoBox Micrometer Screw | |
|---|---|

| |
| Synonyms: | micrometer screw gauge; DE: Mikrometer, Messschraube, Mikrometerschraube, Bügelschraube, Bügelmessschraube |
| Type: | measuring tool |
| Used with: | metal lathes |
| Location: | metal workshop |
| Access Requirements: | read this page |
| Tutors: | Luzian |
| Similar (More or Less): | calipers |
We have an (outside) micrometer in the metal workshop.
Capacity: 25 mm
Should I Use It?
This high precision measuring instrument is very sensitive and isn't very versatile or practical compared to a caliper. The upside to this tool is its precision, up to 1/1000 of a millimeter depending on the specific model. The downsides are the small measuring range (25mm max), the high cost and that it takes a lot of time to screw it open - so depending on what you're measuring it usually doesn't make sense to use this tool. Mostly it is used to measure whether the thickness of something is consistent or to take the exact diameter of a turned piece to make adjustments.
How to Use It
- Place the object you want to measure between the anvil and spindle
- Turn the milled knob until the spindle and anvil lightly touch the object. Do not over tighten the spindle.
In order not to damage the spindle and/or get distorted readings, do not turn on the spindle directly but rather use the milled knob. It has a constant amount of slack and will therefore not allow you to over tighten it. Newer models have a ratchet to allow for even more precision.

Further Reading
- Wikipedia