Project:Lockers: Difference between revisions
(linked first finished SketchUp design) |
m (InfoBox title (why was this last in an alphabetic list, anyway?!)) |
||
| (4 intermediate revisions by the same user not shown) | |||
| Line 1: | Line 1: | ||
{{ProjectInfoBox | {{ProjectInfoBox | ||
|project title= | |project title=Plywood Lockers for our Members | ||
|image=Sketching lockers.PNG | |image=Sketching lockers.PNG | ||
|status= | |status=paused until we run out again | ||
|date=Oct 2017 | |date=Oct 2017 | ||
|initiator={{£}}, [[Ciaran]], [[Patrick]], [[Mitja]] | |initiator={{£}}, [[Ciaran]], [[Patrick]], [[Mitja]] | ||
|team=Ed, [[User:Moritz|Moritz]] | |team=[[User:Ed Green|Ed]], [[User:Moritz|Moritz]], ''Michael'' | ||
|materials=[[plywood]] ("Elliotis pine"), [[Wood Screws|wood screws]],<br>[[Piano Hinges|piano hinges]], [[brackets]] | |materials=[[plywood]] ("Elliotis pine"), [[Wood Screws|wood screws]],<br>[[Piano Hinges|piano hinges]], [[brackets]] | ||
|tools=[[Circular Saw|circular saw]], [[Table Saw|table saw]], [[Smoothing Plane|smoothing plane]],<br>[[sandpaper]], [[Cordless Drill|cordless drill]], [[Surform Plane|surform plane]],<br>[[rasps]], [[Japanese Saw|Japanese saw]] | |tools=[[Handheld Circular Saw|handheld circular saw]], [[Table Saw|table saw]], [[Smoothing Plane|smoothing plane]],<br>[[sandpaper]], [[Cordless Drill|cordless drill]], [[Surform Plane|surform plane]],<br>[[rasps]], [[Japanese Saw|Japanese saw]], [[router]] | ||
|software=[[SketchUp]] | |software=[[SketchUp]] | ||
|cost= | |cost= | ||
}} | }} | ||
We are building a bunch of lockers for our [[Common Room|common room]]! | We are building a bunch of lockers for our [[Common Room|common room]]! Design files created with [[SketchUp|SketchUp "Make"]] can be found [https://github.com/LukasFreeze/lockers here] and are released under the Creative Commons "Attribution - Share Alike - Non-Commercial" license. | ||
== | == V1 == | ||
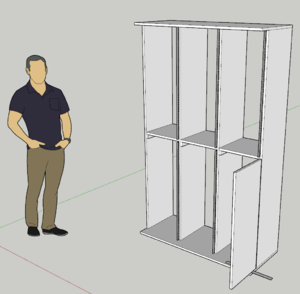
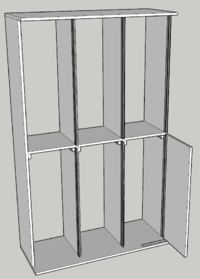
[[File:Vertical approach.PNG|thumb|200 px|left|three lockers across, two up for a total of six per unit]] | [[File:Vertical approach.PNG|thumb|200 px|left|three lockers across, two up for a total of six per unit]] | ||
The first prototype ("v1" | The first prototype ("v1") consists of six lockers arranged in a 3{{x}}2 pattern, all in one frame. The doors are held in place with [[Piano Hinges|piano hinges]]. | ||
This way, we needed rather few individual boards (although pretty large) and got pretty close to the minimum amount of wood needed for lockers this size. | |||
shortcomings: | |||
* cleats holding the floors waste a bit of space | * cleats holding the floors waste a bit of space | ||
* floors need to be secured from top and bottom to avoid tampering | * floors need to be secured from top and bottom to avoid tampering | ||
* warping during the build, hard to get right angles | |||
=== Notes on Construction === | === Notes on Construction === | ||
| Line 32: | Line 29: | ||
<br clear=left> | <br clear=left> | ||
== | == V2 == | ||
[[ | [[User:Moritz|Moritz]] gave some advice for the second unit so the wood would warp less and screws would be used in alternating directions, increasing strength. | ||
[[ | |||
We also made [[Corner Clamping Jigs|corner clamping jigs]] for this build which really helped with getting all the angles right ''(ba-dumm tsss...)'' | |||
improvements: | |||
* boards should pull themselves more straight | |||
* same material consumption as v1, just a smarter arrangement | |||
* more rigid and accurate framework | |||
* fewer cleats needed to hold the floors | |||
shortcomings: | |||
* cleats holding the floors waste a bit of space (less than v1, though) | |||
* ''some'' floors need to be secured from top and bottom to avoid tampering(?) | |||
* floors are not easily removed in case someone wants a double-height locker | |||
<br clear=left> | |||
== V3 == | |||
The third unit was completely designed by Moritz and is raised a bit above the ground to eliminate the danger of a swollen bottom board (due to water from cleaning, for example) that would block the doors. | |||
Another improvement was supposed to be the use of [[Pot Hinges|pot hinges]] rather than piano hinges, but we realized too late that those would have required larger doors. As the doors had already been cut and prepared, we used piano hinges again. | |||
The door edges were nicely rounded over with a [[router]] this time, instead of the simple plane chamfer we made on v1 and v2. | |||
pro: | pro: | ||
* smaller | * raised off the ground, smaller area of contact | ||
shortcomings: | |||
* | * cleats holding the floors waste a bit of space (less than v1, though) | ||
* | * ''some'' floors need to be secured from top and bottom to avoid tampering(?) | ||
* floors are not easily removed in case someone wants a double-height locker | |||
* still no fancy pot hinges | |||
== Latch Hardware == | == Latch Hardware == | ||
Locking is possible by connecting the holes of a [[bracket]] and a matching piece of flat steel, e.g. with a padlock. Members can of course get creative and operate their locker with any number of [https://makezine.com/projects/keep-cabinets-secure-touch-sensitive-lock/ over-engineered fancy setups] ;-) | Locking is possible by connecting the holes of a [[bracket]] and a matching piece of flat steel, e.g. with a padlock. Members can of course get creative and operate their locker with any number of [https://makezine.com/projects/keep-cabinets-secure-touch-sensitive-lock/ over-engineered fancy setups] ;-) | ||
== Hinges == | |||
We originally avoided [[Pot Hinges|pot hinges]] due to their cost but it turns out we just didn't look hard enough! | |||
These may be an option for a future version: [https://www.hornbach.de/shop/SlideOn-Topfscharnier-zum-Aufschrauben-vorliegend/7781517/artikel.html (Hornbach)] - we have them at the Space. | |||
Latest revision as of 21:16, 22 September 2022
| ProjectInfoBox Plywood Lockers for our Members | |
|---|---|

| |
| Status: | paused until we run out again |
| Release Date: | Oct 2017 |
| Initiator: | Lukas, Ciaran, Patrick, Mitja |
| Team: | Ed, Moritz, Michael |
| Materials Used: | plywood ("Elliotis pine"), wood screws, piano hinges, brackets |
| Tools Used: | handheld circular saw, table saw, smoothing plane, sandpaper, cordless drill, surform plane, rasps, Japanese saw, router |
| Software Used: | SketchUp |
We are building a bunch of lockers for our common room! Design files created with SketchUp "Make" can be found here and are released under the Creative Commons "Attribution - Share Alike - Non-Commercial" license.
V1
The first prototype ("v1") consists of six lockers arranged in a 3 × 2 pattern, all in one frame. The doors are held in place with piano hinges.
This way, we needed rather few individual boards (although pretty large) and got pretty close to the minimum amount of wood needed for lockers this size.
shortcomings:
- cleats holding the floors waste a bit of space
- floors need to be secured from top and bottom to avoid tampering
- warping during the build, hard to get right angles
Notes on Construction
The doors should be hung once everything else is in place as the long boards used tend to shift throughout the build. It also turned out that calculated sizes do not always work out as the thickness of the plywood sheets varies by up to 2 mm.
V2
Moritz gave some advice for the second unit so the wood would warp less and screws would be used in alternating directions, increasing strength.
We also made corner clamping jigs for this build which really helped with getting all the angles right (ba-dumm tsss...)
improvements:
- boards should pull themselves more straight
- same material consumption as v1, just a smarter arrangement
- more rigid and accurate framework
- fewer cleats needed to hold the floors
shortcomings:
- cleats holding the floors waste a bit of space (less than v1, though)
- some floors need to be secured from top and bottom to avoid tampering(?)
- floors are not easily removed in case someone wants a double-height locker
V3
The third unit was completely designed by Moritz and is raised a bit above the ground to eliminate the danger of a swollen bottom board (due to water from cleaning, for example) that would block the doors.
Another improvement was supposed to be the use of pot hinges rather than piano hinges, but we realized too late that those would have required larger doors. As the doors had already been cut and prepared, we used piano hinges again.
The door edges were nicely rounded over with a router this time, instead of the simple plane chamfer we made on v1 and v2.
pro:
- raised off the ground, smaller area of contact
shortcomings:
- cleats holding the floors waste a bit of space (less than v1, though)
- some floors need to be secured from top and bottom to avoid tampering(?)
- floors are not easily removed in case someone wants a double-height locker
- still no fancy pot hinges
Latch Hardware
Locking is possible by connecting the holes of a bracket and a matching piece of flat steel, e.g. with a padlock. Members can of course get creative and operate their locker with any number of over-engineered fancy setups ;-)
Hinges
We originally avoided pot hinges due to their cost but it turns out we just didn't look hard enough!
These may be an option for a future version: (Hornbach) - we have them at the Space.
