CNC Router Workholding: Difference between revisions
NitramLegov (talk | contribs) (Created the basic article.) |
NitramLegov (talk | contribs) m (Text replacement - "[[CNC Room" to "[[CNC Area") |
||
| (11 intermediate revisions by 3 users not shown) | |||
| Line 1: | Line 1: | ||
A working [[CNC Router]] will apply strong forces to your workpiece. If it is not properly secured, it can break or even get shot through the room, causing serious damage to the equipment and to you! </ | A working [[CNC Router]] will apply strong forces to your workpiece. If it is not properly secured, it can break or even get shot through the room, causing serious damage to the equipment and to you! <br /> | ||
Therefore, securing your workpiece is a mandatory step before starting a job on the router. For this, multiple techniques exist: | |||
==General== | ==General== | ||
No matter how you choose to secure your workpiece, please think about | No matter how you choose to secure your workpiece, please also think about pieces that can come loose after being cut out. Consider putting tabs or screws at those locations. [[Fusion 360]] supports adding tabs in your [[CAM]] setup.<br /> | ||
Makezine provides a good [https://makezine.com/2017/07/19/keep-your-project-secure-cnc-workholding-techniques/ overview] about different possibilities for properly securing your workpiece. | Makezine provides a good [https://makezine.com/2017/07/19/keep-your-project-secure-cnc-workholding-techniques/ overview] about different possibilities for properly securing your workpiece. | ||
Always make sure to consider the workholding equipment when setting your [[Fusion 360 CAM Parameters|CAM parameters]] - they may stick out quite a bit, and you don't want to cut into metal... | |||
Many of these methods will leave traces on the router's spoilboard - make sure to remove all components and flatten any protrusions in the spoilboard with a [[Chisels (Woodworking) | chisel]] after you are done. | |||
==Screws== | ==Screws== | ||
[[File:CNC workholding - wood screws.JPG|thumb|right|200 px]] | |||
Perhaps the simplest way to attach your workpiece to the spoilboard is driving regular [[Wood Screws|wood screws]] through them. Please ensure you are using screws which are shorter than the spoilboard is thick, otherwise you will be screwing into metal. | |||
Of course the screws will need to be in parts of the workpiece that the router will not cut through, and which you don't want to keep. | |||
==Clamping Claws== | |||
In the [[CNC Area|CNC room]], a set of various sized simple clamping claws ''(Spannpratzen)'' is available, which can be attached to your workpiece. They need to be securely attached to the spoiler board using wood screws and [[washers]], some of which are also available within the CNC room. | |||
In case the clamps break, please 3D print (will be rather weak) or CNC route new ones. You can find the step file on [https://github.com/comakingspace/CommonFiles/tree/master/CNCFiles/Clamps GitHub]. | |||
<gallery> | |||
File:CNC Clamps.jpg | Clamp claws for the CNC router after being cut out. | |||
File:CNC_Clamps_use.jpg | Clamp claw in use to hold down a [[Material:POM|POM]] sheet. | |||
File:clamping claw cross.JPG|A cross-like arrangement of clamping claws secures your workpiece from all four sides. | |||
</gallery> | |||
== Further Ideas == | |||
We haven't tried these options yet, but they might further improve our workholding capabilities: | |||
* [[Machine Vises|machine vise]] (screwed to the spoilboard) | |||
* T-slots in the spoilboard | |||
* [https://www.meusburger.com/EN/GB/workshop-equipment/clamping-equipment/clamping-of-workpieces/mechanical-clamping-elements/hws-122 clamping claws with counterholders] (especially useful for thicker workpieces) | |||
* [https://youtube.com/watch?v=bpJyqLoqV04 DIY clamping claws with counterholders] and [https://youtube.com/watch?v=O-rqf4uSXRE cam levers] by Marius Hornberger - '''very promising & thought through''' | |||
** progress on adding this system to our WorkBee: [https://github.com/comakingspace/do-something/issues/50 issue #50] | |||
[[Category:CNC Routing]] | |||
[[Category:Milling]] | |||
[[Category:Self-Made Tools]] | |||
Latest revision as of 17:19, 29 August 2022
A working CNC Router will apply strong forces to your workpiece. If it is not properly secured, it can break or even get shot through the room, causing serious damage to the equipment and to you!
Therefore, securing your workpiece is a mandatory step before starting a job on the router. For this, multiple techniques exist:
General
No matter how you choose to secure your workpiece, please also think about pieces that can come loose after being cut out. Consider putting tabs or screws at those locations. Fusion 360 supports adding tabs in your CAM setup.
Makezine provides a good overview about different possibilities for properly securing your workpiece.
Always make sure to consider the workholding equipment when setting your CAM parameters - they may stick out quite a bit, and you don't want to cut into metal...
Many of these methods will leave traces on the router's spoilboard - make sure to remove all components and flatten any protrusions in the spoilboard with a chisel after you are done.
Screws

Perhaps the simplest way to attach your workpiece to the spoilboard is driving regular wood screws through them. Please ensure you are using screws which are shorter than the spoilboard is thick, otherwise you will be screwing into metal.
Of course the screws will need to be in parts of the workpiece that the router will not cut through, and which you don't want to keep.
Clamping Claws
In the CNC room, a set of various sized simple clamping claws (Spannpratzen) is available, which can be attached to your workpiece. They need to be securely attached to the spoiler board using wood screws and washers, some of which are also available within the CNC room.
In case the clamps break, please 3D print (will be rather weak) or CNC route new ones. You can find the step file on GitHub.
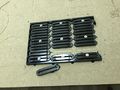
Clamp claws for the CNC router after being cut out.
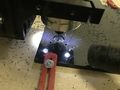
Clamp claw in use to hold down a POM sheet.
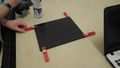
A cross-like arrangement of clamping claws secures your workpiece from all four sides.


Further Ideas
We haven't tried these options yet, but they might further improve our workholding capabilities:
- machine vise (screwed to the spoilboard)
- T-slots in the spoilboard
- clamping claws with counterholders (especially useful for thicker workpieces)
- DIY clamping claws with counterholders and cam levers by Marius Hornberger - very promising & thought through
- progress on adding this system to our WorkBee: issue #50