Project:Laptop Stand: Difference between revisions
m typos |
→V3: Luzian "gave" me the missing photo |
||
| (One intermediate revision by one other user not shown) | |||
| Line 20: | Line 20: | ||
Also, the angle in which the laptop is sitting is too steep and the catches are too small. Therefore the laptop falls off easily when you touch it. <br/> | Also, the angle in which the laptop is sitting is too steep and the catches are too small. Therefore the laptop falls off easily when you touch it. <br/> | ||
The build is not ideal, but making it provided some important lessons which will be incorporated into future verions. | The build is not ideal, but making it provided some important lessons which will be incorporated into future verions. | ||
<br clear=all> | |||
== V2 == | |||
{{ProjectInfoBox | |||
|project title=Laptop Stand V2 | |||
|image=Laptopstand V2.png | |||
|status=discontinued | |||
|date=April 2019 | |||
|initiator= | |||
|team= | |||
|materials=[[PLA]] & [[Aluminum]] | |||
|tools=[[3D Printer]] | |||
|software=[[Fusion 360]] & [[Cura]] | |||
|cost=20h print time | |||
}} | |||
In the 2nd version of the laptop stand [[Luzian]] tried to address all the issues of version 1. The idea was to make the design cleaner and have some space underneath the laptop to store stuff. Also the open sides allow cables to be routed thru. Though after 2 failed prints the build was discontinued. | |||
<br clear=all> | |||
== V3 == | |||
{{ProjectInfoBox | |||
|project title=Laptop Stand V3 | |||
|image=Laptop stand V3.jpg | |||
|status=almost done | |||
|date=April 2019 | |||
|initiator= | |||
|team= | |||
|materials=[[PLA]] & [[Aluminum]] | |||
|tools=[[3D Printer]] | |||
|software=[[Fusion 360]] & [[Cura]] | |||
|cost=15-20$ | |||
}} | |||
As they say: "3rd one is the charm". It's basically a slightly modified version of V2. The differnce being, instead of having to print 2 big parts, it's now split into 6 smaller parts. the rest pretty much stays the same. | |||
[[File:Laptopstand V3 vs V2.png|thumb|left|V3(left) and V2(right)]] | |||
Latest revision as of 09:18, 23 September 2022
Luzian wanted to have a laptop stand since he sits in front of his 13" laptop a few hours a day and looking down on its screen wasn't good for his posture.
V1
| ProjectInfoBox Laptop Stand V1 | |
|---|---|

| |
| Status: | finished |
| Release Date: | 4-2019 |
| Initiator: | Luzian |
| Materials Used: | MDF |
| Tools Used: | Laser Cutter |
| Software Used: | Fusion 360 |
| Approx. Cost: | <10$ |
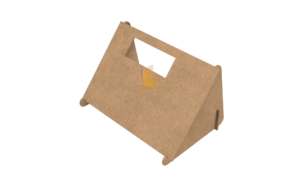
Luzian actually wanted to mill it out of plywood on the CNC Router but then he just used the Laser cutter. The downside of laser cutting was having to clean up the burnt edges which - as you might know if you have used a laser cutter yourself - isn't a lot of fun.
Also, the angle in which the laptop is sitting is too steep and the catches are too small. Therefore the laptop falls off easily when you touch it.
The build is not ideal, but making it provided some important lessons which will be incorporated into future verions.
V2
| ProjectInfoBox Laptop Stand V2 | |
|---|---|

| |
| Status: | discontinued |
| Release Date: | April 2019 |
| Initiator: | |
| Materials Used: | PLA & Aluminum |
| Tools Used: | 3D Printer |
| Software Used: | Fusion 360 & Cura |
| Approx. Cost: | 20h print time |
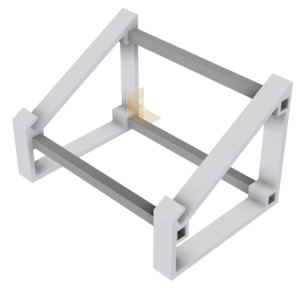
In the 2nd version of the laptop stand Luzian tried to address all the issues of version 1. The idea was to make the design cleaner and have some space underneath the laptop to store stuff. Also the open sides allow cables to be routed thru. Though after 2 failed prints the build was discontinued.
V3
| ProjectInfoBox Laptop Stand V3 | |
|---|---|

| |
| Status: | almost done |
| Release Date: | April 2019 |
| Initiator: | |
| Materials Used: | PLA & Aluminum |
| Tools Used: | 3D Printer |
| Software Used: | Fusion 360 & Cura |
| Approx. Cost: | 15-20$ |
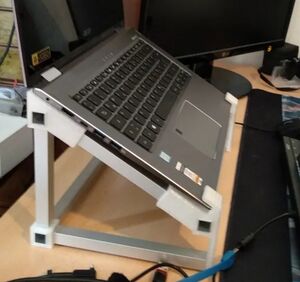
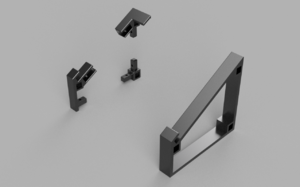
As they say: "3rd one is the charm". It's basically a slightly modified version of V2. The differnce being, instead of having to print 2 big parts, it's now split into 6 smaller parts. the rest pretty much stays the same.
