Project:Mud Kitchen: Difference between revisions
NitramLegov (talk | contribs) First Version Done |
NitramLegov (talk | contribs) m Formatting |
||
| (One intermediate revision by the same user not shown) | |||
| Line 66: | Line 66: | ||
=== Oven === | === Oven === | ||
Since the top of the third sideboard was not needed for building the backplane, it was possible to use it to create an oven door. The door was cut using the table saw and the window was created by using the handheld router. As window glass, acrylic glass has been used (you can cut it to size by using the table saw). Then, the oven door was attached to the mud kitchen with some hinges.<gallery> | Since the top of the third sideboard was not needed for building the backplane, it was possible to use it to create an oven door. The door was cut using the table saw and the window was created by using the handheld router. As window glass, acrylic glass has been used (you can cut it to size by using the table saw). Then, the oven door was attached to the mud kitchen with some hinges. | ||
[[File:Mud Kitchen - Oven 3.mp4|left|thumb]] | |||
<gallery> | |||
File:Mud Kitchen - Oven 1.jpg | File:Mud Kitchen - Oven 1.jpg | ||
File:Mud Kitchen - Oven 2.jpg | File:Mud Kitchen - Oven 2.jpg | ||
</gallery> | </gallery> | ||
<br clear="all"/> | |||
=== "Furniture Feet" === | === "Furniture Feet" === | ||
In order to save the mud kitchen from standing in water during / after rain, some furniture feet were needed. As a basic somewhat water-proof solution, squares have been cut out of leftover texture coated board and screwed onto the bottom of the mud kitchen. | In order to save the mud kitchen from standing in water during / after rain, some furniture feet were needed. As a basic somewhat water-proof solution, squares have been cut out of leftover texture coated board and screwed onto the bottom of the mud kitchen. | ||
Latest revision as of 16:16, 24 April 2022
| ProjectInfoBox Mud Kitchen | |
|---|---|
| |
| Status: | Done |
| Release Date: | Easter 2022 |
| Initiator: | Martin |
| Materials Used: | Wood, Screws, Paint |
| Tools Used: | Router, Cordless Drills, Table Saw, Chop Saw |
| Approx. Cost: | Way too much |
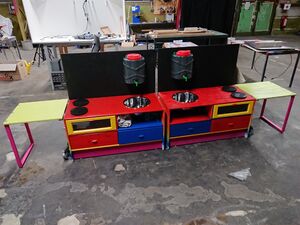
A mud kitchen is basically a play kitchen for kids which is placed on the outside so that kids can freely play with water and sand and "cook" mud. Usually, mud kitchen are made of wood and seem to be fairly basic. There are many explanations available online explaining how to build a mud kitchen from scratch.
The Base
For this version, it was decided to not build it from scratch but to take used wooden sideboards as a base and reuse/-cycle as much as possible. Since two mud kitchens were needed, three sideboards have been bought and used:
Planning & Features
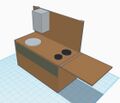
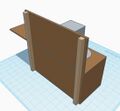
In order to support planning together with the kid and it´s grandma, visual planning was a key feature needed during the planning process. For quick and easy results, Tinkercad has been used as the CAD Tool. As a side-effect, it was also possible to send the visual representation of the mud kitchen to the mother of the kid for approval (pro tip: always ask the parents for approval!)
Planned / required features:
- No direct connection to the garden hose --> Water Tank needed
- Sink unit
- Backplane for attaching the water tank & kitchen tools
- Table on the side
- Wheels for easy movement
- Modular design for easy storage
- Veeeeeery colorful (the kid said "rainbow" when asked about the desired color)
Painting
Since the kitchen is based on existing sideboards, those needed to be re-painted in several colors. For this, the existing paint needed to be removed by sanding first. To make sanding easy, I would recommend to buy grinding grids.
Since the mud kitchen is designed to be used by kids, it was important that the paint fulfills certain certifications such as DIN EN 71-3. Additionally, to make painting a rainbow more easy, I decided to try using spray paint. 2/5 Stars, would not recommend.
While using spray paint for the rainbow parts was fine and really made things easy, the spray paint was by far not enough to paint the entire kitchen. Buying enough spray paint for two entire mud kitchen would have been horribly expensive, so I have switched to regular paint in the mid of the process, which made things significantly easier.
As spray paint, I have used different colors of the water based Dupli-Color Aqua Lack. This was one of the only water-based spray paints I have found which also fulfills DIN En 71-3.
Building
Sink
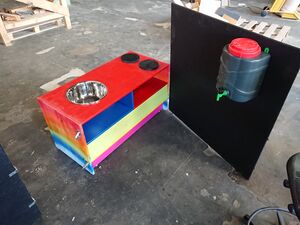
For the sink. a basic round metal bowl has been used. Therefore, a round hole was needed in order to be able to insert the sink bowl into the working area. For this, the circle router jig has been used as an easy option to cut a perfect circle. By cutting a circle large enough to put the sink through and then routing an additional notch which can fit the border of the sink in, it is possible to have a tight fit of the sink while at the same time maintaining the possibility to take the sink out for cleaning.
Cooktops
The cooktops are created very easily. The circle router jig has been used to cut perfect circles from leftover wood found in the workshop. Those have been painted black using spray paint and are now used as cooktops.
Side-Table
The side tables are made of the sides of the third sideboard. Those have plainly been painted in a random color. For stability reason, a rack has been built from leftover battens.
Backplane
For the backplane, the initial plan was to use the top of the third sideboard. Unfortunately, building a mount to attach this to the working area of the mud kitchen in a modular but also stable way was quite hard. Therefore, a new OSB had to been bought. This was painted in black chalkboard paint so that the kids can draw / write on it using chalk. The water tanks are 10 liter tanks which are usually used for camping purposes. The tanks are attached in a very basic way by using screws.
Oven
Since the top of the third sideboard was not needed for building the backplane, it was possible to use it to create an oven door. The door was cut using the table saw and the window was created by using the handheld router. As window glass, acrylic glass has been used (you can cut it to size by using the table saw). Then, the oven door was attached to the mud kitchen with some hinges.
"Furniture Feet"
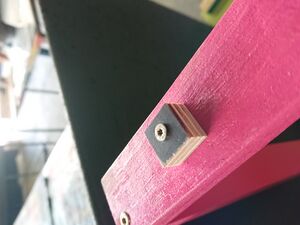
In order to save the mud kitchen from standing in water during / after rain, some furniture feet were needed. As a basic somewhat water-proof solution, squares have been cut out of leftover texture coated board and screwed onto the bottom of the mud kitchen.
Modularity
It is important that the mud kitchen can be easily taken apart for storage during winter. In order to support storage, some modularity features have been added:
- The side table is detachable
- The rack of the side table is detachable
- The mud kitchen has wheels which can be put down when needed
- The entire backplane is detachable
- The water tanks are detachable


