Vertical Bandsaw Introduction: Difference between revisions
(→Safety: explained safeguard(s)) |
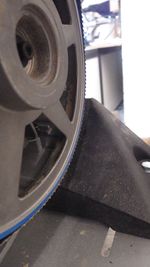
(→Safety: danger zone on the "outside" (photo to follow)) |
||
| Line 34: | Line 34: | ||
* check the blade for cracks, bends or foreign particles before starting | * check the blade for cracks, bends or foreign particles before starting | ||
* lower the top blade guide ''(obere Sägeblattführung'') as close as possible down to the workpiece (about 5 mm) so a snapped blade does not have a lot of space to cause damage in | * lower the top blade guide ''(obere Sägeblattführung'') as close as possible down to the workpiece (about 5 mm) so a snapped blade does not have a lot of space to cause damage in | ||
* avoid having your hands on the "outside" of the blade whenever possible (INSERT PHOTO!) | |||
* carefully tension the blade before every use and release it afterwards | * carefully tension the blade before every use and release it afterwards | ||
* '''immediately''' report and remove a dull blade | * '''immediately''' report and remove a dull blade | ||
Revision as of 05:34, 25 April 2023
This is the content required for an introduction to our bandsaws - reading this does NOT replace the mandatory session with a tutor! It will make it a lot quicker though ;-)
If you need this Introduction, please reach out to the following tutors: Lukas
Let's begin! First off, make sure you have read the machine's manual (see respective "InfoBox" on the machine page).
Safety
(Breathing protection may be required depending on the material)
| Dangers | Precautions |
|---|---|
| entanglement/draw-in hazard |
|
| sharp, quickly moving blade that is only held in place by its own tension |
|
| the blade can bind with the workpiece: there is no splitter as on the table saw |
|
| the sawblade can snap when you pull the workpiece back [1] or the blade is overtightened or dull |
|
| woodworking: a lot of sawdust is generated and can accumulate in the user's lungs or the machine case | use the dust extractor - special caution (breathing protection) when working with toxic woods (e.g. Eiche, Esche, Eibe, Buche, Buchsbaum) or any other dangerous materials! |
| small splinters can fly towards the operator | wear goggles |
| round workpieces can be turned around by the blade | use a stabilizing jig/wedge when sawing round workpieces |
| unsafe disc sander on the Metabo BS 1638 W | DO NOT use this function! A proper disc sander needs a table against kickback, and it's generally a bad idea to use the blade as a mere driving belt |
Suggested Reading
Besides these safety notes, you should know about the different types of bandsaw blades in order to pick the proper one for your project.
Other useful links:
- "Arbeitsschutz Kompakt Nr. 39" der BGHM (DE)
- nice illustration of machine parts and blade guide positioning
- HolzWerken.net: Einstellung der Blattführungen (DE)
Demonstration
The tutor will show you these steps in detail (the order 1-2-3 is important):
- 1) adjusting the blade tension:
- turn the tensioning screw until the indicator points to the width of the blade
- the scale on the saw is usually not very reliable though, so you may want to refine it using the "flutter method"
- wider blades need more tension
- release the tension after you're done using the saw to increase blade lifespan
- turn the tensioning screw until the indicator points to the width of the blade
- 2) check proper tracking on the guide wheels (adjust the top wheel's tilt angle, if necessary)
- the blade should not wander left or right when you turn the wheels by hand. It is OK if the blade slightly oscilates.
- the teeth should not be in contact with the wheels (otherwise, they can be bent)
- flat wheels: blade should run with the teeth extending over the edge
- crowned ("rounded") wheels: blade should run central on crowned wheels ("back" on the high point, teeth free)
- 3) adjusting the blade guides: [2]
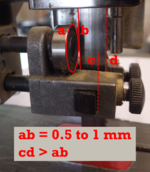
- guide blocks (or bearings in some machines) should lightly touch the back of the blade but not the teeth (you can use the same paper trick as for calibrating a 3D printer or CNC router)
- leave a small gap (0.5-1 mm, about the thickness of a credit card) to the thrust bearing behind the blade
- the distance from the teeth's base to the guide blocks needs to be larger than the gap from the blade's back to the thrust bearing (> 1 mm)
- repeat this with the lower guide
- bring the top guide down to just about 5 mm above your workpiece
- folding a blade for storage
Waiting List
This introduction takes longer than many others and usually can't be done spontaneously during regular opening times. If you would like to receive it, please add yourself to >> this list << and we will find a good time once a few members are on it!


