Project:Festival Radio: Difference between revisions
From CoMakingSpace Wiki
((temporary) cover photo) |
(better photo) |
||
| (4 intermediate revisions by 2 users not shown) | |||
| Line 1: | Line 1: | ||
{{ProjectInfoBox | {{ProjectInfoBox | ||
|project title=Festival Radio | |project title=Festival Radio | ||
|image=festival radio | |image=festival radio battery check.jpg | ||
|status=basic functions implemented, now modding the case | |status=basic functions implemented, now modding the case | ||
|date= | |date=summer 2019 | ||
|initiator={{£}} | |initiator={{£}} | ||
|team=[[Patrick]], [[Martin]] | |team=[[Patrick]], [[Martin]] | ||
| Line 9: | Line 9: | ||
|tools= | |tools= | ||
|software= | |software= | ||
|cost= | |cost=approx. 120 € | ||
}} | }} | ||
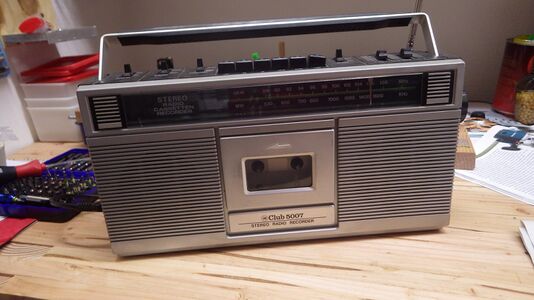
I am turning an old radio (a ''Studio'' Club 5007, but that doesn't really matter) into a digital music player for festivals and garden parties. | I am turning an old radio (a ''Studio'' Club 5007, but that doesn't really matter) into a digital music player for festivals and garden parties. | ||
| Line 15: | Line 15: | ||
Originally I wanted to keep the old radio functions in, but soon scrapped that plan to gain more space for batteries and ease of assembly. | Originally I wanted to keep the old radio functions in, but soon scrapped that plan to gain more space for batteries and ease of assembly. | ||
I was not very experienced with audio, electronics or Raspberry Pi, but was lucky to get help from [[Patrick]] and [[Martin]] with the tricky bits! | |||
== Major Steps == | == Major Steps == | ||
| Line 56: | Line 56: | ||
= MAKE = | = MAKE = | ||
== Gallery == | |||
''coming "soon" - ask if you're interested!'' | |||
<gallery mode=packed heights=200> | |||
File:festival radio 01.JPG|starting point | |||
</gallery> | |||
== Pi Configuration == | == Pi Configuration == | ||
* went with [http://moodeaudio.org/ moOde audio] first as Martin suggested in the [[Project talk:Festival Radio|discussion]] and I quickly found an installation guide for my amp: [https://www.justboom.co/software/configure-justboom-with-moode/ JustBoom.com] | * went with [http://moodeaudio.org/ moOde audio] first as Martin suggested in the [[Project talk:Festival Radio|discussion]] and I quickly found an installation guide for my amp: [https://www.justboom.co/software/configure-justboom-with-moode/ JustBoom.com] | ||
** SD card flashed using [https://www.balena.io/etcher/ Etcher] | ** SD card flashed using [https://www.balena.io/etcher/ Etcher] | ||
** many [https://www.justboom.co/software/ other installation guides] are available as well in case I'll change the software again (next try would probably be the [https://www.justboom.co/software/justboom-player/ JustBoom Player by the board manufacturer], although feature documentation seems to be lacking) | ** many [https://www.justboom.co/software/ other installation guides] are available as well in case I'll change the software again (next try would probably be the [https://www.justboom.co/software/justboom-player/ JustBoom Player by the board manufacturer], although feature documentation seems to be lacking) | ||
* changes to the SD card after flashing the Linux-based image are difficult from my Windows computer | * changes to the SD card after flashing the Linux-based image are difficult from my Windows computer => tried [https://www.bitvise.com/ssh-client-download Bitvise SSH client] for SSH and SFTP access | ||
** [https://www.siteground.com/tutorials/ssh/move-copy/ how to move/copy files] (<code>mv</code>, <code>cp</code>) | |||
** [https://www.computerhope.com/issues/ch000798.htm how to remove full directories] (<code>rm -r mydir</code>) | |||
moOde audio experience: | moOde audio experience: | ||
| Line 69: | Line 78: | ||
* SD cards inserted into the USB OTG card reader are automatically added to the library after setting "Automatically update MPD database on USB insert/remove" to <code>YES</code> | * SD cards inserted into the USB OTG card reader are automatically added to the library after setting "Automatically update MPD database on USB insert/remove" to <code>YES</code> | ||
** removing the SD card in the middle of a song will cause it to continue for a few seconds from RAM, then internal songs start playing -> make sure to put a few "always great" songs onto the remaining space of the internal SD! | ** removing the SD card in the middle of a song will cause it to continue for a few seconds from RAM, then internal songs start playing -> make sure to put a few "always great" songs onto the remaining space of the internal SD! | ||
** BUG: this stopped working reliably after a few uses, perhaps due to hard shutdowns that damaged the SD? | |||
== Hardware Assembly == | == Hardware Assembly == | ||
| Line 87: | Line 97: | ||
* a bit of cooling?? the amp gets quite "warm"... | * a bit of cooling?? the amp gets quite "warm"... | ||
== Raspi Configs== | |||
* Boot config in ''config.txt'': | |||
** Shutdown Pin: <code> dtoverlay=gpio-shutdown,gpio_pin=4,active_low=0,gpio_pull=up </code> | |||
** Enable UART for led: <code> enable_uart=1 </code> | |||
[[Category:Audio]] | [[Category:Audio]] | ||
[[Category:Electronics]] | [[Category:Electronics]] | ||
[[Category:Raspberry Pi]] | [[Category:Raspberry Pi]] | ||
Latest revision as of 09:41, 28 February 2020
| ProjectInfoBox Festival Radio | |
|---|---|

| |
| Status: | basic functions implemented, now modding the case |
| Release Date: | summer 2019 |
| Initiator: | Lukas |
| Team: | Patrick, Martin |
| Materials Used: | old radio, recycled laptop batteries, Raspberry Pi Zero WH + JustBoom Amp HAT; more in the "Shopping List" section |
| Approx. Cost: | approx. 120 € |
I am turning an old radio (a Studio Club 5007, but that doesn't really matter) into a digital music player for festivals and garden parties.
Originally I wanted to keep the old radio functions in, but soon scrapped that plan to gain more space for batteries and ease of assembly.
I was not very experienced with audio, electronics or Raspberry Pi, but was lucky to get help from Patrick and Martin with the tricky bits!
Major Steps
- remove unneeded hardware
- add batteries & charging electronics
- get basic functionality (AP mode & Bluetooth)
- convert the cassette tray into an SD card reader
- find good spots for all components and secure them against shaking (carrying around)
- (optional) display ID3 information about current song somewhere (old tuner scale?)
- (very optional) add a "tuning" feature that biases the shuffle towards certain musical styles (e.g. relaxed - fast - heavy)
Starting Points
- "Make an inexpensive lithium ion battery pack" on Instructables
- patrickweber.info (DE)
- Martin's music box
Shopping List
I got delayed with this project for a bit and wanted to get started quickly, so the sources were selected mainly for speed of delivery, not pricing:
- Raspberry Pi Zero WH
- amplifier board & digital-analog converter: JustBoom Amp Zero pHAT
- power supply considerations:
- Amp: will work fine with 12 V -> the batteries should be selected accordingly!
- Pi: 5 V (output included in the HAT)
- alternatively, it may even be enough to supply power only to the Pi (hack: 12 to 5 V car USB adapter) to save energy & avoid frying the speakers(??)
- charger: 4S battery pack needs 14.4 V (16.8 V max)
- batteries: 3S or 4S lithium pack(s)
- 18650 holders from Patrick
- protection/balancing/charging circuit:
- data input: USB/SD/MicroSD to MicroUSB OTG adapter
- rotary encoder for volume control
- optional: Tuner & Aux In
- would need an ADC to be able to sample the audio signals and output them on the amplifier board
- alternative: an extra AUX amplifier board and switch inputs (e.g. [1])
MAKE
Gallery
coming "soon" - ask if you're interested!
starting point

Pi Configuration
- went with moOde audio first as Martin suggested in the discussion and I quickly found an installation guide for my amp: JustBoom.com
- SD card flashed using Etcher
- many other installation guides are available as well in case I'll change the software again (next try would probably be the JustBoom Player by the board manufacturer, although feature documentation seems to be lacking)
- changes to the SD card after flashing the Linux-based image are difficult from my Windows computer => tried Bitvise SSH client for SSH and SFTP access
- how to move/copy files (
mv,cp) - how to remove full directories (
rm -r mydir)
- how to move/copy files (
moOde audio experience:
- set ALSA volume to 80 % as there is not quite enough power for 100 % (sound cuts out) - this setting prevents user errors
- only efficient for local playback - bluetooth devices can still go too high(?)
- resets to 100 % after every reboot...
- bluetooth functionality was rather easy after finding the appropriate settings (bluetooth "on"/pairing agent "on")
- SD cards inserted into the USB OTG card reader are automatically added to the library after setting "Automatically update MPD database on USB insert/remove" to
YES- removing the SD card in the middle of a song will cause it to continue for a few seconds from RAM, then internal songs start playing -> make sure to put a few "always great" songs onto the remaining space of the internal SD!
- BUG: this stopped working reliably after a few uses, perhaps due to hard shutdowns that damaged the SD?
Hardware Assembly
urgent TODOs:
- come up with a solution to an apparent problem with the battery balancer: needs a charge coming in once before opening the output - problematic when 18650 cells are exchanged with fresh ones and it shuts down
- Patrick had an idea involving a resistor which I can't quite remember :-(
- Patrick idea is to add a resistor (maybe 100 Ohm) between B+ and P+ that can be switched in via a button. This would simulate a charge to the circuit and release it from its lockdown state. Not sure if the voltage on the power in/out side needs to be higher than the current battery voltage. In that case one could use a small battery (like a coin cell) to lift the voltage briefly.
- Patrick had an idea involving a resistor which I can't quite remember :-(
- start using IO pins
- shutdown script for a push button
- volume control (ideally sliding potis from original radio)
- moOde audio has a "use rotary encoder" option to try out: could not get (sliding) potis to work
- moOde's "GPIO button handler" only seems to work for buttons (1 pin per command, nothing as gradual as volume)
- output battery status?
- a bit of cooling?? the amp gets quite "warm"...
Raspi Configs
- Boot config in config.txt:
- Shutdown Pin:
dtoverlay=gpio-shutdown,gpio_pin=4,active_low=0,gpio_pull=up - Enable UART for led:
enable_uart=1
- Shutdown Pin: