Project:Beeswax Wrap: Difference between revisions
(cover photo) |
(photos, finishing up) |
||
| Line 2: | Line 2: | ||
|project title=Wax Cloth to Wrap Food | |project title=Wax Cloth to Wrap Food | ||
|image=wax wrap Vader.JPG | |image=wax wrap Vader.JPG | ||
|status= | |status=all wrapped up (ba-dum tss...) | ||
|date=late 2018 | |date=late 2018 | ||
|initiator=[[Lukas]] | |initiator=[[Lukas]] | ||
|team= | |team=Gesa | ||
|materials=[[Material:Beeswax|beeswax]], kitchen towels (or straight [[fabric]]) | |materials=[[Material:Beeswax|beeswax]], kitchen towels (or straight [[fabric]]) | ||
|tools=[[scissors]], [[flatiron]] ''(Bügeleisen)'' | |tools=[[scissors]], [[flatiron]] ''(Bügeleisen)'' | ||
|software= | |software= | ||
|cost=12 € (fabric) + | |cost=12 € (fabric) + 25 € (wax)<br>for 30 small (20{{x}}20 cm) and 17 large (30{{x}}30 cm) wraps | ||
}} | }} | ||
In order to reduce our use of aluminum foil and cling foil ''(Frischhaltefolie)'' even more, my wife and I want to make some beeswax-impregnated wrapping cloth. It should be affordable and easily made so it can be copied by others and given away as a small present. | In order to reduce our use of aluminum foil and cling foil ''(Frischhaltefolie)'' even more, my wife and I want to make some beeswax-impregnated wrapping cloth. It should be affordable and easily made so it can be copied by others and given away as a small present. | ||
This will not be an overly detailed write-up as there are enough of those out there already, but perhaps someone would like to see what we found out! And feel free to ask questions, of course :-) | |||
== Materials == | == Materials == | ||
* beeswax | * 500 g [[beeswax]] (around 10-15 g per wrap) | ||
** local | ** local option [http://www.heidelberghonig.de/index.php/imkerei/bienenwachs.html HeidelbergHonig]: too off-season to buy raw wax (try it in summer!) | ||
** [https://bio-honig.com/shop/deutsches-bienenwachs/ Bio-Honig.com] (4.90 €/100 g) | ** we went for [https://bio-honig.com/shop/deutsches-bienenwachs/ Bio-Honig.com] (4.90 €/100 g) then | ||
** already mixed with other ingredients | ** you could also buy wax that is already mixed with other ingredients, e.g. from [https://www.avocadostore.de/products/133653-diy-bienenwachstuch-wachsmischung-80g-little-bee-fresh Avocadostore] or [https://wax-wrap.de/shop/diy-klotz Wax-Wrap.de] | ||
* cotton fabric | * cotton [[fabric]] | ||
** | ** this project is great to [[Upcycling|upcycle]] scraps! | ||
** two 140{{x}}60 cm pieces from Stoff-Ideen (Plöck) | ** for the nicer gifts, we also bought two 140{{x}}60 cm pieces from Stoff-Ideen (Plöck) | ||
*** strawberries: 125 g/m² | *** strawberries: 125 g/m² | ||
*** yellow: 131 g/m² | *** yellow: 131 g/m² | ||
*** thickness didn't seem to make a difference in this comparison | |||
<br clear=right> | |||
== Make == | |||
<gallery mode=packed heights=150> | |||
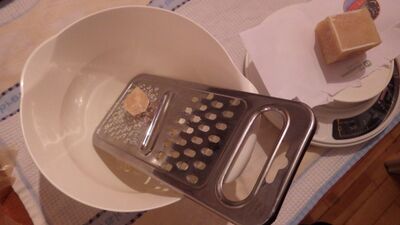
waxwrap1.JPG|first of all, the [[beeswax]] needs to be shredded into workable pieces | |||
waxwrap2.JPG|spread the [[beeswax]] flakes onto a piece of cotton [[fabric]] | |||
waxwrap3.JPG|place the [[beeswax]]-covered [[fabric]] between to sheets of baking paper and use a [[flatiron]] to melt the wax into it | |||
waxwrap4.JPG|the warmth of your hands should now be sufficient to shape your beeswax wrap around pretty much anything - if it doesn't keep its shape, add more wax | |||
waxwrap5.JPG|the finished beeswax wrap can be cleaned with soapy water (not too hot!) | |||
</gallery> | |||
some ironing tips we sometimes learned the hard way: | |||
* we nearly ruined two towels - keep in mind that the baking paper still lets some wax through! | |||
* you might feel like quite a lot of wax needs to go into each piece - the fabric should become stiff enough to softly wave through the air without flapping | |||
* ironing at a low setting should be sufficient | |||
* give the wax some time to cool down before removing the baking paper, or you will pull it right back out of the fabric | |||
* it should be enough to put wax flakes on one side of the fabric, but do iron it from both sides! | |||
== Further Information == | |||
Here's what we researched before starting to make our wax wrap - maybe someone else will find it interesting! | |||
search terms: | search terms: | ||
* Wachstücher/Bienenwachstücher | * Wachstücher/Bienenwachstücher | ||
| Line 40: | Line 62: | ||
* [https://wildwaxtuch.de/ Wildwax Tuch] (still pretty expensive...but sold in some Heidelberg stores) | * [https://wildwaxtuch.de/ Wildwax Tuch] (still pretty expensive...but sold in some Heidelberg stores) | ||
* [https://wax-wrap.de/ Wax Wrap] - also add resin, sell [https://wax-wrap.de/shop/diy-klotz "DIY wax blocks"] | * [https://wax-wrap.de/ Wax Wrap] - also add resin, sell [https://wax-wrap.de/shop/diy-klotz "DIY wax blocks"] | ||
[[Category:Quick Projects]] | |||
[[Category:Upcycling]] | |||
Revision as of 15:17, 17 April 2019
| ProjectInfoBox Wax Cloth to Wrap Food | |
|---|---|

| |
| Status: | all wrapped up (ba-dum tss...) |
| Release Date: | late 2018 |
| Initiator: | Lukas |
| Team: | Gesa |
| Materials Used: | beeswax, kitchen towels (or straight fabric) |
| Tools Used: | scissors, flatiron (Bügeleisen) |
| Approx. Cost: | 12 € (fabric) + 25 € (wax) for 30 small (20 × 20 cm) and 17 large (30 × 30 cm) wraps |
In order to reduce our use of aluminum foil and cling foil (Frischhaltefolie) even more, my wife and I want to make some beeswax-impregnated wrapping cloth. It should be affordable and easily made so it can be copied by others and given away as a small present.
This will not be an overly detailed write-up as there are enough of those out there already, but perhaps someone would like to see what we found out! And feel free to ask questions, of course :-)
Materials
- 500 g beeswax (around 10-15 g per wrap)
- local option HeidelbergHonig: too off-season to buy raw wax (try it in summer!)
- we went for Bio-Honig.com (4.90 €/100 g) then
- you could also buy wax that is already mixed with other ingredients, e.g. from Avocadostore or Wax-Wrap.de
- cotton fabric
- this project is great to upcycle scraps!
- for the nicer gifts, we also bought two 140 × 60 cm pieces from Stoff-Ideen (Plöck)
- strawberries: 125 g/m²
- yellow: 131 g/m²
- thickness didn't seem to make a difference in this comparison
Make
first of all, the beeswax needs to be shredded into workable pieces
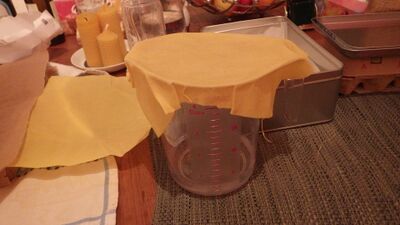
the warmth of your hands should now be sufficient to shape your beeswax wrap around pretty much anything - if it doesn't keep its shape, add more wax
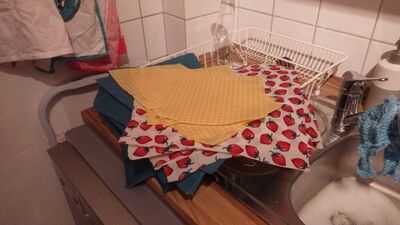
the finished beeswax wrap can be cleaned with soapy water (not too hot!)


some ironing tips we sometimes learned the hard way:
- we nearly ruined two towels - keep in mind that the baking paper still lets some wax through!
- you might feel like quite a lot of wax needs to go into each piece - the fabric should become stiff enough to softly wave through the air without flapping
- ironing at a low setting should be sufficient
- give the wax some time to cool down before removing the baking paper, or you will pull it right back out of the fabric
- it should be enough to put wax flakes on one side of the fabric, but do iron it from both sides!
Further Information
Here's what we researched before starting to make our wax wrap - maybe someone else will find it interesting!
search terms:
- Wachstücher/Bienenwachstücher
- wax wrap
DIY instructions:
- "Beeswax Wrap - Reusable Substitution for Plastic Wrap" on Instructables
- Zerowastefamilie.de - add oil for flexibility?
- Utopia.de
- Wax Wrap "workshops" page - very few details
- Johanna Rundel - hairdryer for final touch, 20 % oil!
commercial options:
- Bee's Wrap (high shipping cost to Germany)
- Wildwax Tuch (still pretty expensive...but sold in some Heidelberg stores)
- Wax Wrap - also add resin, sell "DIY wax blocks"