Airbrush Area: Difference between revisions
No edit summary |
(→Airbrush-Corner Induction: moving to separate page) |
||
| Line 55: | Line 55: | ||
[[File:Airbrush-Assembly.gif|frameless]] | [[File:Airbrush-Assembly.gif|frameless]] | ||
== | == Access == | ||
To use the airbrush area, you need to get an [[Airbrush Introduction|airbrush introduction]]. | |||
[[Category:Facilities]] | [[Category:Facilities]] | ||
Revision as of 00:14, 18 February 2024
This page is INCOMPLETE and still missing some important information before it can be used as a resource. Please use the "Discussion" feature above or talk to one of the tutors if you would like to help improve it. Thanks!
This page is work in progress. We are aiming to open the new airbrush area in February this year.
The airbrush area is located in the electronics room and contains our airbrush related tools and machines. Not just for creating beautiful airbrush art, but also for painting 3D-printed models and other materials. Using an airbrush is easy, fun to learn – and a lot better for the environment than spray cans.
Airbrush Colors
Dedicated airbrush paints are usually water-based acrylic paints, with a milk-like consistency.
Schmincke AERO COLOR is very high quality, and ready-to-use without the need to mix/dilute any further. (Besides their large selection of readymade colors, they even offer instructions or "recipes" on how to mix RAL colour tones). Airbrush paints are very expensive – around €300 per litre(!). But the good news is: even just a 4-5 pipette drops of airbrush paint can go a very long way. Try to get a feel for this (you'll be surprised!), and try not to use too much.
Do not pour unused colour from your airbrush back into the original bottles, as this will contaminate the original colour tone.
You'll find a donation/honesty box in the airbrush corner where you can donate back to our community. As little as €0.50 per session will probably have you covered, even after a long session. (A 30ml bottle costs about €9).
Be careful when using cheap / no-name airbrush-paints, as you may have to thinnen them with a dedicated medium and/or distilled water. The same of course applies to any "non-airbrush" paints. An airbrush is a precision tool, with very fine nozzle diameters ranging between 0.2 and 0.5mm. If your paint is too thick, it will clog your nozzle within a few seconds.
Best case scenario: you'll have to disassemble and clean the airbrush.
Worst case scenario: the clogged nozzle spills paint blobs onto your beautiful piece of art!
If your paint is too thick and you'd like to dilute it with water: please use distilled water, especially for large quantities of paint that you want to store over a longer period of time. (Tap water can contaminate your paint, so it may become moldy / reduce shelf life).
Spray Booth and Air Extraction
Make sure you always have the spray booth's air extractor turned to on to "max Level" (Level 3) when the airbrush is in use (don't forget to use ear protection). The easiest method would be to keep the extractor running throughout your entire session, even if you take a break. That way, you don't forget to turn it on. Always keep the curtain behind you closed. Aerosols can travel for quite a long distance across the room, and we'd like to keep the other equipment free of paint. Once you've finished your session (whilst cleaning the airbrush): keep the air extractor running for a few more minutes and open the curtain and the door, to allow for additional air exchange in the room.
The spray booth we've built should be large enough to accomodate most needs, be it a A1-sized airbrush painting, or a t-shirt, shoes etc.
At the rear of the spray booth, you'll see a metal plate which can be tilted towards you, for a convenient viewing angle. For painting miniature figures / 3D-printed models etc: you'll find a turntable in one of the drawers. Also: Working with the airbrush is a lot more convenient if you lift your model up (to just below eye level). Positive side-effect: This also increases air ectraction efficiency.
How to connect the airbrush to the compressor
To connect the compressor hose to the airbrush, please use the adaptor piece. The compressor will keep its pressure even if no airbrush is connected.
Compressor settings
Cleaning the airbrush
Cleaning is mandatory after every session. Even during a session, be aware that paint can dry quickly and clog the airbrush. If you interrupt your airbrush session even for as little as 5 Minutes: please remove any remaining paint AND rinse the airbrush with water and a few drops of cleaning agent, using the dedicated cleaning jar.
At the end of the session (if no one else wants to continue using the airbrush corner): please clean the airbrush thoroughly, following these instructions: (This should take around 15 Minutes, so don't leave it too late.)
- remove any remaining color from the compartment
- fill the compartment with water and run it through the airbrush (Please use the rinsing jar for this, so to collect all coloured water and residue)
- disconnect airbrush from compressor
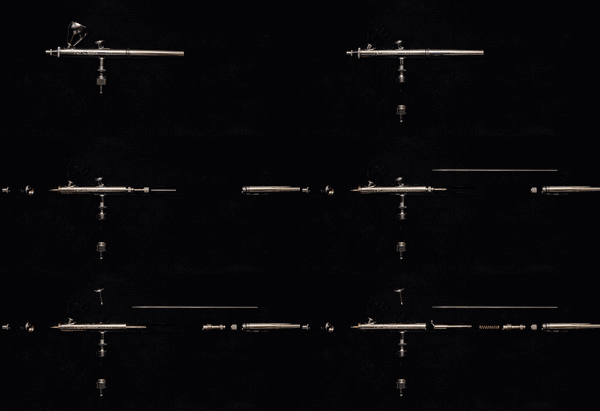
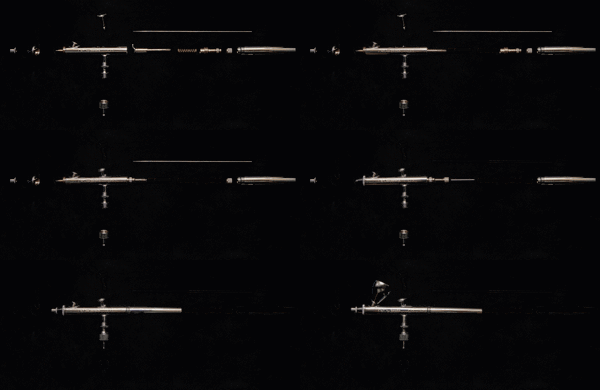
- disassemble the entire airbrush on a large enough and clean surface; make sure no parts fall down, particularly the needle (€15 replacement cost!) – see animated GIF below
- clean all parts, removing ALL visible paint. Please do not use any metal brushes for cleaning.
- reassemble the airbrush and put it back into its case – see animated GIF below
Animated GIFs that show the disassembly and reassembly of our Iwata Neo CN airbrush.
Airbrush disassembly (click image, then on the following page click "open in Media Viewer")
Airbrush reassembly (click image, then on the following page click "open in Media Viewer")
Access
To use the airbrush area, you need to get an airbrush introduction.

