User:Micha: Difference between revisions
From CoMakingSpace Wiki
added screenshot of dithering in Gimp |
Moved laser-engraved photo to its own project page |
||
| Line 39: | Line 39: | ||
** Created a derivative version with [https://www.tinkercad.com/ Autodesk Tinkercad]. Just added more material at the most fragile part. That worked. | ** Created a derivative version with [https://www.tinkercad.com/ Autodesk Tinkercad]. Just added more material at the most fragile part. That worked. | ||
* Laser-cut and engraved stylized paper flowers to put around play-doh containers. | * Laser-cut and engraved stylized paper flowers to put around play-doh containers. | ||
* Laser-engraved photo for the [[Members Wall]]: | * Laser-engraved photo for the [[Members Wall]]: See project page [[Project:Laser-engraved Photo for Members Wall]] | ||
=== in process === | === in process === | ||
Revision as of 17:08, 27 September 2024
about me
Hullo fellow makers!
I'm a computer scientist turned user experience designer living in Nußloch.
Pronouns: he/him
interests
Everything 😅
I'm still exploring the space. I can imagine I'll find a couple of useful things around the household, regarding home automation (mainly Homematic IP right now), musical instruments (bass guitar / guitar) or repairing electronics. Or anything that leads to some cool or fun stuff for my kids (5 and 7 years old).
Besides that, feel free to chat with me about Terry Pratchett, politics, computer games, management, parenting... really about anything but soccer or beer.
projects
done:
- A laser-cut of my daughter's name for the door of her new room.
- Steps:
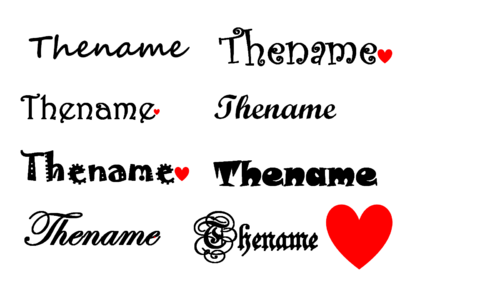
- Use PowerPoint to create samples of my daughter's name in different fonts.
- Have multiple rounds of voting on her favorite representations of her name to find her favorite one. Of course, she picked the most fancy-looking and curly font (see screenshot):
- Convert winner name to SVG.
- Import in Inkscape, add a border.
- Export as DXF (on the same machine as PPT, Inkscape so it knows the font).
- Try out a few ways to cut this into a piece of poplar plywood (4mm):
- Cut: the centers of the letters are not connected to anything so they fall out. Doesn't look good.
- Engraving the name gives a nice result (cut the border, of course). Just some smoke resdiue on the surface.
- To remove discoloring around the name, sand the surface with some sand paper (by hand).
- Further options: Paint or spray or give a finish in some other way.
- Steps:
- Laser-cut product logo into a piece of 4mm plywood. It's about A3 size and can be used to draw the complex logo onto a whiteboard or flipchart.
- Laser-cut stylized christmas tree ornaments with product logo.
- Laser Cutter: A more or less 3D robot to be put together during a treasure hunt at my daughter's birthday party.
- Designed in Autodesk Fusion (after the fantastic Seminar here in the space).
- Exported to DXF files via the free plug-in DXF for Laser. Exported all relevant faces individually.
- Use File Drop to get (zipped) files to Laser PC.
- 3D printed broken Flowbee adapter
- First with original version by daschi. It was almost robust enough with 100% infill and PLA - almost ;-)
- Created a derivative version with Autodesk Tinkercad. Just added more material at the most fragile part. That worked.
- Laser-cut and engraved stylized paper flowers to put around play-doh containers.
- Laser-engraved photo for the Members Wall: See project page Project:Laser-engraved Photo for Members Wall
in process
- "Unicorn" game based on designs that my daughter and I made.
ideas
- Several contraptions to put multiple prints of photos on a concrete wall without drilling holes for each and every one of them.
- Maybe several picture frames as well.
- Our family name as a sign on the outside wall next to our front door. There are already holes there from the previous owner which I could use to attach it to the insulation.
- more to come 🤓
machines I've had an introduction to
contact me
You can reach me via Special:EmailUser/Micha.
