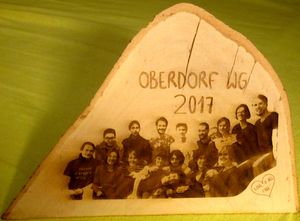
Laser Engraving Photos: Difference between revisions
Add dithering photo preparation and add info about using making tape on the material. |
add some ideas for acrylic glas |
||
| (3 intermediate revisions by one other user not shown) | |||
| Line 8: | Line 8: | ||
** the lighter and more uniform, the better - [[Poplar Plywood|poplar plywood]] works pretty well, for example | ** the lighter and more uniform, the better - [[Poplar Plywood|poplar plywood]] works pretty well, for example | ||
** the grain will take away some detail and you can't really go higher than 300 dpi, but this material adds a very unique character | ** the grain will take away some detail and you can't really go higher than 300 dpi, but this material adds a very unique character | ||
** can also be 3D engraved if you | ** can also be 3D engraved with different shades of brown | ||
*** putting masking tape (there is a huge roll in the eRoom) on the wood may reduce smoke residues, but keep in mind you'll to peel off many tiny pieces depending on your design. With the tape you need to add a little power or reduce the speed. Run a test to make sure your engraving goes through the tape! | |||
* [[Acrylic Glass|acrylic glass]] | |||
** if you engrave a mirrored version of the photo from the back of the (thin) workpiece you get a glossy surface, but still see a nice 3D effect | |||
** smoke residues can be washed off with soapy water | |||
** lighting the finished piece from the side can give cool effects | |||
** it may be a good idea to put tape on the surface to minimize white shadows around edges. Especially for text, because it looks really ugly. On pictures however, it is not necessary and may even look nice, just make sure to tape around the edges of the picture | |||
** text and symbols can be colored with [[Fill-In Paint|fill-in paint]] | |||
** you can also try to engrave the picture and the text on different sides. This way, you can put text or symbols behind the picture and color them. Just flip the acrylic glass around and make sure to keep it in the same position | |||
* the steps below ''should'' also work with: | * the steps below ''should'' also work with: | ||
** [[metals]] (with a [[Laser Marking Spray|marking spray]]) | ** [[metals]] (with a [[Laser Marking Spray|marking spray]]) | ||
| Line 15: | Line 25: | ||
== Photo Preparation == | == Photo Preparation == | ||
=== | Different methods are available depending on the desired result: | ||
* it's very important to convert your photo to grayscale (desaturate) and brighten it (e.g. using [[GIMP]] or [[Photoshop]]) - people have to look like ghosts | |||
=== Grayscale/Dithering Method === | |||
[[File:Grayscale canoe on wood.jpg|thumb|grayscale engraved canoe on [[Poplar Plywood|poplar plywood]]]] | |||
* it's very important to convert your photo to grayscale (desaturate) and brighten it (e.g. using [[GIMP]] or [[Photoshop]]) - people have to look like ghosts! | |||
** this is because your substrate, unlike white paper, will likely make everything darker | ** this is because your substrate, unlike white paper, will likely make everything darker | ||
* use the filter "unsharp mask" (''unscharf maskieren'') to | * use the filter "unsharp mask" (''unscharf maskieren'') to exaggerate contours | ||
* use "dither" (without adding color!) to get lots of dots which will preserve the photo gray scale somewhat as it will set more dots in the darker areas and less in lighter ones | * use "dither" (without adding color!) to get lots of dots which will preserve the photo gray scale somewhat as it will set more dots in the darker areas and less in lighter ones | ||
* (optional, but beneficial in many cases) remove the background or at least make it even fainter than the part of the photo you are interested in | * (optional, but beneficial in many cases) remove the background or at least make it even fainter than the part of the photo you are interested in | ||
* (optional) add text or a frame for cutting the photo out of the wooden plate | * (optional) add text or a frame for cutting the photo out of the wooden plate | ||
** if you apply different colors for the text or the frame, cutting software (e.g. Visicut) will easily distinguish between them | ** if you apply different colors for the text or the frame, cutting software (e.g. [[Lasercut 5.3]] or [[Visicut]]) will easily distinguish between them | ||
** "cut everything" applied to a raster image will automatically cut it at its border | ** Visicut: "cut everything" applied to a raster image will automatically cut it at its border | ||
'' | * proceed with '''[[#Raster Engraving|raster engraving]]''' | ||
=== | ''If you are interested in more details, please let [[Lukas]] know and he will do his best to finally add some example pictures...'' | ||
Even though Inkscape is targeted at creating and editing vector graphics, it can also handle other image formats such as png. | |||
===Posterization Method=== | |||
[[File:3D engraved logos on wood.jpg|thumb|right|3D engraved logos; posterized photos are similar]] | |||
Even though [[Inkscape]] is targeted at creating and editing vector graphics, it can also handle other image formats such as png. | |||
In order to prepare an image for laser engraving, you will need to add a filter to it. To do so, please import the image into inkscape (Datei/File --> Importieren/Import). Afterwards, select the image and apply the filter you like. | In order to prepare an image for laser engraving, you will need to add a filter to it. To do so, please import the image into inkscape (Datei/File --> Importieren/Import). Afterwards, select the image and apply the filter you like. | ||
| Line 34: | Line 52: | ||
You will need to change the filter settings afterwards. Therefore, make sure you can see the filter editor on the right side. If you cannot see it, select Filter --> Filtereditor from the menu. | You will need to change the filter settings afterwards. Therefore, make sure you can see the filter editor on the right side. If you cannot see it, select Filter --> Filtereditor from the menu. | ||
The first thing to change is the size of the filter in the general | The first thing to change is the size of the filter in the general filter settings. In order to apply the filter to your entire image, but not more, please set the coordinates to 0 and the dimensions to 1,0. If you do not do this, Inkscape will put a black border around your image during exporting! | ||
<pre style="color: red"> TODO: Add Examples for Basic Drawing, Lithographic Filter and Drawing Filter. </pre> | <pre style="color: red"> TODO: Add Examples for Basic Drawing, Lithographic Filter and Drawing Filter. </pre> | ||
Proceed with [[#Raster Engraving|'''raster engraving''']] or [[#3D Engraving|'''3D engraving''']] | |||
''If you are interested in more details, please let {{NL}} know.'' | ''If you are interested in more details, please let {{NL}} know.'' | ||
=== | ===Native [[LaserCut 5.3]] Options=== | ||
''If you are interested in more details, please let {{NL}} know.'' | ''If you are interested in more details, please let {{NL}} know.'' | ||
== Engraving == | == Engraving == | ||
When it comes to the actual engraving, there are two options: raster (pretty universal) or 3D (for materials that can also be cut by the laser). | When it comes to the actual engraving, there are two options: raster (pretty universal) or 3D (for materials that can also be cut by the laser). | ||
== Raster Engraving === | |||
* open the prepared file in [[Visicut]] or another laser cutting program and apply the appropriate engraving settings for the chosen material as usual | * open the prepared file in [[Visicut]] or another laser cutting program and apply the appropriate engraving settings for the chosen material as usual | ||
* repeat with different dithering settings until you're happy: | * repeat with different dithering settings until you're happy: | ||
| Line 68: | Line 85: | ||
** even though [[User:Fabian|Fabian]] likes the outcome he would recommend using a slightly higher speed (maybe 15-20) which would not burn too deep into the wood and result in a brighter photo | ** even though [[User:Fabian|Fabian]] likes the outcome he would recommend using a slightly higher speed (maybe 15-20) which would not burn too deep into the wood and result in a brighter photo | ||
[[File:Laser 3d engraved Photo.jpg|left|thumb|Close-up of | [[File:Laser 3d engraved Photo.jpg|left|thumb|Close-up of [[Fabian]]'s 3D engraved photo|400px]] | ||
Latest revision as of 13:15, 25 September 2024

Engraving photos on various materials can be an awesome alternative to just printing them on paper!
Here are some tips for creating beautiful laser engraved pictures.
Choice of Materials
- wood/plywood
- the lighter and more uniform, the better - poplar plywood works pretty well, for example
- the grain will take away some detail and you can't really go higher than 300 dpi, but this material adds a very unique character
- can also be 3D engraved with different shades of brown
- putting masking tape (there is a huge roll in the eRoom) on the wood may reduce smoke residues, but keep in mind you'll to peel off many tiny pieces depending on your design. With the tape you need to add a little power or reduce the speed. Run a test to make sure your engraving goes through the tape!
- acrylic glass
- if you engrave a mirrored version of the photo from the back of the (thin) workpiece you get a glossy surface, but still see a nice 3D effect
- smoke residues can be washed off with soapy water
- lighting the finished piece from the side can give cool effects
- it may be a good idea to put tape on the surface to minimize white shadows around edges. Especially for text, because it looks really ugly. On pictures however, it is not necessary and may even look nice, just make sure to tape around the edges of the picture
- text and symbols can be colored with fill-in paint
- you can also try to engrave the picture and the text on different sides. This way, you can put text or symbols behind the picture and color them. Just flip the acrylic glass around and make sure to keep it in the same position
- the steps below should also work with:
- metals (with a marking spray)
- dark marble or granite (becomes brighter, so invert your photo before engraving)
- glass?
Photo Preparation
Different methods are available depending on the desired result:
Grayscale/Dithering Method

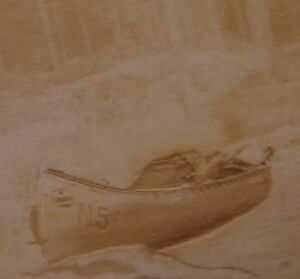
- it's very important to convert your photo to grayscale (desaturate) and brighten it (e.g. using GIMP or Photoshop) - people have to look like ghosts!
- this is because your substrate, unlike white paper, will likely make everything darker
- use the filter "unsharp mask" (unscharf maskieren) to exaggerate contours
- use "dither" (without adding color!) to get lots of dots which will preserve the photo gray scale somewhat as it will set more dots in the darker areas and less in lighter ones
- (optional, but beneficial in many cases) remove the background or at least make it even fainter than the part of the photo you are interested in
- (optional) add text or a frame for cutting the photo out of the wooden plate
- if you apply different colors for the text or the frame, cutting software (e.g. Lasercut 5.3 or Visicut) will easily distinguish between them
- Visicut: "cut everything" applied to a raster image will automatically cut it at its border
- proceed with raster engraving
If you are interested in more details, please let Lukas know and he will do his best to finally add some example pictures...
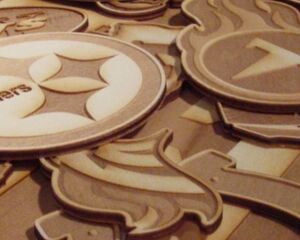
Posterization Method

Even though Inkscape is targeted at creating and editing vector graphics, it can also handle other image formats such as png.
In order to prepare an image for laser engraving, you will need to add a filter to it. To do so, please import the image into inkscape (Datei/File --> Importieren/Import). Afterwards, select the image and apply the filter you like.
You will need to change the filter settings afterwards. Therefore, make sure you can see the filter editor on the right side. If you cannot see it, select Filter --> Filtereditor from the menu.
The first thing to change is the size of the filter in the general filter settings. In order to apply the filter to your entire image, but not more, please set the coordinates to 0 and the dimensions to 1,0. If you do not do this, Inkscape will put a black border around your image during exporting!
TODO: Add Examples for Basic Drawing, Lithographic Filter and Drawing Filter.
Proceed with raster engraving or 3D engraving
If you are interested in more details, please let Martin know.
Native LaserCut 5.3 Options
If you are interested in more details, please let Martin know.
Engraving
When it comes to the actual engraving, there are two options: raster (pretty universal) or 3D (for materials that can also be cut by the laser).
Raster Engraving =
- open the prepared file in Visicut or another laser cutting program and apply the appropriate engraving settings for the chosen material as usual
- repeat with different dithering settings until you're happy:
- check that you don't have large areas that are to be engraved completely or areas without engraving, but varying densities of points everywhere
- zoom in on a critical area with high contrast - eyes are nice for that - and check again
- if you can't get good results, go back to editing the photo (e.g. equalizing brightness of critical areas)
- (if you haven't edited the background) try to estimate how well the background is separated from the main part of the photo, i.e. is there a clear difference in point density?
- if not, think about removing or altering the background again
- fire up the laser and admire your work!
3D Engraving
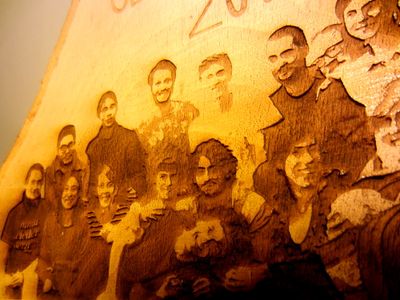
Depending on what wood you are planning to use, the laser cutter settings may vary a lot. If your wood is somehow valuable or you only have one chance to get it right, it is advisable to give it a test run on a similar piece of scrap wood or cheaper plywood.
- make sure to set the focus right
- for engraving the piece of wood shown below, the following settings were chosen on an Epilog LEGEND (40 W):
- Power 100; Engrave: Speed 100; 3D Engrave: Speed 10
- even though Fabian likes the outcome he would recommend using a slightly higher speed (maybe 15-20) which would not burn too deep into the wood and result in a brighter photo
