Circle Router Jig: Difference between revisions
(→Rectangles: added photo) |
(→Rectangles: more disadvantages for copying ring mode) |
||
| Line 25: | Line 25: | ||
** ''please double-check, not tested!'' <code>inside<sub>(jig)</sub> = inside<sub>(hole/recess)</sub> + copying ring diameter - router bit diameter</code> | ** ''please double-check, not tested!'' <code>inside<sub>(jig)</sub> = inside<sub>(hole/recess)</sub> + copying ring diameter - router bit diameter</code> | ||
** advantages: even guidance no matter how you turn the router, also works close to the workpiece's edge | ** advantages: even guidance no matter how you turn the router, also works close to the workpiece's edge | ||
** disadvantages: harder to clamp down loss of routable depth, only possible if copying ring is flatter than the jig | ** disadvantages: harder to clamp the jig down without obstructing the machine, loss of routable depth, corner radius = copying ring radius (larger), only possible if copying ring is flatter than the jig | ||
Then, make sure to '''[[clamp]] the jig down securely''' before starting your cut and you'll get great results! | Then, make sure to '''[[clamp]] the jig down securely''' before starting your cut and you'll get great results! | ||
Revision as of 14:48, 26 February 2020
When you're routing a hole or recess and want precision, freehanding is not an option. CNC routing may work, but takes a lot of preparation for a one-time cut - so your best option may be a router jig!
Rectangles
| ToolInfoBox Rectangle Router Jig | |
|---|---|

| |
| Synonyms: | adjustable rectangle routing template |
| Type: | guidance jig |
| Used with: | clamps, TX 30 key or screwdriver; router, copying rings (optional) |
| Location: | next to router table |
| Access Requirements: | read this page |
| Tutors: | Lukas |
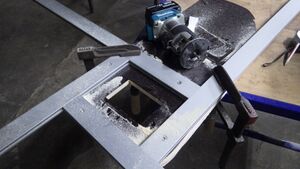
We have some very handy flat aluminum extrusions that Lukas saved from the trash because of their jig potential: they can interlock with each other at 90 degrees at any length!
Before assembly, you will need to calculate the desired inside measurement. This depends on the way you'll use it:
- using a router within the jig:
inside(jig) = inside(hole/recess) + router base diameter - router bit diameter- advantages: maximum depth usable, corner radius = bit radius
- disadvantage: large enough workpiece area needs to be availabe (easier with a palm router), router bases are usually not evenly round
- using a router with copying ring on top of the jig
- please double-check, not tested!
inside(jig) = inside(hole/recess) + copying ring diameter - router bit diameter - advantages: even guidance no matter how you turn the router, also works close to the workpiece's edge
- disadvantages: harder to clamp the jig down without obstructing the machine, loss of routable depth, corner radius = copying ring radius (larger), only possible if copying ring is flatter than the jig
- please double-check, not tested!
Then, make sure to clamp the jig down securely before starting your cut and you'll get great results!
Future Improvements
- it would be very handy to keep a dedicated Torx key in the same place as the jig
- maybe we could add precise rulers for easier setup - e.g. glued on or engraved somehow?
- the jig should be marked so potential users find this page ;-)
Circles
small circle jigs may be included with some routers, let's check and add them here!
self-built options: look for "circle routing jig" or "Fräszirkel" online!