Project:SUSPENsion Board: Difference between revisions
added a gallery of the building process |
m categories |
||
| (One intermediate revision by one other user not shown) | |||
| Line 1: | Line 1: | ||
{{ProjectInfoBox | |||
|project title=SUSPENsion Board | |||
|image=SUSPENsion Board Done.jpeg | |||
|status=done | |||
|date=Dec18 | |||
|initiator={{P}} | |||
|team= | |||
|materials=Eucalyptus wood, Valchromat,<br> | |||
aluminium, copper pipe, steel,<br> | |||
polycarbonate, lacquer | |||
|tools=[[CNC Router]], [[Table Saw]],<br> | |||
[[Eccentric Sander]], [[3D Printer]] | |||
|software=[[Fusion 360]], [[bCNC]] | |||
|cost= | |||
}} | |||
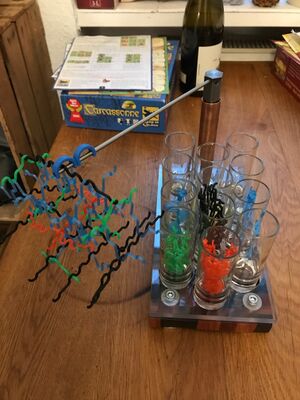
At the open day 2018 [[Lukas]] showed a board game he [https://www.thingiverse.com/thing:3106784 made], based on an American board game SUSPENsion. I wanted to recreate something similar for a Christmas present, but the board should also be useable as a shot glass stand. | At the open day 2018 [[Lukas]] showed a board game he [https://www.thingiverse.com/thing:3106784 made], based on an American board game SUSPENsion. I wanted to recreate something similar for a Christmas present, but the board should also be useable as a shot glass stand. | ||
| Line 55: | Line 71: | ||
File:SUSPENsion Board Stand.jpeg | File:SUSPENsion Board Stand.jpeg | ||
</gallery> | </gallery> | ||
[[Category:3D Printing]] | |||
[[Category:Toys & Games]] | |||
[[Category:Woodworking]] | |||
Latest revision as of 10:30, 25 January 2019
| ProjectInfoBox SUSPENsion Board | |
|---|---|

| |
| Status: | done |
| Release Date: | Dec18 |
| Initiator: | Patrick |
| Materials Used: | Eucalyptus wood, Valchromat, aluminium, copper pipe, steel, |
| Tools Used: | CNC Router, Table Saw, |
| Software Used: | Fusion 360, bCNC |
At the open day 2018 Lukas showed a board game he made, based on an American board game SUSPENsion. I wanted to recreate something similar for a Christmas present, but the board should also be useable as a shot glass stand.
Parts
Base Board
The wooden board is made from leftover pieces of eucalyptus wood and 19mm black Valchromat, which is basically like stained MDF.
The wood was cut in 20mm strips on the circular saw and then glued with waterproof wood glue. This step is repeated in the opposite direction to result in a checkerboard pattern. As the pieces of wood had different thicknesses the pattern doesn't match up exactly, therefore I shifted it slightly to get a diagonal pattern made from the black and red squares.
After the glue had set I sanded the surfaces with 80/120/240 grid sand paper using the Eccentric Sanders. Due to the Valchromat being much softer than the eucalyptus wood, a nice wave pattern was created on the surface.
On the CNC Router pockets were cut out for mounting and the shot glasses. Afterwards the board was coated with silk matt lacquer 4 times with light sanding steps in between.
Polycarbonate Plate
The transparent PC plate was also cut on the CNC Router creating the holes for the glasses to go through and mounting the feed. The edges were broken with a handheld deburer. This also removes any residues that were left from routing.
Aluminium Feet
The feet were turned from 7075 aluminium rest pieces from another project. They were drilled and tapped to accept a M6 bolt for mounting.
Stand
The stand is made from four pieces; an aluminium foot, copper pipe, steel head and a titanium rood to hang the SUSPENsion pieces.
Foot
It is similarly made as the the feet for the board from leftover 7075 aluminium.
Copper pipe
The copper pipe was cut with a handsaw and squared up on the lathe. When doing this be aware of the copper binding on the lathe tool and coming out of the chuck.
Steel head
The head was turned from hex stock machining steel to fit a small ball bearing. 3 4mm holes were also drilled at different angles to accept the titanium rod to result in different heights to play at.
For assembly the foot was glued and the head pressed into the the copper pipe.
SUSPENsion pieces
They were 3D printed with UniCoFil filament from Lukas 3D model.
Shot Glasses
From Amazon.
Assembly
The feet were glued to the board using 5min epoxy and levelled on a table to make sure the board doesn't wobble. Afterwards the PC plate was screwed to the board with M6 cap screws.


