Project:CamperVan
This is the project page for a camper van called Lala Safari (lala = sleep, safari = travel). We tried to document the process. Make sure to check out our Instagram profile.
| ProjectInfoBox Camper Van | |
|---|---|

| |
| Status: | In Progress |
| Release Date: | September 2021 (started November 2020) |
| Initiator: | Steffi and Markus |
| Materials Used: | Wood |
Motivation
We rented a camper van for one week and had a great road trip in switzerland. This was the start for us to think about owning a camper van. We like building and designing stuff and so we thought: let's go.
Planning a Camper Van
Planning is a very important part of the process. You will buy a car, you will use it for some time and you have to live with all the decision you make. So take your time and think twice before building or buying the wrong stuff.
Vehicle Types

There are a lot of options but basically 3 types are relevant:
- Small transporters like Defender 110 or Volkswagen TX (where x is a number between 1 and 7) or Volkswagen Caddy or Volkswagen Sharan or something similar by any other manufacturer. You cannot stand upright in those vehicles except you install something like a roof tent.
- Medium transporters like Mercedes Sprinter, Fiat Ducato, Peugeot Boxer, Citroen Jumper. You can buy those cars in different sizes. Typically the names are like L1H1 (Length 1 and Height 1) which is the smallest option with a loading space of 2,67m (length) x 1,87m (width) x 1,66m (height) (Fiat Ducato) and L5H3 which is the largest option with a loading space of 4,07m (length) x 1,87m (width) x 2,17m (height). So there may be vehicles in which you are easily able to stand upright.
- Large Transporters like Renault TRM 2000, Mercedes Unimog 404 or 1300L or any other really big vehicle. You will almost always need a special driver license in germany for those cars.
Once you make up your mind you will have to decide between a fairly new vehicle or an oldtimer. We bought Peugeot Boxer L2H2 from 2016 which was in a good condition and is not that big. We still want to drive on small streets leading to nice mountains.
The Layout
The layout is very essential for your build. Our build has a fixed bed. A very good video with all pros and cons for fixed bed vs dinette: https://www.youtube.com/watch?v=Zz1fBVYK_2c&ab_channel=VanlifeSagas
Finding and Buying a Vehicle
Often you can find a van like a Peugeot Boxer from electricians or other craftsman. Typically you need to search in the news paper, mobile.de, autoscout24.de etc.
Beware: Try to buy your used car from a official dealer or from a private person. Used-car dealers often do not have any clue about the car and its condition. Sometimes they will even deny you the implied warranty. They just wanna earn quick money.
We bought our van from a official Peugeot dealer. We even got a one year guarantee in Europe.
Insurance and Registration
Plan your Build


Tools you will need
Probably at least:
Stuff you have to buy
- lots of screws (stainless steel is recommended)
- glue like dekasyl ms-5 (polymer power glue, uv resistant, seals and glues)
- wood
- etc.
Building the Camper Van
Clean-up and Rust Prevention
First of all we cleaned the van. We were very lucky. The vendor offered was still interested in the existing interior (brackets, floor plate, rails...). So he offered to buy the stuff. Hence the van was already empty. So our steps were:
- cleaning with water and dish detergent
- locating rust
- removing the rust with the grinder
- applying metal protection (Hammerite)
We had only a few rusty spots. So the work was done within 1 or 2 days.
Setting up the Floor
One of our highest priorities for the van is the usable height inside. We want at least 1.88m of height in the van. So we needed to build our floor construction as low as possible. The floor of the van is not flat. The lower section are 20mm (estimated) lower than the higher sections. Between the alternating sections there is a space of 50mm (estimated). There perfect fit were wood (spruce) laths 18x45mm.
We glued the laths to the floor of the car with dekasyl ms-5 which is a polymer power glue. It will probably hold as good as with screws and we will not have any holes in the car which may cause rust. Since the glue sits between the metal floor and the laths (about 2mm of glue) this is also a good way to protect the wood from the cold metal.
Our floor is then a 9mm sheet of coated plywood.
-
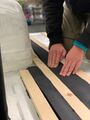
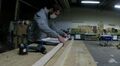
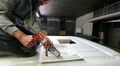
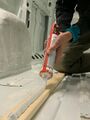 Adding glue to the lathes
 -
 Adding glue to the lathes / 2
 -
 Caulking gun which you can use with your drill. Very good tool for such a task!
 -
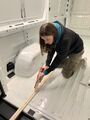
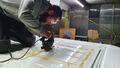
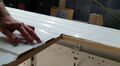
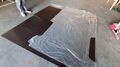 The foil is a our template for the van floor.
 -
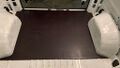 First promising results
 -
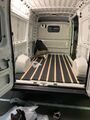
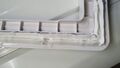
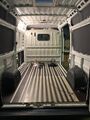 Finished! We marked the position of out lathes with tape


We needed 9 cartridges of dekasyl. We really recommend to use a good caulking gun for this task. As you can see in the pictures we first used the very simple one. We then upgraded then to a caulking gun which works with drills. We were at least 4 times faster with this method and our hands were fine...
Insulation
This is a very special topic. There are very different opinion how a camper van should be isolated:
- not at all
- wool or other natural material
- styrodur and a moisture barrier
- armaflex
The option to use no insulation at all was never an option for us. We want to use the van also in cold climates (Norway in september/october....) and we believe that some kind of insulation will at least help use to keep the existing warmth inside. But you need to be aware that it is not easy to insulate a van. There are a lot of holes which you cannot reach and it is also quite common for this kind of vehicle, that there are holes which will lead condensed water out of the vehicle.
We used armaflex since it is easy to handle (you can buy it with in a self-adhesive version), pretty much hydrophobic and hardly inflammable. There are different types of armaflex. We used armaflex xg which has almost the same quality attributes as the superior, and very expensive, armaflex af. Do not use armaflex ace since it is kind of an old version of the material.
There are different sizes available. We used 19mm for the floor, ceiling and most of the walls. We also used 9mm for those parts which we will cover with wood.
You can cut armaflex very easy with a sharp box cutter.
-
 We cutted lanes of armaflex for our floor. Make sure you clean the surface (with alcohol or something else) before you stick the armaflex to it.
 -
 Progress...
 -
 Floor already done. This took us about 2.5 hours
 -
 For big parts like the dividing wall it is our recommendation to divide and conquer. It is much easier to handle.
 -
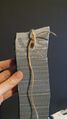 For regions where you cannot put your hand in and reach the adhesive foil: use some cord and tie it to the adhesive foil. You can then use to remove the foil once your armaflex piece is in place.


Windows
The van has two rear windows, one in each of door. Additionally we wanted two roof windows and one side window.
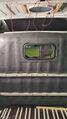
Roof Windows with and without Fan
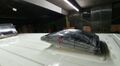
The first roof window is placed over the bed, which is located in the back of the van. The second one is placed over the kitchen, which is located near the dividing wall in the front of the van.
This window over the bed is a simple window with an opening of 40x40cm. The one over the kitchen is a window with an electrical fan with an integrated rain cover. So we can use the fan also when it is raining. It can blow air inside the vehicle or suck the air out of the vehicle. We plan to use it as a hood for our cooking fumes.
-
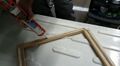
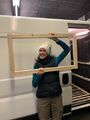
 We needed to build a wood frame for the windows
 -
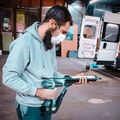
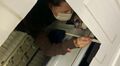
 Cutting a hole in the roof of the van for the window. Make sure to use saw blades for metal.
 -
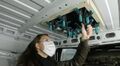
 Drilling the holes for the window. We can later screw the window through the roof the van to our wood frame.
 -
 We had to drill some hills to mount the window. So we also added rust protection.
 -
 We glued the wood frame to the ceiling of the van
 -
 We glued the wood frame to the ceiling of the van / 2
 -
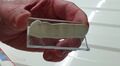 The roof of the van is also not flat (like the floor), so we used acryl glass and glue as a leveling compound.
 -
 Mounting the acryl glass to the van
 -
 adding glue to the window
 -
 glue added to the window
 -
 mouting the window in the hole
 -
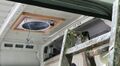 the mounted window
 -
 both windows are mounted


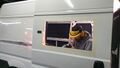
Side Window
For the side window we cut a hole of 90x45cm in the sliding door of the van. The window (CARBEST elegance 900 x 450 mm) also needed a wooden frame like the windows for the roof. We added the window since we wanted to have more light in the van.
-
 The wooden frame for the side window
 -
 cutting the hole for the side window in the sliding door
 -
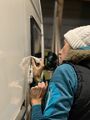 cleaning up the black glue from the sliding door. Make sure to use tape, then it is much easier to clean up the excessive glue.

