Project:ArcadeMachine
| ProjectInfoBox Arcade Machine | |
|---|---|

| |
| Status: | Completed |
| Release Date: | 2023-11-1 |
| Initiator: | Lorenz |
| Materials Used: | MDF, Framing Lumber, Electronics |
| Tools Used: | Handheld Circular Saws, Chop Saw, Handheld Routers, |
| Software Used: | FreeCAD 0.19 |
| Approx. Cost: | ~700 € |
This was my first project.
This page is also not finished, yet.
Introduction
The idea is to build an Arcade Machine also known as Arcade Cabinet. Think of an old Pac-Man machine. "Insert Coin"... "New Player"... that kind of stuff.
I designed the cabinet in two parts. An upper part that houses the computer, the buttons and joysticks, the screen, and the speakers. The bottom part is is just the support to bring the upper part to the right height and then also serves as storage. The two parts are held together by four screws.
The cabinet is almost completely build from 16mm MDF and with the exception of the bezel around the screen which is only 3mm. Since MDF is not well suited for being screwed together and I put 24mm x 48mm framing lumber in the corners to screw into.
For the electronics I wanted a Raspberry Pi 4 but unfortunately due to the current (2023) chip shortage this is not readily available or only at unreasonably inflated prices. As an alternative I bought a Raspberry Pi 400 which is essentially the same hardware in a different form factor with a heat sink and a keyboard for the same price tag. And it has the great advantage that it is readily available from several vendors. Including a 5.1V 3A USB-C power supply, a micro HDMI to HDMI cable and a 128 GB micro SD card this set me back ~100 €.
The screen is a ASUS 24" (VK248H) that I picked up from ebay-kleinanzeigen for 20€.
The buttons and joysticks I bought an amazon from EG-STARTS as a 2 player kit which comes with 2 joysticks 20 buttons and the electronics to connect it via USB all together for 50€.
...to be continued.
Materials List
| ID | Quantity | Description | Source | Total Price |
|---|---|---|---|---|
| Support Cabinet | ||||
| 2 | MDF 1100x1000x16 mm | Bauhaus | 50 € | |
| 1 | MDF 1400x800x16 mm | Bauhaus | 20 € | |
| 4 | Framing Lumber 2000x24x48 mm | Bauhaus | 8 € | |
| 2 | Pot Hinge with built-in damper; full-overlay (Innenanschlag) | amazon.de | 11 € | |
| 4 | Rubber feet; 38x10 mm | amazon.de | 7 € | |
| 4 | Gewindeschrauben 25x6 mm + Unterlegscheiben + Muttern | Bauhaus | <1 € | |
| 4 | Gewindeschrauben; 80x6 mm | Bauhaus | <1 € | |
| 3 | MDF-Foundation Paint white (375ml) | Bauhaus | 36 € | |
| 1 | MDF-Paint black (750ml) | Bauhaus | 22 € | |
| Arcade Cabinet | ||||
| 3 | MDF 800x600x16 mm | Bauhaus | 32 € | |
| 3 | MDF 820x525x16 mm | Bauhaus | 29 € | |
| 1 | MDF 800x600x3 mm | Bauhaus | 4 € | |
| 5 | Framing Lumber 2000x24x48 mm | Bauhaus | 8 € | |
| 4 | Kistenverschluss | amazon.de | 6 € | |
| 2 | Hinges | Bauhaus | 5 € | |
| 4 | Rubber feet; 38x10 mm | amazon.de | 7 € | |
| 4 | Gewindeschrauben 25x6 mm + Unterlegscheiben + Muttern | Bauhaus | <1 € | |
| 6 | T-Molding | arcadexpress.com | 25 € | |
| 1 | MDF-Foundation Paint white (750ml) | Bauhaus | 22 € | |
| 1 | MDF-Paint black (750ml) | Bauhaus | 22 € | |
| Electronics | ||||
| 1 | ED-STARTS Arcade Kit: 2xJoystick; 20xButtons; 2xUSB encoder | amazon.de | 50 € | |
| 1 | Screen; ASUS 24" (VK248H) | ebay-kleinanzeigen.de | 20 € | |
| 1 | RaspberryPi 400 | welectron.com | 90 € | |
| 1 | USB-C PSU 5.1V / 3A | welectron.com | 8 € | |
| 1 | SanDisk Ultra microSD 128 GB | welectron.com | 14 € | |
| 1 | Micro-HDMI to HDMI Kabel | welectron.com | 6 € | |
| 1 | Micro-HDMI to HDMI Adapter | amazon.de | 8 € | |
| 1 | 4-Port USB 3 Hub | amazon.de | 8 € | |
| 1 | USB 3 & HDMI extension Dash Panel | amazon.de | 15 € | |
| 2 | USB 3 extension Dash Panel | amazon.de | 22 € | |
| 1 | Externe USB Soundkarte | amazon.de | 10 € | |
| 1 | Speakers (Creative Pebble v2) | amazon.de | 22 € | |
| 1 | USB power supply | amazon.de | 6 € | |
| 1 | Multi-Socket | Bauhaus | 3 € | |
| 1 | Kaltgerätekabel (unten gewinkelt) | amazon.de | 7 € | |
| 1 | Power switch | amazon.de | 8 € | |
| Other | ||||
| 500 | Screws 4x35 mm; partial threaded | Bauhaus | 20 € | |
| 1 | T-Slot router bit set | amazon.de | 27 € | |
| 1 | Pinselset | Bauhaus | 7 € | |
| 1 | Pinselreiniger (500ml) | Bauhaus | 5 € | |
| 1 | Lackierroller | Bauhaus | 4 € | |
Log Book
Day 1
- Buying materials:
- 2x MDF 1100x1000x16 mm
- 1x MDF 1400x800x16 mm
- 4x Framing Lumber 2000x24x48 mm
- 500 Screws 4x35 mm partial threaded
- Instructions for Reciprocating Saw
Day 2
- Marking cut lines on the boards
- Instruction for handheld circular saw
Day 3
- Cutting boards with handheld circular saw
- Instructions for 3D printer, drill, and handheld router
Day 4
- Marking points for drilling holes.
- Drill holes with cordless drill.
Day 5
- Instructions for handheld sander
- Instructions for laser cutter
- Finish drilling holes with cordless drill.
Day 6
- Sanding Framing Lumber with Eccentric Sander.
- Cut Framing Lumber to length with Jigsaw.
Day 7
- Drill pilot holes into framing lumber.
- Cut corners from middle shelf to make room for rear framing timber.
- Start test assembly to check whether everything fits together.
- Middle shelf and Top shelf are slightly to wide. Need to take of 1 mm from each side.
Day 8
- shorten middle and top shelf with handheld circular saw.
- Experiment with 35mm Forstner drill for pot hinges. Turns out the 16 mm MDF is too thin and the tip of the drill but pokes through. Solution was to not drill all the way and scrape some material out with a chisel. The MDF is soft enough to make this a viable option.
Day 8
- Finish pot hinges. Drill pilot holes on corpus
- Disasemble test assembley. All parts of the framing support were made unique by sawing off certain corners so that the cabinet can be reassembled with the parts in the correct location in case they are not 100% the same.
- Drill 44mm hole in back wall to allow cables to be passed through.
Day 9
- Paint 4 walls (side walls, door and back) of support cabinet with foundation
Day 10
- Buy MDF plates for arcade cabinet.
- Start measuring and cutting.
Day ...
Day 3718
The machine is finished!
Lessons learned
As I mentioned in the introduction, this was my first ever project. Therefore, some of these "lessons learned" might be obvious to more experienced makers but might be helpful for novices like myself.
- Painting
- Don't use a brush. Use a roll. It is much faster, uses less paint (cheaper), and the result looks better (more even). I did not see a downside to it.
- There are two different types of paint; Water-based and solvent-based. Use the water based one. The solvent-based paint stinks and you need special brush cleaner (Pinselreiniger) which classifies as "special waste" (Sondermüll). Furthermore, it takes several hours for the paint to dry. The water-based paint on the other hand can be cleaned with warm water and soap and it dries in 30 to 60 minutes.
- Have a plan how and where to dry the work pieces. First I dried them in an upright position. This created ugly dripping marks. I also didn't have a good rig so I could only work on three boards at a time. The time it took to build a better drying rig was definitely worth it and saved me a lot of time in the log run.
- Make sure to wipe the surface clean with a damp cloth and let it dry before painting. If the surface is dusty (and the CoMakingSpace is very dusty) the paint will peel of easily. Lightly sand the surfaces (and again wipe them) between coatings.
- T-Molding
- The T-Molding looks frickin' awesome! It really makes the arcade machine look authentic. Totally worth the effort.
- There is U-Molding and T-Molding. I can't really comment on the looks of U-Molding. I hear it is easier to install but might not look as good. Personally, I was afraid of having the edge on the front where your wrists are going to rest. That is why I went for the more authentic T-Molding.
- To install the T-Molding I used a 1.8mm T-slot router bit. The manufacturer recommended between 2mm and 2.5mm but 1.8mm seems to have also worked. I hope this won't cause the MDF to split at some point in the future.
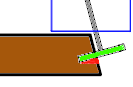
- The hand rest is angles at 10° but I wanted the T-modling to be flush with the but of the edge which means the routing should happen at an 80° or 100° angle to the surface. For this I used the Makita DRT50 with the angled edge attachment. BUT CAREFUL! In this setup you must not cut into the board from the front! You must cut into the board from the side! Otherwise your slot will be much bigger than the 1.8mm. I tried to illustrate this in this diagram:
- I put in some wood glue into the slot before putting in the T-Molding.
- Use a hammer and a piece of wood (to dampen the blows from the hammer) to get the T-Molding into the slot. In the concave corners I used broomstick and a hammer. This worked quite well.
- The PacMan and Ghosts on the front are 3D printed (a friend printed them so I don't have the model) and glued to the arcade machine.
- The Mario vs Sonic sticker is from Etsy.com
