Project:Container on Rollers: Difference between revisions
From CoMakingSpace Wiki
m (Lukas moved page Project:Container on roles to Project:Container on Rollers without leaving a redirect: typo) |
|||
| (2 intermediate revisions by one other user not shown) | |||
| Line 5: | Line 5: | ||
|status= finished | |status= finished | ||
|date= November 2021 | |date= November 2021 | ||
|initiator= Hanna | |initiator= [[User:Hanna|Hanna]] | ||
|cost= ~215€ (+50€ on tools): | |cost= ~215€ (+50€ on tools): | ||
* 154€ Wood | * 154€ Wood | ||
| Line 14: | Line 14: | ||
}} | }} | ||
[[File:Screenshot 2021-11-09 at 10.37.54.png|thumb]]After buying a new desk with a wild oak plate I needed a wild oak container on roles for under the desk. | [[File:Screenshot 2021-11-09 at 10.37.54.png|thumb|alt=|none]]After buying a new desk with a wild oak plate I needed a wild oak container on roles for under the desk. | ||
Couldn’t find any suitable ones online and a custom made one was too expensive and also not 100% according to my idea (invisible roles). So I decided to create one myself. | Couldn’t find any suitable ones online and a custom made one was too expensive and also not 100% according to my idea (invisible roles). So I decided to create one myself. | ||
<br clear="all" /> | |||
<gallery mode="slideshow"> | |||
File:Container on roles.png|The finished container on its roles | |||
File:6 finished body.jpg|The finished body before inserting the drawers | |||
File:6 roles.jpg|The invisible roles the container is standing on | |||
</gallery> | |||
==Building Process== | ==Building Process== | ||
# Draw a sketch of the container and calculate needed wood. I used glued wild oak panels (Leimholzplatten) from Bauhaus. I decided to put the base plate inside the container so that the roles will be hidden at the end and the container “floating” over the floor. | |||
#Saw the wood panels for the two sides, back, top, bottom, shelf, and front (two parts for the door and drawer) with the plunge saw [[File:2 wood panels.jpg|thumb|alt=|none]] | |||
#Add holes for srews with an undercover Jig into the bottom, sides and back. From outside the screws will not be visible.<br> [[File:Step 3) - undercover Jig.jpg|thumb|alt=|none]] <br clear="left"> | |||
[[File:2 wood panels.jpg|thumb]] | #Drill lines of holes all with the same depth and distance to both side plates, so that the shelf inside the container can be moved in height later.<br> [[File:4 holes.jpg|thumb|alt=|none]] | ||
#Before assembling, sand all parts (tip: do one more sanding round with slightly moistened wood to make it extra smooth) and oil it. | |||
[[File:Step 3) - undercover Jig.jpg|thumb]] <br clear="left"> | #Assemble all parts, start with sides, back and top and add the bottom when wheels have already been attached to make sure it has the perfect height. | ||
#Add the hinge to the door. Invest in a cheap template to know exactly where to drill the whole in the wood (Forstner Bohrersatz). | |||
[[File:4 holes.jpg|thumb]] | #Build the drawer but buy the drawer rail first to know the exact widths of the rails which needs to be considered for the width of the drawer.<br>[[File:8 drawer.jpg|thumb|alt=|none]] | ||
#Add the front to the finished drawer when the drawer is already in the drawer rails.[[File:9 drawer and door.jpg|thumb|alt=|none]] | |||
[[File:8 drawer.jpg|thumb]] | |||
[[File:9 drawer and door.jpg|thumb]] | |||
Latest revision as of 21:19, 22 September 2022
| ProjectInfoBox Wooden container on roles for desk | |
|---|---|

| |
| Status: | finished |
| Release Date: | November 2021 |
| Initiator: | Hanna |
| Approx. Cost: | ~215€ (+50€ on tools):
|

After buying a new desk with a wild oak plate I needed a wild oak container on roles for under the desk.
Couldn’t find any suitable ones online and a custom made one was too expensive and also not 100% according to my idea (invisible roles). So I decided to create one myself.
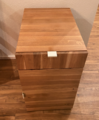
The finished container on its roles
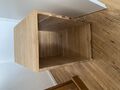
The finished body before inserting the drawers
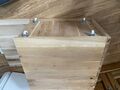
The invisible roles the container is standing on


Building Process
- Draw a sketch of the container and calculate needed wood. I used glued wild oak panels (Leimholzplatten) from Bauhaus. I decided to put the base plate inside the container so that the roles will be hidden at the end and the container “floating” over the floor.
- Saw the wood panels for the two sides, back, top, bottom, shelf, and front (two parts for the door and drawer) with the plunge saw
- Add holes for srews with an undercover Jig into the bottom, sides and back. From outside the screws will not be visible.
- Drill lines of holes all with the same depth and distance to both side plates, so that the shelf inside the container can be moved in height later.
- Before assembling, sand all parts (tip: do one more sanding round with slightly moistened wood to make it extra smooth) and oil it.
- Assemble all parts, start with sides, back and top and add the bottom when wheels have already been attached to make sure it has the perfect height.
- Add the hinge to the door. Invest in a cheap template to know exactly where to drill the whole in the wood (Forstner Bohrersatz).
- Build the drawer but buy the drawer rail first to know the exact widths of the rails which needs to be considered for the width of the drawer.
- Add the front to the finished drawer when the drawer is already in the drawer rails.

_-_undercover_Jig.jpg)


