Project:Cello Lamp: Difference between revisions
m (thinner box) |
m (Category:Lighting) |
||
| (8 intermediate revisions by 2 users not shown) | |||
| Line 1: | Line 1: | ||
{{ProjectInfoBox | {{ProjectInfoBox | ||
|project title= | |project title= Cello Lamp | ||
|image= | |image=Cello Lamp 2.jpg | ||
|status= | |status= finished | ||
|date= | |date= July 2019 | ||
|initiator= Hanna | |initiator= Hanna | ||
|cost= ~208€: | |||
|cost= | |||
* 120€ used cello | * 120€ used cello | ||
* 35€ lampshade | * 35€ lampshade | ||
* 33€ HUE smart light bulb | * 33€ HUE smart light bulb | ||
* ~ | * ~20€ for cable, light fitting, glue etc. | ||
}} | }} | ||
==Building Process== | |||
Following steps have been performed to transform a cello into a lamp:<br> | |||
1) Prepare cello by removing tail piece, bridge, strings and pegs <br> | |||
2) Separate the fingerboard from the cello neck with a [[Japanese Saws|Japanese saw]] <br> | |||
[[File:Step 2.jpg|x300px|left]] <br clear=left> | |||
3) Cut a groove into the cello neck (e.g. with [[Rotary Rasps|rotary rasps]]) for the cable <br> | |||
[[File:Step 3.jpg|x300px|left]] <br clear=left> | |||
4) Drill a hole in the cello scroll, pull the cable through and tuck in the light fitting <br> | |||
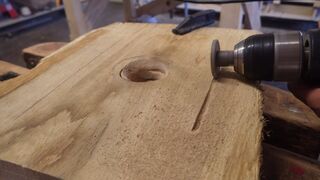
5) Drill a hole in the cello body directly at the lower end of the neck and at the lowest body part connecting to the stand and pull the cable through <br> | |||
[[File:Step 5.jpg|x300px|left]] <br clear=left> | |||
6) Glue the fingerboard back on the cello neck (cable hidden inside) – I used a [[Polyurethane Glue|polyurethane glue]], which expands when applied <br> | |||
[[File:Step 6.jpg|x300px|left]] <br clear=left> | |||
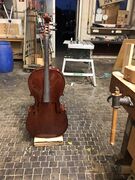
7) Build the stand out of different layers of wood (in this case 3 layers of wild oak) <br> | |||
<gallery mode="packed-hover"> | |||
File:Step 7.jpg|Drill holes to fit the tailgut | |||
File:Step 7a.jpg|Remove the endpin of the cello and replace it with a screw to securely connect cello and stand | |||
File:Step 7b.jpg|Paint the stand | |||
</gallery> <br clear=left> | |||
8) Assemble cello by reconnecting tail piece, bridge, strings and pegs <br> | |||
[[File:Callo Lamp 1.jpg|200px|left]] <br clear=left> | |||
9) Tune the cello and use the lamp <br> | |||
[[File:Cello lamp gif reduced.gif|x300px|left]] | |||
[[Category:Lighting]] | |||
Latest revision as of 19:37, 3 September 2023
| ProjectInfoBox Cello Lamp | |
|---|---|

| |
| Status: | finished |
| Release Date: | July 2019 |
| Initiator: | Hanna |
| Approx. Cost: | ~208€:
|
Building Process
Following steps have been performed to transform a cello into a lamp:
1) Prepare cello by removing tail piece, bridge, strings and pegs
2) Separate the fingerboard from the cello neck with a Japanese saw

3) Cut a groove into the cello neck (e.g. with rotary rasps) for the cable

4) Drill a hole in the cello scroll, pull the cable through and tuck in the light fitting
5) Drill a hole in the cello body directly at the lower end of the neck and at the lowest body part connecting to the stand and pull the cable through

6) Glue the fingerboard back on the cello neck (cable hidden inside) – I used a polyurethane glue, which expands when applied

7) Build the stand out of different layers of wood (in this case 3 layers of wild oak)
Drill holes to fit the tailgut
Remove the endpin of the cello and replace it with a screw to securely connect cello and stand
Paint the stand


8) Assemble cello by reconnecting tail piece, bridge, strings and pegs

9) Tune the cello and use the lamp
