Project:Mechanical Keyboard: Difference between revisions
(Created page with "{{ProjectInfoBox |project title=Wax Cloth to Wrap Food |image=Keyboard_1.JPG |status=Completed |date=September 05, 2021 |initiator=User:Kalunho |materials=PLA |tools=[...") |
No edit summary |
||
| (4 intermediate revisions by the same user not shown) | |||
| Line 1: | Line 1: | ||
{{ProjectInfoBox | {{ProjectInfoBox | ||
|project title= | |project title=3D Printed Mechanical Keyboard | ||
|image=Keyboard_1.JPG | |image=Keyboard_1.JPG | ||
|status=Completed | |status=Completed | ||
| Line 8: | Line 8: | ||
|tools=[[3D Printer|3D printer]] | |tools=[[3D Printer|3D printer]] | ||
|software=[https://www.tinkercad.com Tinkercad], [https://www.blender.org Blender], [https://www.meshmixer.com Meshmixer] | |software=[https://www.tinkercad.com Tinkercad], [https://www.blender.org Blender], [https://www.meshmixer.com Meshmixer] | ||
|cost= | |cost=60€ (board) + 20€ (Switches) + 20€ (PLA) | ||
}} | }} | ||
<gallery mode=packed-hover heights=150 | I designed this custom mechanical keyboard case including the keycaps. The PCB I used for this project is the [https://keygem.store/collections/pcb/products/dz60rgb-v2-hot-swap-mechanical-keyboard-pcb DZ60rgb v3] hot-swappable, therefore no soldering is required. I personally like small and compact keyboards, that is why I choose a 60% layout. The PCB is configured via [https://config.qmk.fm/#/ QMK], which allows you to pretty much re-programm all the keys. For this build, I have also added four small white LEDs on the back, which I soldered directly on the board (there is a 5v output pin somewhere on the board). These four LEDs are static and cannot be controlled via the software and light up as soon as you plug your USB-C cable in the keyboard. | ||
One 750g spool of regular PLA should be more than enough to print this keyboard. | |||
File:Keyboard_2.JPG| | |||
File:Keyboard_3.JPG| | == Features == | ||
File:Keyboard_4.JPG| | The main features of this keyboard are: | ||
File:Keyboard_5.JPG| | * Gasket Mount | ||
* No screws are required | |||
* fully 3D printable | |||
== Tutorial / Download == | |||
A full tutorial is available on my [https://www.youtube.com/watch?v=ilK-Wx_Bp7w YouTube] channel. The file is available on [https://www.thingiverse.com/thing:4948525 thingiverse]. | |||
== Photos== | |||
<gallery mode=packed-hover heights=150> | |||
File:Keyboard_2.JPG|My name on the back | |||
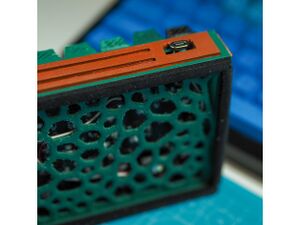
File:Keyboard_3.JPG|Backside of the keyboard | |||
File:Keyboard_4.JPG|Magnetic USB-C adapter | |||
File:Keyboard_5.JPG|3D-printed Keycaps | |||
</gallery> | </gallery> | ||
Latest revision as of 11:39, 16 September 2021
| ProjectInfoBox 3D Printed Mechanical Keyboard | |
|---|---|

| |
| Status: | Completed |
| Release Date: | September 05, 2021 |
| Initiator: | User:Kalunho |
| Materials Used: | PLA |
| Tools Used: | 3D printer |
| Software Used: | Tinkercad, Blender, Meshmixer |
| Approx. Cost: | 60€ (board) + 20€ (Switches) + 20€ (PLA) |
I designed this custom mechanical keyboard case including the keycaps. The PCB I used for this project is the DZ60rgb v3 hot-swappable, therefore no soldering is required. I personally like small and compact keyboards, that is why I choose a 60% layout. The PCB is configured via QMK, which allows you to pretty much re-programm all the keys. For this build, I have also added four small white LEDs on the back, which I soldered directly on the board (there is a 5v output pin somewhere on the board). These four LEDs are static and cannot be controlled via the software and light up as soon as you plug your USB-C cable in the keyboard. One 750g spool of regular PLA should be more than enough to print this keyboard.
Features
The main features of this keyboard are:
- Gasket Mount
- No screws are required
- fully 3D printable
Tutorial / Download
A full tutorial is available on my YouTube channel. The file is available on thingiverse.
Photos
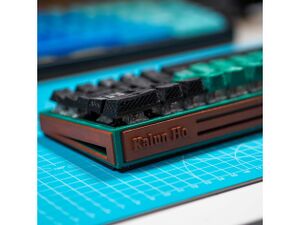
My name on the back

Backside of the keyboard
Magnetic USB-C adapter
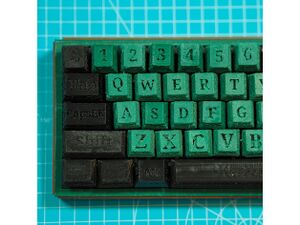
3D-printed Keycaps


