Project:Circular Saw Guide: Difference between revisions
m (fixed overcomplicated link) |
|||
| (10 intermediate revisions by 2 users not shown) | |||
| Line 1: | Line 1: | ||
{{ProjectInfoBox | |||
|project title=Circular Saw Guide - No Measuring! | |||
|image=circular saw guide build 5.JPG | |||
|status=finished | |||
|date=2018 | |||
|initiator=[[Lukas]] | |||
|team= | |||
|materials=[[Wood Glue|wood glue]], [[Scrap Wood|scrap wood]]<br>(thin [[plywood]] or similar + thicker board) | |||
|tools=[[Handheld Circular Saw|handheld circular saw]] | |||
|software= | |||
|cost=0 € | |||
}} | |||
{{£}} made a saw guide that | Tired of calculating how far from your desired cut line you'll have to place a board to use as a parallel fence when using a [[Handheld Circular Saw|handheld circular saw]]? | ||
{{£}} made a saw guide that solved this problem for an old saw we used to have. We now have a nice [[Plunge Saw|plunge saw]] at the Space that comes with a 1400 mm aluminum rail, but this DIY approach should work for pretty much anything you might have at home! | |||
== How It's Made == | |||
For any other saw than the "Herkules BHK 1600LE" you'll most likely need a different guide. However, it's pretty easy to make without any measurements! | |||
You'll need: | |||
* a board with a straight edge (wider than the saw's motor so you have room for clamps) | |||
* a flat sheet, e.g. [[plywood]] about twice the size of your board | |||
* [[Wood Glue|glue]] the board onto the sheet, leaving enough bare sheet so the circular saw fits on it | |||
* after the glue-up, clamp the contraption down where you can saw and cut away as much of the thin part as the thick board lets you (keeping the wider side of the saw towards the board) | |||
<gallery mode=packed-hover heights=150 caption="steps of the build - hover for explanations, click for larger images!"> | |||
circular saw guide build 1.JPG|select your pieces and spread some [[Wood Glue|wood glue]] | |||
circular saw guide build 2.JPG|apply gluing pressure with [[clamps]] and/or heavy stuff | |||
circular saw guide build 3.JPG|cut off the excess plywood '''with the exact saw you'll use with the [[jig]]''' | |||
circular saw guide build 4.JPG|(optional) mark areas of the guide, e.g. where the saw travels and where clamps can be placed | |||
</gallery> | |||
You can also find similar instructions all over the internet, e.g. by [http://www.popularmechanics.com/home/tools/reviews/a3602/4283497/ Popular Mechanics] or [https://www.woodmagazine.com/woodworking-tips/techniques/sawing-solutions/circular-saw WOOD magazine]. | |||
== How It's Used == | == How It's Used == | ||
| Line 11: | Line 42: | ||
* let the saw ride on the guide and cut! | * let the saw ride on the guide and cut! | ||
[[Category:Jigs]] | [[Category:Jigs]] | ||
[[Category:Woodworking]] | [[Category:Woodworking]] | ||
Latest revision as of 10:44, 20 September 2022
| ProjectInfoBox Circular Saw Guide - No Measuring! | |
|---|---|

| |
| Status: | finished |
| Release Date: | 2018 |
| Initiator: | Lukas |
| Materials Used: | wood glue, scrap wood (thin plywood or similar + thicker board) |
| Tools Used: | handheld circular saw |
| Approx. Cost: | 0 € |
Tired of calculating how far from your desired cut line you'll have to place a board to use as a parallel fence when using a handheld circular saw?
Lukas made a saw guide that solved this problem for an old saw we used to have. We now have a nice plunge saw at the Space that comes with a 1400 mm aluminum rail, but this DIY approach should work for pretty much anything you might have at home!
How It's Made
For any other saw than the "Herkules BHK 1600LE" you'll most likely need a different guide. However, it's pretty easy to make without any measurements!
You'll need:
- a board with a straight edge (wider than the saw's motor so you have room for clamps)
- a flat sheet, e.g. plywood about twice the size of your board
- glue the board onto the sheet, leaving enough bare sheet so the circular saw fits on it
- after the glue-up, clamp the contraption down where you can saw and cut away as much of the thin part as the thick board lets you (keeping the wider side of the saw towards the board)
- steps of the build - hover for explanations, click for larger images!
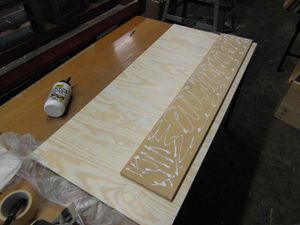
select your pieces and spread some wood glue
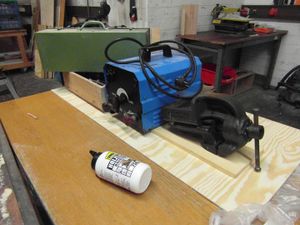
apply gluing pressure with clamps and/or heavy stuff
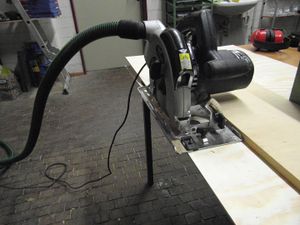
cut off the excess plywood with the exact saw you'll use with the jig
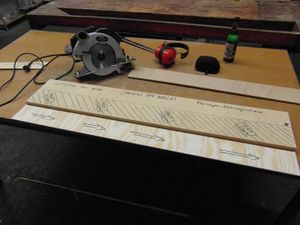
(optional) mark areas of the guide, e.g. where the saw travels and where clamps can be placed


You can also find similar instructions all over the internet, e.g. by Popular Mechanics or WOOD magazine.
How It's Used
- measure your workpiece and mark where you want to cut (at least two points)
- lay the guide on your cut line, connecting the measured points with its thin side and keeping the guide on the part of the workpiece that you'll keep
- clamp the guide to the workpiece, avoiding the area labeled "KEEP CLEAR" (that's where the saw's motor will travel)
- secure your workpiece so the cut path is free of obstacles and the wood won't move unexpectedly
- place the circular saw on the thin part of the guide, just before your workpiece (you may have to open the blade guard by hand)
- let the saw ride on the guide and cut!