Project:Laptop Powerbank: Difference between revisions
finished project |
m typos, categorized |
||
| Line 6: | Line 6: | ||
|initiator= [[Luzian]] | |initiator= [[Luzian]] | ||
|team= | |team= | ||
|materials= [[18650]] | |materials= [[18650]] lithium battery, BMS | ||
|tools= [[soldering iron]] | |tools= [[soldering iron]] | ||
|software= | |software= | ||
| Line 18: | Line 18: | ||
The Surface's power supply delivers 12 V DC, about the voltage you get out of a 3s Li-Po or Li-Io. I ordered a power plug for the Surface (it's a special magnetic connector with support for a dock) and we connected it to a 3s 3000mAh Li-Po. The laptop drained the battery all the way down to 10 V, for us this means we won't need a boost converter. | The Surface's power supply delivers 12 V DC, about the voltage you get out of a 3s Li-Po or Li-Io. I ordered a power plug for the Surface (it's a special magnetic connector with support for a dock) and we connected it to a 3s 3000mAh Li-Po. The laptop drained the battery all the way down to 10 V, for us this means we won't need a boost converter. | ||
Now I have to order 6 18650 cells and a suitable BMS. | Now I have to order 6 18650 cells and a suitable BMS (battery management system). | ||
| Line 24: | Line 24: | ||
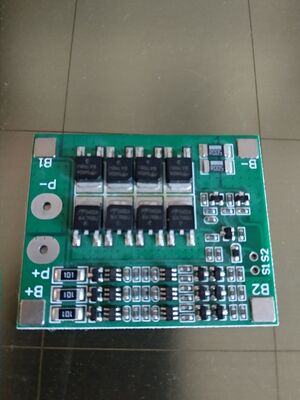
[[File:BMS 3s.jpg|thumb|left|the BMS board]] | [[File:BMS 3s.jpg|thumb|left|the BMS board]] | ||
I ordered a BMS board with balance charging | I ordered a BMS board with balance charging from China and some rather expensive (ca 4$/cell) [[18650]] cells from a German shop. I would advise to use cells with prewelded nickel strips because you don't want to damage your cells by overheating them while soldering directly on the contacts. | ||
After the cells had arrived, my dad designed a clip in [[Fusion 360]] and printed it on my [[3D Printer|3D printer]] to fixate the cells and protect the contacts. Then my dad [[Soldering Iron|soldered]] everything together as shown in this very professional wiring diagram. | |||
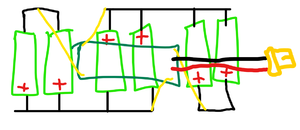
[[File:BMS-wirering .png|thumb|left|2p3s the "professional" wiring diagram]] | [[File:BMS-wirering .png|thumb|left|2p3s the "professional" wiring diagram]] | ||
The battery pack can be charged with pretty much any | The battery pack can be charged with pretty much any 12 V DC power supply with XT60 connector or barrel jack (needs a simple adapter though). | ||
Now you might be asking how much extra laptop usage do I get out of a 2p3s battery pack. Assuming each battery has a capacity of 2500mAh (maybe higher, don't remember exactly) and there are 2 in parallel so an overall capacity of around 5000mAh at 11.1V (3.7V x 3s). To get to our Wh we just need to multiply the capacity times voltage and we get our energy, so 11.1V*5Ah=55.5Wh. This is about the capacity of the Surface's battery which means you get double the usage time on the go. | |||
[[Category:Electronics]] | |||
Latest revision as of 15:56, 18 April 2019
| ProjectInfoBox Surface Pro 4 Powerbank | |
|---|---|

| |
| Status: | in prototyping |
| Release Date: | Jan 2019 |
| Initiator: | Luzian |
| Materials Used: | 18650 lithium battery, BMS |
| Tools Used: | soldering iron |
| Approx. Cost: | ~35$ |
Idea
My dad's daily driver is a Microsoft Surface Pro 4 and the NON-removeable battery has lost some of its capacity over the years, otherwise it still works fine. So we want to build an external battery pack.
The Surface's power supply delivers 12 V DC, about the voltage you get out of a 3s Li-Po or Li-Io. I ordered a power plug for the Surface (it's a special magnetic connector with support for a dock) and we connected it to a 3s 3000mAh Li-Po. The laptop drained the battery all the way down to 10 V, for us this means we won't need a boost converter.
Now I have to order 6 18650 cells and a suitable BMS (battery management system).
Realization

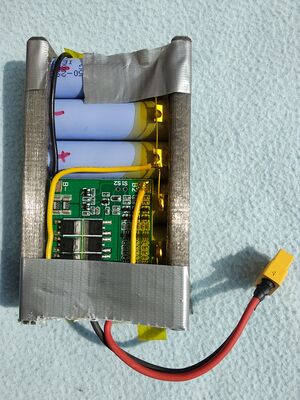
I ordered a BMS board with balance charging from China and some rather expensive (ca 4$/cell) 18650 cells from a German shop. I would advise to use cells with prewelded nickel strips because you don't want to damage your cells by overheating them while soldering directly on the contacts.
After the cells had arrived, my dad designed a clip in Fusion 360 and printed it on my 3D printer to fixate the cells and protect the contacts. Then my dad soldered everything together as shown in this very professional wiring diagram.

The battery pack can be charged with pretty much any 12 V DC power supply with XT60 connector or barrel jack (needs a simple adapter though).
Now you might be asking how much extra laptop usage do I get out of a 2p3s battery pack. Assuming each battery has a capacity of 2500mAh (maybe higher, don't remember exactly) and there are 2 in parallel so an overall capacity of around 5000mAh at 11.1V (3.7V x 3s). To get to our Wh we just need to multiply the capacity times voltage and we get our energy, so 11.1V*5Ah=55.5Wh. This is about the capacity of the Surface's battery which means you get double the usage time on the go.