Project:DeWalt Battery Replacement: Difference between revisions
Created page with "{{ProjectInfoBox |project title=DeWalt baterry replacement |image=ProjectDeWalt Battery Replacement 0.jpg |status=done |date=October 2018 |initiator= |team=Johannes |mater..." |
category |
||
| (5 intermediate revisions by 3 users not shown) | |||
| Line 1: | Line 1: | ||
{{ProjectInfoBox | {{ProjectInfoBox | ||
|project title=DeWalt | |project title=DeWalt Battery Replacement (NiMH to LiPo) | ||
|image=ProjectDeWalt Battery Replacement 0.jpg | |image=ProjectDeWalt Battery Replacement 0.jpg | ||
|status=done | |status=done | ||
| Line 6: | Line 6: | ||
|initiator= | |initiator= | ||
|team=[[Johannes]] | |team=[[Johannes]] | ||
|materials=DeWalt cordless drill with broken battery, 3S lipo, a balancer | |materials=DeWalt cordless drill with broken battery, 3S lipo, a balancer board | ||
|tools= | |tools=[[Soldering Iron|soldering iron]], [[3D Printer|3D printer]] | ||
|software=[[Fusion 360]] | |software=[[Fusion 360]] | ||
|cost=approx. 10 € (without the battery) | |cost=approx. 10 € (without the battery) | ||
}} | }} | ||
A DeWalt_DC740KA [[Cordless Drill]] that we used to have had a broken battery which needed to be replaced. In order to replace it, we used LiPo batteries with a custom charging curcuit. In addition to this page, the discussions during the replacement can be read on [https://github.com/comakingspace/do-something/issues/12 github]. | |||
== Battery Circuit == | |||
connections between Battery and Protection Circuit:<br/> | |||
[[File:DeWalt_DC740KA_Balancer_mit_Akku-Schutzschaltung.png|x200px|the inside of the Battery]] | |||
<br/> | |||
Originally, the battery circuit was using a 20A protection circuit:<br/> | |||
[[File:ProjectDeWalt Battery Replacement 2.jpg|x200px|connections between Battery and Protection Circuit]] | |||
<br/> | |||
This was modified in order to support 30A:<br/> | |||
[[File:ProjectDeWalt Battery Replacement 3.jpg|x200px|how I made a 30A protection circuit out of an 20A protection circuit ]]<br/> | |||
The battery case had to be recreated. This was done using the [[3D Printer]]. The files can be found [https://github.com/comakingspace/CommonFiles/tree/master/3DPrintingFiles/DeWalt_Battery here]. | |||
== Charging Station == | |||
Since the battery got replaced, we also needed a new charging station:<br/> | |||
[[File:ProjectDeWalt Battery Replacement 1.jpg|x200px]]<br/> | |||
The charging station is nothing special, just a DC to DC converter with constant current and constant voltage (CC/CV). The current is set to 0.5A and the voltage to 12.5V which provides a safe charging process. | |||
<br/> | |||
Charging Curve: [[File:Dewalt ladevorgang.png|500px]]<br> | |||
Charging: CC red LED<br> | |||
Battery Full: CV green LED | |||
[[Category:3D Printing]] | [[Category:3D Printing]] | ||
[[Category:Cordless Tool Hacks]] | |||
[[Category:Electronics]] | [[Category:Electronics]] | ||
Latest revision as of 12:46, 23 September 2025
| ProjectInfoBox DeWalt Battery Replacement (NiMH to LiPo) | |
|---|---|
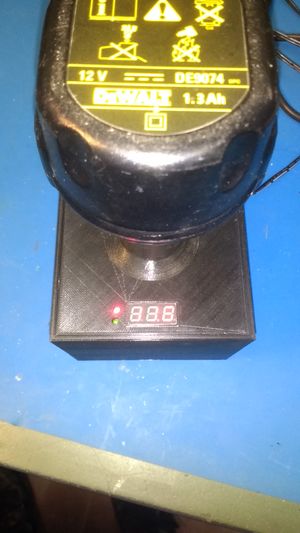
| |
| Status: | done |
| Release Date: | October 2018 |
| Initiator: | |
| Team: | Johannes |
| Materials Used: | DeWalt cordless drill with broken battery, 3S lipo, a balancer board |
| Tools Used: | soldering iron, 3D printer |
| Software Used: | Fusion 360 |
| Approx. Cost: | approx. 10 € (without the battery) |
A DeWalt_DC740KA Cordless Drill that we used to have had a broken battery which needed to be replaced. In order to replace it, we used LiPo batteries with a custom charging curcuit. In addition to this page, the discussions during the replacement can be read on github.
Battery Circuit
connections between Battery and Protection Circuit:
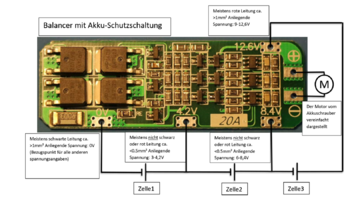
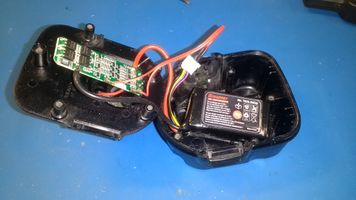
Originally, the battery circuit was using a 20A protection circuit:
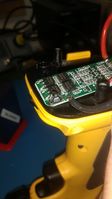
This was modified in order to support 30A:
The battery case had to be recreated. This was done using the 3D Printer. The files can be found here.
Charging Station
Since the battery got replaced, we also needed a new charging station:
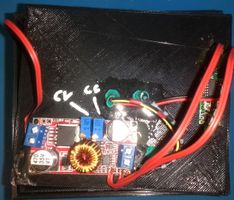
The charging station is nothing special, just a DC to DC converter with constant current and constant voltage (CC/CV). The current is set to 0.5A and the voltage to 12.5V which provides a safe charging process.
Charging Curve: 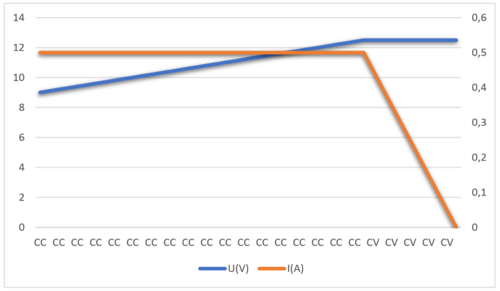
Charging: CC red LED
Battery Full: CV green LED