WorkBee Machine Operation: Difference between revisions
Workbee Docs: splitting things up |
NitramLegov (talk | contribs) m →Web Interface: fix link |
||
| (One intermediate revision by one other user not shown) | |||
| Line 6: | Line 6: | ||
Interfacing with the WorkBee CNC has changed significantly after the 2024 rebuild. | Interfacing with the WorkBee CNC has changed significantly after the 2024 rebuild. | ||
[[File:Workbee-overview-labeled.png|alt=a labeled overview of the work area|center|thumb|763x763px]] | [[File:Workbee-overview-labeled.png|alt=a labeled overview of the work area|center|thumb|763x763px|the new machine setup]] | ||
'''The machine:''' | '''The machine:''' | ||
| Line 15: | Line 15: | ||
=== Web Interface === | === Web Interface === | ||
The WorkBee CNC is controlled via a Web Interface accessible through the CoMakingSpace network. On any connected device, visit [http:// | The WorkBee CNC is controlled via a Web Interface accessible through the CoMakingSpace network. On any connected device, visit [http://workbeecnc/ http://workbeecnc/] or [http://10.2.0.3 http://10.2.0.3] to control the machine and upload jobs. | ||
To start milling, you begin by | To start milling, you begin by installing an endmill. Use the [[:File:Workbee-wrench.png|Wrench]] to [https://www.youtube.com/watch?v=Klz9pB9qDjI&t=33s insert the endmill of your choice] into the spindle. | ||
Then start the machine, and use the ''Machine Movement'' Dashboard on the Web Interface to jog the machine XY over your workpiece origin (usually the left-front corner). | |||
[ | Then, slowly lower down until the tip of the endmill touches the workpiece. You can use the [https://youtu.be/UaDMzl_ZXVg?si=14Hr0xJUmM1L_L4A&t=368 paper method]. | ||
This is your workpiece zero point. Save this point by clicking on ''Set Work XYZ'' on the top right of the ''Machine Movement'' section. | |||
<div class="figure">[[File:Workbee-webinterface-jog.png|center|thumb|728x728px]]</div> | |||
=== Starting a job === | === Starting a job === | ||
You can upload your job to the machine through the ''Jobs'' tab on the left vertical menu. | |||
When starting a milling job, make sure the workpiece is secured well and you are wearing proper PPE. | |||
Next, start your job via the Web Interface. The machine will home. | |||
Then, after homing, you can start the spindle with the button on the front panel interface. This button will not work before homing or if no job is running to ensure someone is present at the start of any operation. | |||
Sit back, relax, and keep an eye out in case you need to use the E-Stop - the machine will | Sit back, relax, and keep an eye out in case you need to use the E-Stop - the machine will begin its milling operation. | ||
Latest revision as of 14:54, 28 September 2024
Operating the WorkBee CNC
This Page explains how operate the Workbee CNC to create parts.
General Machine Operation
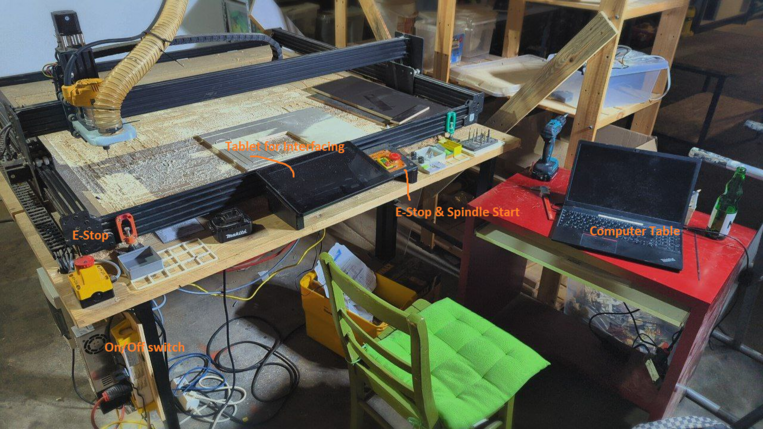
Interfacing with the WorkBee CNC has changed significantly after the 2024 rebuild.

The machine:
To start the Machine, the Electronics Panel on the left have a power strip (Mehrfachstecker) with a toggle switch. This is the main on/off switch.
After starting, ensure both E-Stops are not pressed. The machine will start up, and you can open the Web Interface on the Tablet, PC or any other device.
Web Interface
The WorkBee CNC is controlled via a Web Interface accessible through the CoMakingSpace network. On any connected device, visit http://workbeecnc/ or http://10.2.0.3 to control the machine and upload jobs.
To start milling, you begin by installing an endmill. Use the Wrench to insert the endmill of your choice into the spindle.
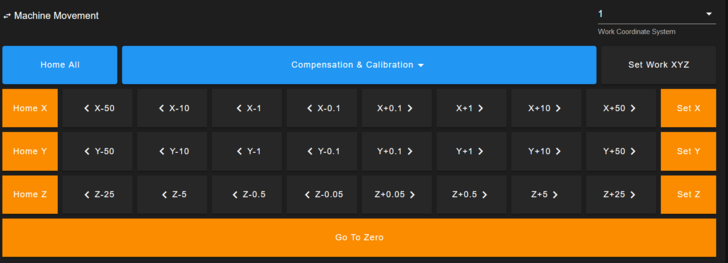
Then start the machine, and use the Machine Movement Dashboard on the Web Interface to jog the machine XY over your workpiece origin (usually the left-front corner).
Then, slowly lower down until the tip of the endmill touches the workpiece. You can use the paper method.
This is your workpiece zero point. Save this point by clicking on Set Work XYZ on the top right of the Machine Movement section.
Starting a job
You can upload your job to the machine through the Jobs tab on the left vertical menu.
When starting a milling job, make sure the workpiece is secured well and you are wearing proper PPE.
Next, start your job via the Web Interface. The machine will home.
Then, after homing, you can start the spindle with the button on the front panel interface. This button will not work before homing or if no job is running to ensure someone is present at the start of any operation.
Sit back, relax, and keep an eye out in case you need to use the E-Stop - the machine will begin its milling operation.
