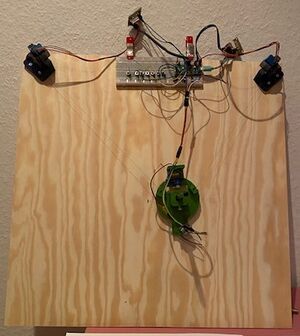
Project:Pico Plotter
| ProjectInfoBox Pico Plotter | |
|---|---|

| |
| Status: | Working |
| Release Date: | February 2023 |
| Initiator: | Koen |
| Materials Used: | Raspberry Pi Pico, Stepper and Servo Motors,
Push Buttons, Filament, Wooden Board |
| Tools Used: | 3D printer, Table Saw |
| Approx. Cost: | 25€ |
I have always been fascinated by machines drawing stuff, from artsy geometrical patterns to the more serious plotters. Also, for a while now, I have wanted to get some experience in integrating microcontrollers such as Raspberry Pi's and Arduino's into my projects. Luckily I came across a project in edition 55 of Hackspace magazine that would allow for both of that to happen!
I resisted my normal urge to want to do everything myself and instead followed the given instructions closely. After this, hopefully, positive experience I can then start making changes and understanding it a bit deeper.
The Plotter
The Plotter works on a very simple concept: A gondola that holds the pen is suspended by two threads that each go to a spool connected to a stepper motors at the top corners of the board. Through the spools these stepper motors can control the length of each thread, and thus, the position of the gondola. By moving the gondola around the plotter "draws". Attached to the gondola is a single servo motor that can push the gondola slightly up, in this up position the pen does not touch the paper and the gondola can be moved around without drawing.
The whole plotter is controlled by a Raspberry Pi Pico, so far the smallest and cheapest in their line.
The Process
All steps are pretty well described in the magazine article.
I have had most trouble with getting the Pico to connect to my computer. Attention Windows 11 users, your computer can turn off your USB-ports to save power and not give you a warning..
After I finally got the Pico working I first tried to figure out how exactly one can make both servo and stepper motors move. There are plenty of articles online to get you going for both servo as well as stepper motors.
The files for the gondola and stepper motor holders are linked from the article and were printed using regular PLA with a layer height of .35mm. This all worked without problems. The board was cut to length on the saw table and the motor mounts attached with small screws. Then it was only a bit of software work to get it ready.
Results
In the end it actually works!
These are supposed to be squares, so yes, it might need a bit more fine tuning. But right now, it is drawing, so who cares?
Future Goals
Finish the plotter:
- Design and print an enclosure for the electronics on top
- Design and print low profile holders for the paper
- Solder the electronics more permanently
