Project:Foiling
| ProjectInfoBox Foiling | |
|---|---|

| |
| Status: | Complete |
| Initiator: | User:Finno |
| Materials Used: | Paper/Card/Reactive Transfer Foil |
| Tools Used: | Laser printer/laminator/ Computer |
| Software Used: | Word, Illustrator, Inkscape |
!!!QR CODE IS DEAD!!!
Foil Blocking / Foiling / Heiß Folie Prägung but *make it D.I.Y*
Normally done with foil,heat and pressure. An image plate is machined into a metal plate and then heated and pressed into the piece with the foil inbetween the plate and the paper or substrate. You can get specialed machienes to do this process. It is ofetn seen in leather working, book binding and letterpress.
How Does Crafting with Foil Work?
I saw a couple of instagram reels showing the results and did a bit of research. I watched a few youtube videos LIKE THIS ONE and also found THIS ARTICLE.
I have used 'Reactive tranfer foil', becuase I didnt want to spend a lot of money on somewhat speacilized equipment/ chemical/ adhesives. This type of foil can react with laser printer toner, and when I figured out that the space already had a Laser printer and a laminator it made this fun craft more accessible.
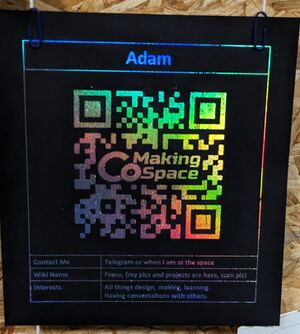
I bought THIS foil multipack on amazon that seems to work okay, at least in the first test or two. Which you can see for yourself in the picture and video below.
Process
Process pictures are in the works, check back soon :)
1. Getting your design ready
The nice thing about this method is that you dont need to have any specific design software to create the files for your projects, but they do make it a little easier (If you have access and know how to use them or can put the time into learning them).
For the first test I used the 'Members wall' poster template because I had not yet made one. This is a word file that I edited and printed it directly from word when I was finished.
2. Printing
You will see from your own research that any random printer might not work for this process. It needs to be specifically a laser printer (I have read that some laser inks/toners may not work, but what we have in the space currenlty seems to be just fine).
To print the deigns you first need to be connected to the printer, instructions for doing that can be found on the PRINTER PAGE on the WIKI. (I did have some issues with this and needed to use the printer and port names to find it and then select the correct driver from a long list.)
Once connected, ensure that you are printing in Black and White. The foil will really only stick to the Black printed area of your design.
3. Foiling
Turn on the laminator and allow it to come up to temperature. The instructions for the laminator in the space can be found HERE.
Once the design has been printed, cut a piece of foil to a size that just covers the printed deign. Then lay the foil, shiny side up, onto the printed deign. You can in theory run this through the laminator now, or you can place a sheet of blank paper under your work piece and over top of the foil and work piece.
Layers being; Blank paper - work piece - foil - blank paper.
Now pass the materials through the laminator. (With the laminator at the space you should start to feed the materials from the 'back' side with the power switch on the left facing towards you.)
4. Next steps
The satisfying part, as seen in the video above, peel the foil and you are done. If your material was already the finished size you need then yes you are done, otherwise use whatever method you prefer to cut project down to final size.
Further steps depending on the project and requirements can involve actually laminating the project in plastic or putting it in a protective sleeve.
Multi colour foiling
The process is almost the same as written above, however some minor changes need to be made. Depending on the size of the area that you need to foil you can spilt your design up into multiple 'layers' or stages.
- Print the 1st stage then foil it.
- Put the same sheet back into the printer and print the 2nd stage and foil it,
- and so on for as many layers as you need.
**You need to know which orientation to place it back into the printer tray for this to work but a quick test makes this more favourable than the next method.**
Which is to print the full design and try to place lots of small pieces of different coloured foil at the same time. The foil is really thin and can be a pain to work with/ handle as you want to keep it smooth for the best results.