Copy Stand
| ToolInfoBox Copy Stand | |
|---|---|

| |
| Synonyms: | DE: Reprostativ, Kameraständer, Reproständer, Reprostand |
| Type: | camera stand |
| Used with: | camera |
| Location: | common room |
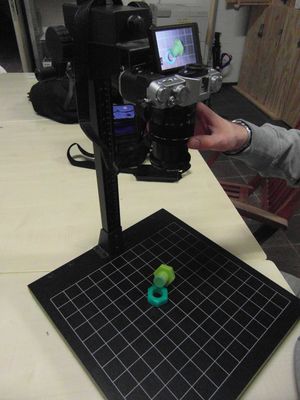
We have a small copy stand for taking reproducible photos (repro-copies) of two-dimensional originals. Any camera with a standard 1/4" thread should be compatible with it.
You can find it in the common room, usually on top of the lockers.
Reproductions of prints, books, paintings etc
To create high-quality reproductions, you'll need two identical lightsources (for example flashguns, or daylight bulbs). Flashguns are ideal, as they allow for a short shutter speed (usually 1/200 or faster), so any other light sources in the room won't show in your final repro-photo.
The two light sources should have:
- the same strength/power (flashguns are ideal, as their power can easily be adjusted when in manual mode).
- identical angle and distance to the centre of the copy stand surface
- angles around 25-50° are ideal; if the angle is too high, light (hotspots) can reflect back into the camera
- the same colour temperature (ideally daylight, so colours get reproduced correctly)
If you don't have access to two identical light sources, the next best thing would be to use the copy stand indoors, or in a shady location. In other words: not in direct sunlight. Ideal circumstances in this case would be:
- indirect light (shade, indoors)
- not too close to a wall (even if you're indoors: light reflects back from walls – worst case would be a coloured wall)
- not too close to a window (due to light fall-off)
- window pointing away from the copy stand's column (so it doesn't cast a shadow)
- use a cable release (or timer), so to avoid camera shake (indoors without flash, your exposure times will likely be long enough to be prone to camera shake)
For best results, it's recommended to set your camera to shoot in RAW format – this is particularly important when you're not using flashguns. If your camera doesn't support RAW format, try setting it to custom white balance whilst pointing it towards a white wall or piece of paper.
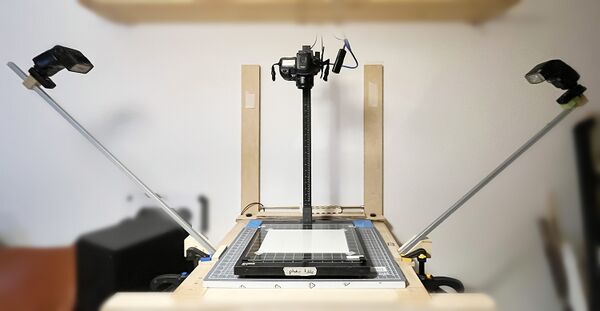
Here's a sample setup with two flashguns – both at the same distance and at 45° angle to the surface.

In this picture, the two flashguns are different brand. This is totally fine, as long as you can trigger them simultaneously – either via a photocell trigger, two sync cables, or in this case an wireless electronic trigger.
To check if your two flashguns have the same strength, you can take two test images of a white piece of paper (one flash off, the other on) and compare them. Most flashguns can be adjusted in 1/3 stop increments or even less.
If the original you'd like to reproduce is bent or warped, you could use a clean glass plate. Of course, as dust-free as possible. But as long as your "light-angle" isn't too steep, you won't see any reflections from your glass plate.
Reproductions of negatives, slides and transparency originals
To create reproductions of transparent materials, you'll need.
- one lightsource (ideally a flashgun)
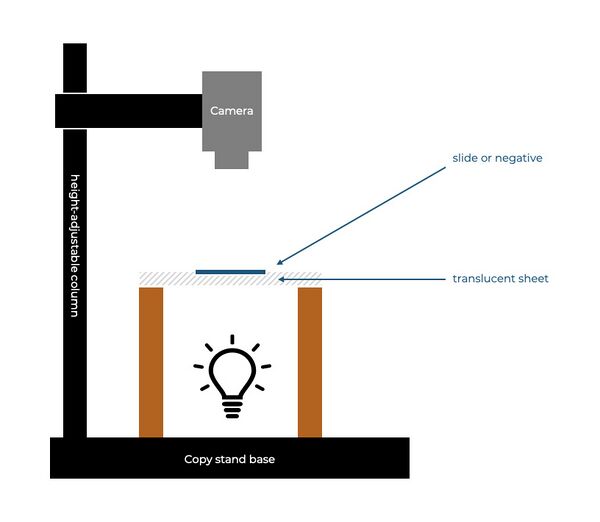
- two "stands" (pile of books, box, two equal size pieces of wood etc) to create a large enough gap between the copy stand's base plate and the camera
- a sheet of white translucent perspex (or similar), also known as "milky white" acrylic/perspex/plexiglass
- for slides/negatives: ideally, a macro-lens or extenstion tubes, so you can get close enough to the original
The translucent sheet should be large enough to hold your original. For negatives and slides, you could cut a hole into a piece of wood or strong cardboard (or a box), then rest a small piece of translucent acrylic on top of that.
Place the lightsource centered below the translucent surface. Center and focus your camera, then do a few test exposures (just the white surface, without any slides/negatives), until the perspex sheet is nearly white. A little darker is fine, but it shouldn't be grey, and also not too bright. (Underexposure is better than overexposure in this case).
Then put your negative/slide straight onto the translucent surface (watch out for dust) and start reproducing slides. With good lighting, a good enough camera (DSLR, 12mp or more), and a decent macro lens (for example f2.8/100mm, set to f8-11), the resulting quality is as good as scans from a professional drum-scanner. With a camera around 50 megapixels, you could even reproduce 4 slides at the same time (2x2 setup) and duplicate/crop files later.
- larger distance between the lightsource and the translucent sheet = softer light / better results (no hotspots)
- ideally, the "stands" (brown bits in illustration below) should be neutral color (white/grey/black), so to keep a consistant and neutral colour temperature inside your "flash box"
An old box of shoes (white or grey inside) is ideal – just cut a large enough hole for your perspex sheet. Then place the box vertically onto the base (=30-40cm height) and put a flashgun inside, pointing upwards. With a setup like this, the adjustable column on our copy stand is long enough to accomodate a full-frame DSLR + 100mm lens, focused onto a single slide.
Other ideas
A copy stand, combined with just a single lightsource, can also be used to create high quality normal maps for use in 3d-software:
Upgrade Ideas
- lights (could be wired through the extra holes in the back)
- optional white background
- 3D printed "quick mounts"
