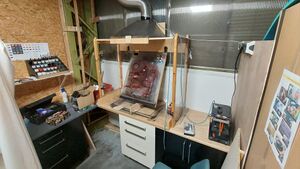
Airbrush Area

The airbrush area is located in the electronics room and contains our airbrushing related tools and machines. Not just for creating beautiful airbrush art, but also for painting 3D-printed models and other materials. Using an airbrush is easy, fun to learn – and a lot better for the environment than spray cans.
Access
To use the machines in the airbrush area, you need to get an airbrush introduction.
Airbrush cleaning
Cleaning at the end of your session
Regardless how short or long the airbrush has been used. Properly cleaning the airbrush every time you finish using it is essential to keeping the airbrush working well and avoiding costly problems. Simply rinsing the airbrush with water or cleaning agent is not sufficient. The entire airbrush needs to be disassembled as demonstrated during the airbrush introduction.
Here's why thorough cleaning matters (in short: not cleaning = expensive)
- Dried paint will clog the airbrush: Even a small amount of leftover paint can dry inside the nozzle, needle, or internal passages. Once that happens, it creates blockages that restrict airflow. In some cases, the airbrush may stop working entirely until it's deep-cleaned — or parts replaced. The nozzle and its o-ring are the most sensitive parts and may get damaged during deep-cleaning. (Cost: €20-30; the o-rings are not available on their own).
- Skipping cleaning might feel faster in the moment, but fixing a clogged or damaged airbrush takes much longer. It can take hours trying to troubleshoot issues, disassemble tiny parts, or order replacements. 10-20 minutes of proper cleaning after every use saves a lot of frustration.
An airbrush is a precision tool — please treat it like one. Cleaning it properly every single time ensures it works when you (or others) need it.
Cleaning during your session:
- between changing colours: simply rinse the airbrush with a little bit of water or cleaning agent (window cleaner)
- if you pause your session (even if it's just for a few minutes)
- make sure the ink compartment is empty
- submerge the airbrush in water (yfor example a glass jar filled with water, placed inside one of the cutouts on the right hand side of the airbrush booth)
Airbrush Colors
Only water-based, dedicated airbrush paints are allowed to be used with our airbrushes.
If you'd like to use anything else than water-based, dedicated airbrush paints (for example solvent- or oil-based colours), you're free to bring your own personal airbrush and connect it to our compressor.
See Material:Airbrush Paint for more information and experiences!
Spray Booth and Air Extraction
Make sure you always have the spray booth's air extractor turned to on to "max Level" (Level 3) when the airbrush is in use (don't forget to use ear protection). The easiest method would be to keep the extractor running throughout your entire session, even if you take a break. That way, you don't forget to turn it on. Always keep the curtain behind you closed. Aerosols can travel for quite a long distance across the room, and we'd like to keep the other equipment free of paint. Once you've finished your session (whilst cleaning the airbrush): keep the air extractor running for a few more minutes and open the curtain and the door, to allow for additional air exchange in the room.
The spray booth we've built should be large enough to accomodate most needs, be it a A1-sized airbrush painting, or a t-shirt, shoes etc.
At the rear of the spray booth, you'll see a metal plate which can be tilted towards you, for a convenient viewing angle. For painting miniature figures / 3D-printed models etc: you'll find a turntable in one of the drawers. Also: Working with the airbrush is a lot more convenient if you lift your model up (to just below eye level). Positive side-effect: This also increases air ectraction efficiency.
Airbrush Exercises
Here is a PDF with some basic airbrush exercises. Download, print and attach them to the backdrop in the spray booth. (Airbrushing onto a vertical canvas is easier than placing the canvas onto a horizontal surface). Even professional airbrush artists do warm-up exercises before they start a project. File:Airbrush Practice Sheet.pdf