Project:Jigsaw Puzzles: Difference between revisions
From CoMakingSpace Wiki
Adding the first draft of the recipe. |
|||
| Line 4: | Line 4: | ||
|status=work in progress | |status=work in progress | ||
|date=2025-02-19 | |date=2025-02-19 | ||
|initiator=B--rian | |initiator=[[User:B--rian|B--rian]] | ||
|team= | |team= | ||
|materials= | |materials=4mm poplar plywood, e.g. [ (no affiliation) | ||
|tools= | |tools=[[Laser_Cutter|Laser Cutter]] | ||
|software=Gimp, Inkscape, Lasercutter-Software | |software=Gimp, Inkscape, Lasercutter-Software | ||
|cost= | |cost=Up to now: | ||
* [https://www.hornbach.de/p/bastelsperrholz-pappel-297x210x4-mm-din-a4-pack5stueck/3841377/ A4 poplar sheets] 3,45€ | |||
* machine running donnation: 0,80€ | |||
}} | }} | ||
__TOC__ | |||
== Puzzles Examples == | == Puzzles Examples == | ||
| Line 16: | Line 21: | ||
* https://wiki.comakingspace.de/File:B--rian_HeidelbergCastle_Jigsaw.svg | * https://wiki.comakingspace.de/File:B--rian_HeidelbergCastle_Jigsaw.svg | ||
== Recipe == | == Recipe == | ||
The following recipe is '''not''' complete yet! | |||
=== Image Preparation === | |||
# '''Select and Prepare the Image:''' Choose a high-resolution color image for your puzzle. Adjust the brightness, contrast, and saturation using photo editing software. | |||
# Dither the image. | |||
# Designing the puzzle pieces using a tool like ... | |||
# Using a vector graphics tool like Inkscape, check the outline for your puzzle. | |||
=== Preparation for Machining === | |||
# We have to ensure that all the puzzle piece lines are recognized by the laser cutter as cutting paths. | |||
# Choose a laser-friendly material such as plywood or acrylic, see [[https://wiki.comakingspace.de/Laser_Cutter#Possible_Materials_(Cutting/Engraving)|Possible Materials]]. | |||
# Set the laser cutter parameters (speed and power) according to the material being used, usually provided by the laser cutter's manual. | |||
=== Get physical === | |||
# Start up the water cooler. | |||
# Switch on the laser cutter. | |||
# Send the design from the laser cutter software to the machine by hitting the "Download" button. | |||
# Secure the material onto the laser cutter bed. | |||
# With open laser cutter lid, hit <code>Start</code> which will simulate the actual cutting. The red positioning laser allows you to check, whether you will stay on your piece of material. | |||
# If everything looks ok, close the lid, and go for it! Monitor the laser cutter during operation to ensure nothing catched fire. | |||
== Remarks == | |||
PS: This is WIP, so please be a bit patient with me. --[[User:B--rian|B--rian]] ([[User talk:B--rian|talk]]) 21:24, 19 February 2025 (CET) | PS: This is WIP, so please be a bit patient with me. --[[User:B--rian|B--rian]] ([[User talk:B--rian|talk]]) 21:24, 19 February 2025 (CET) | ||
[[Category:Quick Projects]] | [[Category:Quick Projects]] | ||
Revision as of 12:56, 20 February 2025
| ProjectInfoBox Jigsaw Puzzles | |
|---|---|

| |
| Status: | work in progress |
| Release Date: | 2025-02-19 |
| Initiator: | B--rian |
| Materials Used: | 4mm poplar plywood, e.g. [ (no affiliation) |
| Tools Used: | Laser Cutter |
| Software Used: | Gimp, Inkscape, Lasercutter-Software |
| Approx. Cost: | Up to now:
|
Puzzles Examples
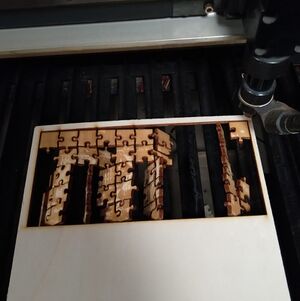
Isn't that what comes to mind first, when getting started with laser cutting wood?
Recipe
The following recipe is not complete yet!
Image Preparation
- Select and Prepare the Image: Choose a high-resolution color image for your puzzle. Adjust the brightness, contrast, and saturation using photo editing software.
- Dither the image.
- Designing the puzzle pieces using a tool like ...
- Using a vector graphics tool like Inkscape, check the outline for your puzzle.
Preparation for Machining
- We have to ensure that all the puzzle piece lines are recognized by the laser cutter as cutting paths.
- Choose a laser-friendly material such as plywood or acrylic, see [Materials].
- Set the laser cutter parameters (speed and power) according to the material being used, usually provided by the laser cutter's manual.
Get physical
- Start up the water cooler.
- Switch on the laser cutter.
- Send the design from the laser cutter software to the machine by hitting the "Download" button.
- Secure the material onto the laser cutter bed.
- With open laser cutter lid, hit
Startwhich will simulate the actual cutting. The red positioning laser allows you to check, whether you will stay on your piece of material. - If everything looks ok, close the lid, and go for it! Monitor the laser cutter during operation to ensure nothing catched fire.
Remarks
PS: This is WIP, so please be a bit patient with me. --B--rian (talk) 21:24, 19 February 2025 (CET)