Project:Japanese marking knife: Difference between revisions
Coming soon |
mNo edit summary |
||
| (3 intermediate revisions by the same user not shown) | |||
| Line 1: | Line 1: | ||
{{ProjectInfoBox|project title=Japanese Marking Knife|status=finished|initiator=[[Luzian]]|materials=[[material:steel]]|image=Japanese marking knife.jpeg}} | |||
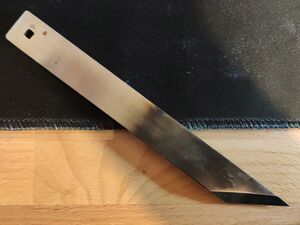
A Japanese making knife, also known as a kiridashi is a small sharp knife with a chisel-like single sided edge that is used for making and cutting wood, lether and other materilas. | |||
This is how I made mine: | |||
Fist I got some unhardened high crabon knife steel from the internet. Then I traced the rough outline with a maker on the steel and cut it out with an [[Disc Grinders|angle grinder]], which I used for the rough shape of the bevel as well. | |||
Afterwards I moved on to the [[Belt and Disc Sander|Belt Sander]] and used a custom 3d printed jig to hold a steady angle and took my time getting to the final shape, stopping every few passes to dip my workpiece in water to keep it from melting my jig. | |||
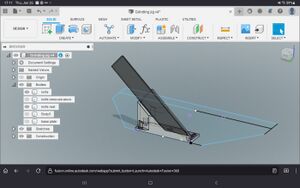
When the desiered shape is reached it's time for hardening. I used a propane tourch and some fire bricks to keep the heat in. Afer getting the steel tip as hot as possible (with my setup), it was quenched in sunflower oil. After remoing the scale left from quenching I sharpened it on the [[Bench Grinders|whetstone sharpener]]. [[File:Jpn knife jig cad design.jpg|thumb|The 3d printed knife jig (white) and the knife (gray) in cad]]I know that I left out tempering after quenshing but i don't use it to pry nor does it experience shock. But I intend to temper future projects. | |||
Latest revision as of 19:32, 28 January 2023
| ProjectInfoBox Japanese Marking Knife | |
|---|---|

| |
| Status: | finished |
| Initiator: | Luzian |
| Materials Used: | material:steel |
A Japanese making knife, also known as a kiridashi is a small sharp knife with a chisel-like single sided edge that is used for making and cutting wood, lether and other materilas.
This is how I made mine:
Fist I got some unhardened high crabon knife steel from the internet. Then I traced the rough outline with a maker on the steel and cut it out with an angle grinder, which I used for the rough shape of the bevel as well.
Afterwards I moved on to the Belt Sander and used a custom 3d printed jig to hold a steady angle and took my time getting to the final shape, stopping every few passes to dip my workpiece in water to keep it from melting my jig.
When the desiered shape is reached it's time for hardening. I used a propane tourch and some fire bricks to keep the heat in. Afer getting the steel tip as hot as possible (with my setup), it was quenched in sunflower oil. After remoing the scale left from quenching I sharpened it on the whetstone sharpener.

I know that I left out tempering after quenshing but i don't use it to pry nor does it experience shock. But I intend to temper future projects.