Project:Apartment Shoe Rack: Difference between revisions
From CoMakingSpace Wiki
No edit summary |
mNo edit summary |
||
| Line 1: | Line 1: | ||
<gallery heights=" | <gallery heights="250" mode="nolines" caption="'[[Project:Navigation Galleries|Navigation Gallery]]' - Click to view projects"> | ||
File:PXL 20240103 180957255.jpg | File:PXL 20240103 180957255.jpg|"Hidden Hardware" used for the assmebly of the Apartment Shoerack | ||
File:PXL 20240103 183445837.jpg | File:PXL 20240103 183445837.jpg|Rough assmebly after drilling all the holes for the hardware. Board edges are untreated | ||
File:PXL 20240104 145751030.jpg | File:PXL 20240104 145751030.jpg|Press on edge banding being applied to raw edges of boards | ||
File:PXL 20240229 165949283.jpg | File:PXL 20240229 165949283.jpg|Finished and in use shoe rack/ entryway table | ||
</gallery> | </gallery> | ||
Pictures; | Pictures; | ||
Revision as of 21:34, 14 July 2024
- 'Navigation Gallery' - Click to view projects
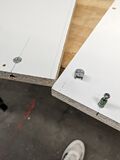
"Hidden Hardware" used for the assmebly of the Apartment Shoerack
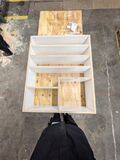
Rough assmebly after drilling all the holes for the hardware. Board edges are untreated
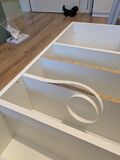
Press on edge banding being applied to raw edges of boards
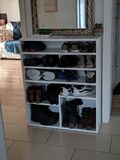
Finished and in use shoe rack/ entryway table


Pictures; Design, creation and use.
If i were to do it again (and not have material to "upcycle") I would go to horbach with dimensions for the panels that are needed, and have them cut and edgeband (kanten-umleimung) all of the pieces instead of using the press on stuff that I found. This is because, while the "raw wood" core of the board is hidden, the edges of the banding are quite sharp and if i sand them you would see the core of the sheet again.