Welding Transformer
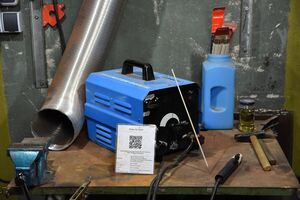
Unknown Welding Transformer
| MachineInfoBox Welding Transformer | |
|---|---|

| |
| Synonyms: | stick welder, arc welder, "welding machine"; DE: Elektrodenschweißgerät, Lichtbogenschweißgerät, Schweißtrafo, Schweißtransformator |
| Type: | Welding Transformer |
| Material: | welding electrodes, steel (or other compatible metals) |
| Used with: | welding helmets, welding curtains |
| Location: | Welding Area |
| Access Requirements: | Arc Welding Introduction |
| Status: | [[Has InfoBox Status::needs a few more commissioning steps and improvements!]] |
| Manual: | a bit similar, but NOT the same tool: Einhell.com |
| Tutors: | Lukas Johannes Marcel |
| Similar (More or Less): | welding inverter |
This tool is not ready for use yet since not all commissioning steps have been completed. The process is also tracked on GitHub. Feel free to contribute to making it usable, any help is very welcome!
| Task | comment | Status |
|---|---|---|
| Name the tool: | nothing specific written on the case | "done"/impossible |
| Take a picture | - | done |
| Find the manual as PDF | Lukas: only possible if we find out the name - not the correct one, but good to read: similar simple Einhell welder | done |
| Documentation | this page could use some love, e.g. pictures of how to set things up & adjust current; settings range | pending |
| Print QR-Code | use the wikicrawler | done |
| Introduction | Arc Welding Introduction | done |
| Security Check | to be done or witnessed by a manager | done |
| Test | Lukas | done |
| tool's name, owner and approx. value | provide to Patrick for inventorization | done |
| Last step: make it available | physically and in the wiki - then delete this template | pending |
We are currently improving a donated welding transformer.
Once the necessary maintenance and documentation is done, it can be used for SMAW ("stick" welding) after a personal introduction!
Settings
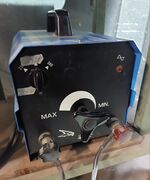
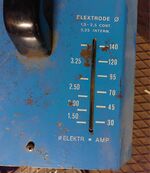
The large tri-star knob on the front adjusts the current ("amps"). In general, you'll need higher current for thicker electrodes.
The approximate thickness range and currents are indicated by a yellow pointer at the top - take the time to find your optimum so you do not get stuck (insufficient current) or burn through thin workpieces (often a sign of excessive current)!

