Project:Wood Beam Candlestick: Difference between revisions
NitramLegov (talk | contribs) m (NitramLegov moved page Project:Beam Lantern to Project:Wood Beam Candlestick: better title :)) |
NitramLegov (talk | contribs) m (Put pictures in galleries for better formatting. Description still missing) |
||
| Line 1: | Line 1: | ||
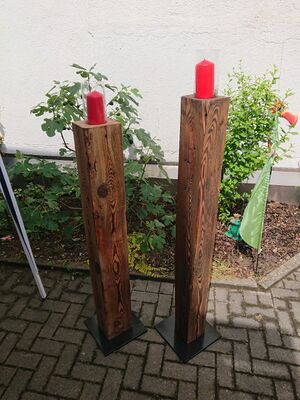
{{ProjectInfoBox|project title=Wood Beam Candlestick|status=done|initiator={{NL}}|materials=[[Wood]]|tools=[[Handheld Router]], [[Chop Saw]], [[Handheld Sander]]|image=Beam | {{ProjectInfoBox|project title=Wood Beam Candlestick|status=done|initiator={{NL}}|materials=[[Wood]]|tools=[[Handheld Router]], [[Chop Saw]], [[Handheld Sander]]|image=Wood Beam Candlestick - Done.jpg}} | ||
If you ever get your hands on an old wood beam, this is the perfect base for some nice upcycling project. | If you ever get your hands on an old wood beam, this is the perfect base for some nice upcycling project. | ||
| Line 7: | Line 7: | ||
If you want to make your own, please follow the steps belo: | If you want to make your own, please follow the steps belo: | ||
== Cutting == | ==Cutting== | ||
Of course, the wood beam has to be cut to size. A length of 130 cm turned out to be a good length. | Of course, the wood beam has to be cut to size. A length of 130 cm turned out to be a good length. | ||
Since the wood beam had a size of ~15{{X}}15 cm, the only saw which could have cut through it in one cut would have been our [[bandsaw]]. However, the beam was just too large to use the bandsaw for this. Therefore, I decided to use the chop saw and cut the beam in multiple cuts. To do so, the following turned out to be successfull: | Since the wood beam had a size of ~15{{X}}15 cm, the only saw which could have cut through it in one cut would have been our [[bandsaw]]. However, the beam was just too large to use the bandsaw for this. Therefore, I decided to use the chop saw and cut the beam in multiple cuts. To do so, the following turned out to be successfull: | ||
# As always, mark the spot you want to cut and put the beam to the correct position on the chop saw | #As always, mark the spot you want to cut and put the beam to the correct position on the chop saw | ||
# Cut approximately half way through the beam | #Cut approximately half way through the beam | ||
# Turn the beam by 90 degrees | #Turn the beam by 90 degrees | ||
# Check that the beam is in the correct position. You can do so by pushing the saw blad down ''while turned off'' and check that it smoothly fits in the cut from step 2. | #Check that the beam is in the correct position. You can do so by pushing the saw blad down ''while turned off'' and check that it smoothly fits in the cut from step 2. | ||
# Cut approximately half way through the beam | #Cut approximately half way through the beam | ||
# Repeat steps 3 to 5 until done | #Repeat steps 3 to 5 until done | ||
== Sanding == | ==Sanding== | ||
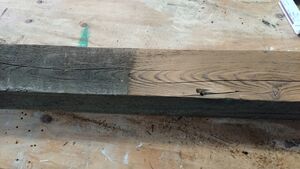
Since those old wood beams are usually covered with dirt and dust, cleaning them was a neccessary step. If you want to have beams looking like new ones, you could use the [[Jointer-Planer]] to take some material off. However, in this project, the used look was preferred, so I just sanded the beams using our [[Sanders]] and 80 [[Sandpaper]]. | Since those old wood beams are usually covered with dirt and dust, cleaning them was a neccessary step. If you want to have beams looking like new ones, you could use the [[Jointer-Planer]] to take some material off. However, in this project, the used look was preferred, so I just sanded the beams using our [[Sanders]] and 80 [[Sandpaper]]. | ||
[[File:Beam | [[File:Wood Beam Candlestick - sanding.jpg|none|thumb|Sanding of the wood beam - left is original, right is sanded]] | ||
== Routing == | ==Routing== | ||
<gallery> | |||
File:Wood Beam Candlestick - Routing jig.jpg | |||
File:Wood Beam Candlestick - Routing 1.jpg | |||
File:Wood Beam Candlestick - Routing glass in jig.jpg | |||
File:Wood Beam Candlestick - Routing done.jpg | |||
</gallery> | |||
== Glacing == | ==Glacing== | ||
<gallery> | |||
File:Wood Beam Candlestick - glacing.jpg | |||
File:Wood Beam Candlestick - glaced.jpg | |||
== The Stand == | </gallery> | ||
==The Stand== | |||
<gallery> | |||
File:Wood Beam Candlestick - Stand Initial.jpg | |||
File:Wood Beam Candlestick - stand drilling.jpg | |||
File:Wood Beam Candlestick - stand drilled.jpg | |||
File:Wood Beam Candlestick - stand painted.jpg | |||
File:Wood Beam Candlestick - stand test.jpg | |||
</gallery> | |||
Revision as of 10:51, 30 June 2022
| ProjectInfoBox Wood Beam Candlestick | |
|---|---|

| |
| Status: | done |
| Initiator: | Martin |
| Materials Used: | Wood |
| Tools Used: | Handheld Router, Chop Saw, Handheld Sander |
If you ever get your hands on an old wood beam, this is the perfect base for some nice upcycling project.
In this project, Martin made a candlestick out of an old wood beam coming from his sisters barn.
If you want to make your own, please follow the steps belo:
Cutting
Of course, the wood beam has to be cut to size. A length of 130 cm turned out to be a good length.
Since the wood beam had a size of ~15 × 15 cm, the only saw which could have cut through it in one cut would have been our bandsaw. However, the beam was just too large to use the bandsaw for this. Therefore, I decided to use the chop saw and cut the beam in multiple cuts. To do so, the following turned out to be successfull:
- As always, mark the spot you want to cut and put the beam to the correct position on the chop saw
- Cut approximately half way through the beam
- Turn the beam by 90 degrees
- Check that the beam is in the correct position. You can do so by pushing the saw blad down while turned off and check that it smoothly fits in the cut from step 2.
- Cut approximately half way through the beam
- Repeat steps 3 to 5 until done
Sanding
Since those old wood beams are usually covered with dirt and dust, cleaning them was a neccessary step. If you want to have beams looking like new ones, you could use the Jointer-Planer to take some material off. However, in this project, the used look was preferred, so I just sanded the beams using our Sanders and 80 Sandpaper.


