Project:CamperVan: Difference between revisions
(Created page with "{| class="wikitable" style="float:right; margin-left: 10px; border-style: solid; border-width: 5px; border-color: #00773D" !colspan="2"|<small style="float:right">Template:P...") |
No edit summary |
||
| Line 1: | Line 1: | ||
{| | {{ProjectInfoBox|project title=Smart Floor Lamp|status=Done|initiator={{NL}}|date=December 2020|image=Smart Floor Lamp Green.jpeg|materials=[[Wood]], [[Acrylic Paint]]|software=[[Homeassistant]], [[ESPHome]]}} | ||
| | |||
| | |||
==Idea== | |||
{{NL}} needed some nice floor lamps for his living room. While researching, he stumbled accross some nice looking lamps which can be put in the corner and indirectly illuminate the wall ([https://de.aliexpress.com/item/4001232339280.html see them on Aliexpress]). | |||
Since the offered lamps seemed pretty expensive, he decided to make some himself! | |||
==Frame== | |||
The frame is entirely made off wood. Specifically, {{NL}} decided to use douglas wood for this project since he liked the look of it. Douglas wood can for example be purchased at [https://www.bauhaus.info/latten-rahmen/rahmenholz/p/20833392 Bauhaus]. | |||
The | The frame consists of thee parts: | ||
#The main holder for the LED-Strips. which is 2.5 meters high (basically ceiling-height) | |||
#Two bottom stands for the stability | |||
== | ===Main Part=== | ||
The | The main part consists of a single piece of wood. | ||
As a first step, the wood was brought into a 3x3 cm square shape using the [[Table Saw]]. | |||
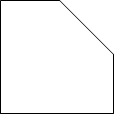
Next, the piece which will hold the LED strips was cut in a 45° angle over the full length of the wood. This resulted in the following shape: | |||
[[File:Smart Floor Lamp Main Part Shape.jpg.png|frameless]] | |||
===Bottom Stands=== | |||
The Bottom parts are just square pieces of 3x3cm with a length of 50 cm. | |||
<gallery mode="slideshow" showthumbnails> | |||
File:Smart Floor Lamp All Parts.jpg | |||
File:Smart Floor Lamp Main Part Painting.jpg | |||
File:Smart Floor Lamp Bottom Stands Painting.jpg | |||
File:Smart Floor Lamp Done.jpg | |||
</gallery> | |||
==Electronics & Homeassistant Integration == | |||
===LED Controller=== | |||
In order to be able to control the LED Strips, {{NL}} decided to get a LED-Controller which is capable of being controlled via WiFi. | |||
Since it was crucial to be integrateable into [[Homeassistant]], ESP based controllers seemed very suitable and can easily be purchased on Amazon: [https://smile.amazon.de/gp/product/B0772PGDFM Wlan RGB Led Streifen Controller] | |||
As mentioned, these controllers are based on an ESP (ESP-8285 to be specific) and have test pins available for RX,TX, 3v3, GND and IO0: | |||
<gallery> | |||
File:Smart Floor Lamp LED Controller Front.jpg | |||
File:Smart Floor Lamp LED Controller Pins.jpg | |||
File:Smart Floor Lamp LED Controller Soldered.jpg | |||
</gallery> | |||
These pins can be used in order to connect the device to a USB-Serial converter and subsequently flash them with [[ESPHome]]. | |||
Since the devices are well known, some smart people already created an ESPHome configuration targeted on these devices: | |||
https://www.esphome-devices.com/devices/magichome-zj-wfmn-a-rgbw/ | |||
One thing to be carefull about is that multiple versions of these devices exist. If you need the pinout for another version, please check this reference: | |||
https://tasmota.github.io/docs/devices/MagicHome-with-ESP8285/ | |||
===Homeassistant === | |||
Since the device is based on ESPHome, it should automatically appear in your homeassistant installation (check the notifications). If it does not, you can always set up the integration manually. | |||
In order to control the devices, you need to add them to your UI Config. | |||
Since this project consists of two lamps, a possibility was needed in order to control both of them at once. In Homeassistant, multiple options exist for this: | |||
#Adding a switch to your UI which calls a service:<syntaxhighlight lang="yaml" line="1"> | |||
type: button | |||
name: Toggle Lights | |||
tap_action: | |||
action: call-service | |||
service: light.toggle | |||
service_data: | |||
entity_id: light.led_couch_fenster, light.led_tv_wand | |||
</syntaxhighlight> | |||
#Adding them to a group:<syntaxhighlight lang="yaml" line="1"> | |||
livingroom_lights: | |||
name: Living Room Lights | |||
entities: | |||
- light.led_tv_wand | |||
- light.led_couch_fenster | |||
</syntaxhighlight> | |||
Option 1 is easier, but bears the downside that you can only turn the lights on and off. In addition, if only one of the lights is turned on and you press the button, it will just invert the states. | |||
Therefore, Option 2 is the much more advanced option. In addition, it also allows to set the color and brightness of all lights in the group at once! | |||
# | |||
==Experiences & Improvements== | |||
In general, the lights work very well. However, the frames are not really stable and need improvement! | |||
[[File:Smart Floor Lamp Green.jpeg|alt=|none|thumb]] | |||
[[Category:Electronics]] | |||
[[Category:Home Automation]] | |||
Revision as of 12:43, 3 January 2021
| ProjectInfoBox Smart Floor Lamp | |
|---|---|

| |
| Status: | Done |
| Release Date: | December 2020 |
| Initiator: | Martin |
| Materials Used: | Wood, Acrylic Paint |
| Software Used: | Homeassistant, ESPHome |
Idea
Martin needed some nice floor lamps for his living room. While researching, he stumbled accross some nice looking lamps which can be put in the corner and indirectly illuminate the wall (see them on Aliexpress).
Since the offered lamps seemed pretty expensive, he decided to make some himself!
Frame
The frame is entirely made off wood. Specifically, Martin decided to use douglas wood for this project since he liked the look of it. Douglas wood can for example be purchased at Bauhaus.
The frame consists of thee parts:
- The main holder for the LED-Strips. which is 2.5 meters high (basically ceiling-height)
- Two bottom stands for the stability
Main Part
The main part consists of a single piece of wood.
As a first step, the wood was brought into a 3x3 cm square shape using the Table Saw.
Next, the piece which will hold the LED strips was cut in a 45° angle over the full length of the wood. This resulted in the following shape:
Bottom Stands
The Bottom parts are just square pieces of 3x3cm with a length of 50 cm.
Electronics & Homeassistant Integration
LED Controller
In order to be able to control the LED Strips, Martin decided to get a LED-Controller which is capable of being controlled via WiFi.
Since it was crucial to be integrateable into Homeassistant, ESP based controllers seemed very suitable and can easily be purchased on Amazon: Wlan RGB Led Streifen Controller
As mentioned, these controllers are based on an ESP (ESP-8285 to be specific) and have test pins available for RX,TX, 3v3, GND and IO0:
These pins can be used in order to connect the device to a USB-Serial converter and subsequently flash them with ESPHome.
Since the devices are well known, some smart people already created an ESPHome configuration targeted on these devices:
https://www.esphome-devices.com/devices/magichome-zj-wfmn-a-rgbw/
One thing to be carefull about is that multiple versions of these devices exist. If you need the pinout for another version, please check this reference:
https://tasmota.github.io/docs/devices/MagicHome-with-ESP8285/
Homeassistant
Since the device is based on ESPHome, it should automatically appear in your homeassistant installation (check the notifications). If it does not, you can always set up the integration manually.
In order to control the devices, you need to add them to your UI Config.
Since this project consists of two lamps, a possibility was needed in order to control both of them at once. In Homeassistant, multiple options exist for this:
- Adding a switch to your UI which calls a service:
type: button
name: Toggle Lights
tap_action:
  action: call-service
  service: light.toggle
  service_data:
    entity_id: light.led_couch_fenster, light.led_tv_wand
- Adding them to a group:
livingroom_lights:
   name: Living Room Lights
   entities:
     - light.led_tv_wand
     - light.led_couch_fenster
Option 1 is easier, but bears the downside that you can only turn the lights on and off. In addition, if only one of the lights is turned on and you press the button, it will just invert the states.
Therefore, Option 2 is the much more advanced option. In addition, it also allows to set the color and brightness of all lights in the group at once!
Experiences & Improvements
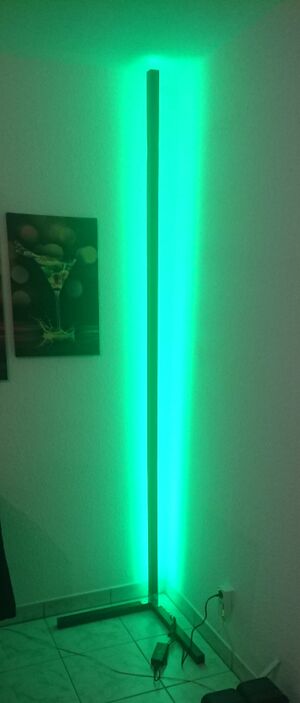
In general, the lights work very well. However, the frames are not really stable and need improvement!


